jikangchen
ALCOHOL
- Joined
- Jan 16, 2003
- Messages
- 78
Hey friends:
Thank you for reading my thread.
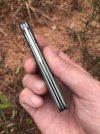
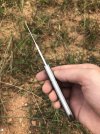
I started the second batch of Clip Point slippie about half a year ago. Now nearly ready. It's similar as last time, Similar size,Similar shape,similar Materials(S35Vn + Titanium alloy handle)

Specification:
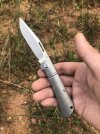
Overall Length: 6.93"(176mm)
Blade Length: 3.07"(78mm)
Blade Thickness: 0.1"(2.55mm)
Blade Steel: CPM S35Vn
Hardness: 59-60HRC
Heat Treating: Vacuum heat treated, oil quench, -112℉(-80℃)*2hours, Temper*2h*2
Spring Steel: 420 Stainless steel @ 49-50HRC
Spring heat treating: Individual Vacuum heat treated, oil quench, -112℉(-80℃)*2hours, Temper*2h*2
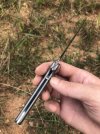
weight: about 80g(Smooth Titanium handle with bolster grooves)
Something changed. Let me say something before the release.
And What's the difference from my first slip joint folder.
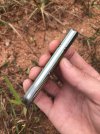
1. The joint angle of the blade will be hide in the handle when folded this time . I did a Guard on the handle.

I am a fan of traditional knives, but I think this can make the knife feel more "smooth". It will not hurt you any more. Also this makes the pivot locate on the middle of the handle, that looks comfortable. And we can make the Tang more stronger.
But it's not fit for every traditional slippies, sometime looks not good, such as Gunstock. I feel bad when I do a guard for Gunstock.
2. Kick of the blade will not kick, I set a stop pin inside the handle.
The blade will never cut the back spring even pressing the blade spine when folded.
(But take care please when you are disassembling it, blade could reach the spring when the rear screw was taken down)

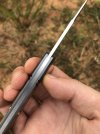
3. Satin finish!
This has taken me 1 and a half years to make it as good as I want. Wish you like it. Just for good looking.

Thank you for reading my thread.
I started the second batch of Clip Point slippie about half a year ago. Now nearly ready. It's similar as last time, Similar size,Similar shape,similar Materials(S35Vn + Titanium alloy handle)
Specification:
Overall Length: 6.93"(176mm)
Blade Length: 3.07"(78mm)
Blade Thickness: 0.1"(2.55mm)
Blade Steel: CPM S35Vn
Hardness: 59-60HRC
Heat Treating: Vacuum heat treated, oil quench, -112℉(-80℃)*2hours, Temper*2h*2
Spring Steel: 420 Stainless steel @ 49-50HRC
Spring heat treating: Individual Vacuum heat treated, oil quench, -112℉(-80℃)*2hours, Temper*2h*2
weight: about 80g(Smooth Titanium handle with bolster grooves)
Something changed. Let me say something before the release.
And What's the difference from my first slip joint folder.
1. The joint angle of the blade will be hide in the handle when folded this time . I did a Guard on the handle.
I am a fan of traditional knives, but I think this can make the knife feel more "smooth". It will not hurt you any more. Also this makes the pivot locate on the middle of the handle, that looks comfortable. And we can make the Tang more stronger.
But it's not fit for every traditional slippies, sometime looks not good, such as Gunstock. I feel bad when I do a guard for Gunstock.
2. Kick of the blade will not kick, I set a stop pin inside the handle.
The blade will never cut the back spring even pressing the blade spine when folded.
(But take care please when you are disassembling it, blade could reach the spring when the rear screw was taken down)
3. Satin finish!
This has taken me 1 and a half years to make it as good as I want. Wish you like it. Just for good looking.