-
The BladeForums.com 2024 Traditional Knife is available! Price is $250 ea (shipped within CONUS).
Order here: https://www.bladeforums.com/help/2024-traditional/
You are using an out of date browser. It may not display this or other websites correctly.
You should upgrade or use an alternative browser.
You should upgrade or use an alternative browser.
Feedback and tips please
- Thread starter JonBishop
- Start date
Horsewright
Knifemaker / Craftsman / Service Provider
- Joined
- Oct 4, 2011
- Messages
- 13,773
Randy, is that hand stitched? It looks great! Horsewright, I’m waiting on a couple of tools to get in and I’m going to copy one of those pancake holsters. The border on that 1903 holster is great. Where did you purchase that?
Thanks, Jon
Thats called a Carlos Border stamp. I do that quite a bit. In fact I did four sheaths last night, in the batch I'm working on right now. Here's a tutorial I did a while back that goes over it:
https://www.bladeforums.com/threads/carlos-border-stamping-an-how-to.1589116/#post-18169653
My personal tool is kinda a mystery, its not marked and I don't remember where it came from. Barry King makes these tools, which is mentioned in the tutorial.
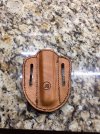
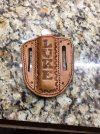
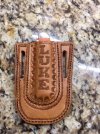
Well, I still can’t post pictures. The files are too large to post. Trying to post from an iphone. Anyway. I made a pancake style sheath for a folder for a coworker. Things got asymmetrical on me. Some tooling is not so great. I used Horsewrights finishing tips on this one though. A bit of a different recipe. But I think the finish turned out good. I didn’t have any hi lighter so I used saddle tan stain hi lighter with the bag kote and mixed in some bison brown dye. Not a bad result. I did like Horsewright and played with the mix until I liked the color. All in all this wasn’t a bad effort. I’m still not happy with it though.
Thanks, Jon
Thanks, Jon
Horsewright
Knifemaker / Craftsman / Service Provider
- Joined
- Oct 4, 2011
- Messages
- 13,773
Good deal. The finish looks a lot better. I'd agree with the tapering, a lot of wasted space.. Yep more practice. I resize pics to 1500 pixels on the long axis, give that a try.
duramax
Knifemaker / Craftsman / Service Provider
- Joined
- Nov 29, 2012
- Messages
- 6,669
Another popular carry option is called an Askin's Avenger. It does not pull the front of the gun in quite as tightly as Dave's pancakes but they are very secure and stable and seem to fit my body better. Here is one I made to carry my baby Springfield 45. I carry it a lot and really don't notice it being there. I also have one for my full size 1911 and it works equally as well. Proper belt fit is critical though.


Very nice work !!

 Thank you Ebbtide. I’m hoping that’s the case. I decided to make another one for this guy because I didn’t like the last one. The new one has problems but I think I can take steps to correct that in later projects. I’m going to go ahead and give this one to him. It’s free, so he shouldn’t complain too much! All comments welcome.
Thanks, Jon
Hengelo_77
Basic Member
- Joined
- Mar 2, 2006
- Messages
- 6,283
Do you melt the end of the thread on the outside?
Horsewright
Knifemaker / Craftsman / Service Provider
- Joined
- Oct 4, 2011
- Messages
- 13,773
I like this one a lot better design wise. More svelte and compact. Something I'm always shooting for. Get yourself a set of letter stamps and some bevelers then you can inlay or bevel letters or brands much crisper. If you inlay follow up with your backgrounders.
duramax
Knifemaker / Craftsman / Service Provider
- Joined
- Nov 29, 2012
- Messages
- 6,669
I’m still a newbie myself at this stuff. I think your piece is looking nice 
Only thing I can offer is something I do myself. With regards to stamping or tooling. I use my scrap leather to practice. If while practicing I make a nice pattern I like. I then write down my tools and order in which I did it. This helps me when I’m away from leather, as a memory jolt and refresher when I start up. You may even already be doing this

Only thing I can offer is something I do myself. With regards to stamping or tooling. I use my scrap leather to practice. If while practicing I make a nice pattern I like. I then write down my tools and order in which I did it. This helps me when I’m away from leather, as a memory jolt and refresher when I start up. You may even already be doing this
Horsewright
Knifemaker / Craftsman / Service Provider
- Joined
- Oct 4, 2011
- Messages
- 13,773
This belt for a young boy (2 yr old) has the letters stamped with a 3/4" set of stamps (we have 1/4", 1/2", 3/4", and 1" sets). They were then beveled around:

The belt for his older 5 yr old brother shows inlay, followed up with backgrounding tools and then painted with a small brush with black dye. While this is a brand that was done freehand the same can be done with the letter stamps. Instead of beveling them out you bevel to the inside of the stamp in effect inlaying them:

If ya don't use the back grounders after inlaying it it looks like this:

Had to go way back to find it, but here is a pic of a dog collar with stamps being inlaid and then done with a backgrounder and painted:


The belt for his older 5 yr old brother shows inlay, followed up with backgrounding tools and then painted with a small brush with black dye. While this is a brand that was done freehand the same can be done with the letter stamps. Instead of beveling them out you bevel to the inside of the stamp in effect inlaying them:

If ya don't use the back grounders after inlaying it it looks like this:

Had to go way back to find it, but here is a pic of a dog collar with stamps being inlaid and then done with a backgrounder and painted:

Hey Hengelo_77, yes the threads are melted. In the first pic you can see it at top right and bottom left. It’s the first time I used this thread. It’s heavier than what I normally use. It didn’t melt well. Thank you duramax! That’s sound advice. Horsewright the letters were traced then transferred to the leather. I used a bolder pattern backgrounder I thought looked nice. I can see it now compared to your pics. I guess I just sort of stamped around the lines not really insetting. The only letter stamps I have are 1/4”. I use them for my makers mark. I shall improve on the next project (I hope). I guess I’ll keep adding to this thread when I get something done. Always looking for tips and feedback!
Thanks, Jon
Thanks, Jon
Horsewright
Knifemaker / Craftsman / Service Provider
- Joined
- Oct 4, 2011
- Messages
- 13,773
Hey Hengelo_77, yes the threads are melted. In the first pic you can see it at top right and bottom left. It’s the first time I used this thread. It’s heavier than what I normally use. It didn’t melt well. Thank you duramax! That’s sound advice. Horsewright the letters were traced then transferred to the leather. I used a bolder pattern backgrounder I thought looked nice. I can see it now compared to your pics. I guess I just sort of stamped around the lines not really insetting. The only letter stamps I have are 1/4”. I use them for my makers mark. I shall improve on the next project (I hope). I guess I’ll keep adding to this thread when I get something done. Always looking for tips and feedback!
Thanks, Jon
Good deal! Keep er up!

