Grinder dust collection - a few questions

One thing that I've done when grinding handle materials, is to use the attachment with the narrow nozzle and place is as close to the bottom wheel under my grinder as practical. The smaller the opening of the vacuum, the more powerful the suction, and I was able to eliminate a significant portion (I'd estimate 90%+) of my dust after doing this.
cxpK5P3.jpg
 
Last edited:
I'm also a hobbyist, just getting started in all this :) Of course using a vacuum cleaner is better than nothing. I did try it, with my collection hood, and honestly I'd prefer a large bucket with water instead. Sure it sucked away the dust that fell/shot into the hood, but it did not make the dust fly in there well enough.

I too am just starting out and from different observations I have too come to the conclusion that a large bucket is perhaps even better because usually the suction funnel is limited in size and you see sparks flying by it. A very big bucket, on a stool just below the grinder, filled with a bit of water will catch all of the the sparks which fly down.

I put a drop of dish soap in the water which will break the surface tension of the water and lead to better absorption of the dust.

In my observation there are three forms of grinder dust: the sparks flying down, the sparks that are pulled in a circle with the belt and fly against the apron, and the very fine dust which is airborne for hours and settles down all across the room.

The last is the hardest to deal with and I did a lot of thinking of what to do about it since there are quite a few other things in my workshop and I did not want to have dust everywhere.

My inspiration was this video: youtu.be/X8cNeuF_78k

But I went one step further and built a dust cabin around the grinder:

cXIfXV7.jpg


The foundation which holds everything together is a plywood roof and on the sides there are plexiglass windows and a plexiglass sliding door.
Connected to the wooding housing around the grinder is a funnel which is connected to the cyclon extractor outside of the cabin (in the lower right of the photo) which is connected to a Nilfisk Attix shop vac with a Hepa Filter.

This set up works really well and there is no dust to be found even inside of the cabin after a grinding session (except for a bit of dust directly around the grinder inside wooden housing).

Some more photos:

The plexiglass sliding door has an aluminum angle attached to the plywood strip on top of it which hooks
a wooden angle on top of the roof. A wood sliding compound makes it open and close easier.
I6yQzBP.jpg


On the bottom is an aluminium angle which guides the door.
hoGwir4.jpg


kMG1G1H.jpg


YBbs3WW.jpg


Lmb2YK1.jpg


Another big recommendation are the "true light" tubes which have the spectrum of sun light and are completely flicker free. They make a very nice daylight atmosphere and the light has positive effects on mental and body health. It also merges perfectly with any incoming light from outside. The lowest photo is almost entirely lit by two tubes, a small bulb is on the top left which makes a warmer light and a very small top window is at the top right and the light coming from it merges perfectly with the tube light from the top.
 
Sweet set-up Julius. It's been quite a while since I've been envious of anything....

My only questions are: (a) how hot does it get in there after an hour or so of grinding? and (b) what was the cost of materials for the cabin enclosure? (not including the lights or vacuum system)
 
My workshop is in the basement of my house and even on a hot day it's very cool down there, so heat is never an issue. Moreover, I don't think that the motor and the sparks produce that much heat, at least I couldn't tell a difference in temperature after a grinding session:

The costs of the materials were:

- 3 x heavy duty angle brackets which hold the roof: 10€
- Plywood board 200x135cm: 80€ - You can definitely use cheaper material here. I wanted mine to be stable so I could use the top for storing stuff, it will hold more than a ton.
- 3 x plexiglass 100x189cm + lots of different wooden angles and aluminum angles: 200€ - I bought all this stuff from a good friend who's a carpenter and who had it lying around. If I would have bought the plexiglass through retail it would have cost me more than 600€ so it's best to find it on craigslist or somewhere else. I was actually looking for bigger plexiglass but that's what he had so I filled the rest of the space with the wooden angles. Now I even prefer the look with the wood. (There can never be enough wood in a place :) )
- Brush Weatherstrip: 8€
- I found the big pole which carries the free hanging corner of the top on the street when a neighbours house was being redone. It fit almost perfectly, less than an inch had to be sawed off.


Total: 300€ / 330$

I was going to use PVC curtains at first but they wouldn't seal and look as good, also I read that their vapors can be quite toxic (depending on the PVC).

That is basically it! Let me know, if you have any more questions.

I'm going to change a few things when my new belt grinder comes, I want to replace the wooden grinder encapsulation with plexiglass so that the space looks less confined and to have a better view on the beautiful grinder. The new grinder will be higher so I have to redo that part anyway and shorten the steel tube which is attached to the funnel.

Although I love my set up, I think this grinder encapsulation (as it's shown in the video I've posted) just by itself will also take care of most of the airborne dust.
 
Last edited:
  • Like
Reactions: weo
I was going to use PVC curtains at first but they wouldn't seal and look as good, also I read that their vapors can be quite toxic (depending on the PVC).
If you dont mind i would like to look further into the curtains. Home renovators use plastic “airlocks” all the time ( they have zippers ). Gotta look into the vapor issue though...

What a cool idea - thank you for sharing!

(Btw - received my Dust Deputy today! So cool to see something in a small pre-fab form that i learned how to design on an industrial scale. Ok i admit - my inner nerd wants to say “the fluid mechanics behind how it works is really cool! But i think you guys would kick me out en-masse if i tried to talk about THAT )

Thanks again for the idea.
 
I did my best to take into account what everyone said, and this is what I was able to come up with, at least for a start:
upload_2019-8-4_18-31-46.png
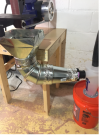
all from Home Depot: the square thing tucked up under the grinder is a 4" x 6" heat register box. all the other stuff below it are adapters to make the 90 degree turn to the side (and backward a little), and reduce the 6" outlet from the register box down to 2" needed to feed the dust deputy. I wish I could "tuck" the dust deputy further behind the stand ... but the geometry does not work, and I wanted to keep to smooth metal from intake to dust deputy, so did not resort to flexible tubing. the register is actually bent forward and backward to "expand" it front to back for more "catch area". BillyO - I like your flat nozzle idea - I kind of tried to replicate it bu tucking the catch pan tight up to the belt - not sure if it would work though. If I need to add one of those flat nozzles later I can, but would need to either spice a split into the feed for the dust deputy, or use a totally separate shop vac.

Julius - I LOVE your setup (more to say I envy you for it!) - and hear you loud and clear about the "fine dust" that is generated. I just do not have room though. I am intrigued, however, by the "box" you have put around the grinder itself. Do you think that if I replicated that, in addition to what I have now, that would at least help? Question: the black intake manifold you have on the top-rear of the box over the grinder - what is that??? Not a standard HVAC manifold I could buy at Home Depot, I do not believe....

Almost ready to grind .... I have a lot of blades piling up... :-)
 
Hi Cushing,

just the "box" by itself would work very well, and it is done in this video (also has top suction for the fine dust):


Btw, the side of my box removes very easily for belt change. I've just put a screw halfway into the top side of the side board which clamps into the top board. When I want to remove it, I just lift the top board for a few mm and take it out.

Vu9GwXG.jpg


I bought the funnel at Dictum in Germany, it is the same as in this post, so may be it's available in the US as well:

https://www.bladeforums.com/threads/grinder-dust-collection-a-few-questions.1636769/#post-19159876

Edit: It's on amazon when you search for "dust collection hood" under the name "Powertec 70122 Big Gulp Dust Hood".

I'm also using the "POWERTEC 70136 4-Inch to 2-1/2-Inch Cone Reducer" to reduze the size for the steel tube.
 
Last edited:
I'll give some engineering things to keep in mind when designing dust extraction:

1) It is always best to have a dust/debris extraction system below the source of dust/debris and going downward continuously. Upward loops and vertical/rising pipes will trap the material. Avoid them like they were the plague. This can cause clogs or a fire. Dust id a particle. Grinding swarf and wood chips are bigger particles. All particles are under the force of gravity.
Design a dust system just like it was a drain for a sink or toilet.
2)The major way to remove dust/debris with your vac system is to have as little as possible in the air stream. A large catch tank under the collection area will allow the heavier particles to fall and the lighter ones to travel along with the air. This is where a spark bong or dust deputy pays off.

3) The next way to get particles moving and keep them moving is by airflow volume. Airflow helps defeat some of gravity's force, but it takes a BIG extraction blower to move particles uphill. A shop vac isn't anywhere near that air volume needed. Commercial blowers are expensive because the blowers are very efficient and high power. 3HP is a small system. The 1HP blowers will only work for systems where the blower is near the source. A big powerful shop vac will work for a small home shop, but everything must be setup properly. Corrugated hosing is a big cause of poor airflow. Use the smoothest piping you can. Metal ducting is best, PVC works fine as long as you have the sparks taken care of at the source.

4) The next way to increase the power of moving air is velocity. Start with a duct size your blower can handle. Foe smaller blowers that is usually 3" or 4". Larger blowers can draw down 6" manifolds. Then reduce to a smaller size as it approaches the blower. After the blower, the piping should increase by at least 50%. A typical shop system might go
debris source -4"- to 3" - to 2.5" - blower - 4" - out the shop.
 
Hi Stacy,

I think in general you are right but it is only valid for the large amount of sparks going down from the belt. In my opinion these can also be caught with a water bucket but perhaps a suction system will work even better (I might experiment with this).

The very fine airborne dust can be absorbed from the top. It is very fine and cannot clog the tubes, it also is not sparked (with the exception of an occasional spark) and can't enflame anything. Since this dust is airborne anyways it can very well be transported uphill by a shop vac which is proven by the fact that my connected dust deputy has collected plenty of fine dust. It is good if the attached vac has a hepa filter which prevent any very fine particles to get back into the air.
 
I think stacy is concerned about fine dust adhering/collecting on the corrugations of plastic tube. It would stay there, and so you would not see it anywhere else. Reasonable concern. Perhaps periodically bang on / shake the plastic tubing to jar it loose?
 
Curious thing though - i was grinding yesterday (bevel refinement and surface grind) .. still learning, so ran at a pretty slow speed. This was post HT, so i was dipping the blade. Few sparks... but definitely material removal. That pan below the grinder caught almost all of it. But especially because it was wet, most of it just sat at the bottom of the pan or in the curve below it. I can live with that - will run the vacuum again when it dries out, and will back vacuum from the pan side if needed. Wood dust will be the bigger test, and that which am most concerned about... (health issues, and it can go everywhere...)
 
I think stacy is concerned about fine dust adhering/collecting on the corrugations of plastic tube. It would stay there, and so you would not see it anywhere else. Reasonable concern. Perhaps periodically bang on / shake the plastic tubing to jar it loose?

My tube has no corrugations and it is transparent so I would notice it.

KlRRfPN.png
 
I've been thinking of upgrading my shop vac set up.
I have it in my basement. The grinding area is fully enclosed. But the ends need to sealed a little better.

As for the shop vac it's up near the window. I used a spare tube to run from the vac to the window. The idea behind that is to remove any offgadsing or fumes from G10, wood or anything else that is unhealthy to breathe. I have a dust deputy immediately under the shop vac. Connected via PVC a smooth 90 and a 6-8inch straight peice to connect. After the dust deputy I use a flexible hose.

I also use a small shop filter system. Got it on amazon for the open side of the basement. It catches a lot of fine duts that escapes from the grinder area. As it's not perfectly sealed. But I have done my best to keep it as sealed as I can.

I would love to keep a similar set up, but increase the power. And keep the outdoor ventilation aspect. I really need more power, something that really pulls the airflow. Since going full time I grind for much longer and much more often.
 
My tube has no corrugations and it is transparent so I would notice it.
By corrugations, i meant the undulations (nonsmooth surface) resulting in the spaces between the wire coil. But your point about it being clear and your being able to see anything inside is well taken.
 
That is a spiral vacuum tube. Better, but it is still a corrugation of a sort.
You can assume you are getting all the dust and grit with a bucket of water below the grinder and a vac running straight vertical, but I can assure you it isn't all of it. If you ran the vac line sideways from the hood across the wall and down between the benches you would get a lot more.

A good way to find out how much dust even a good system misses is to buy a hanging air cleaner from someplace like Woodcraft and see how clogged the filers get in a week. That is the air you breathe!mI highly recommend anyone in a closed shop, like a basement, having a hanging air cleaner. It may be the best $250-300 you ever spend.


Totally agree. I have the Record Power AC 400 hanging air cleaner which I additionally run in the room outside of the grinding cabin. Additionally, I wear a 3M active respirator while grinding in my cabin.

Since I'm changing my set up, I will consider the sideways solution.

But the fact that there is no fine dust which settles down outside of the box inside of the cabin means that it works pretty well, no?

Thanks.
 
Last edited:
Yes, for your setup and amount of grinding it probably works OK. If your production and amount of grinding goes up, there may b e more dust. The AC400 is a good unit and probably is why you don't have settling dust. I bet its filters need cleaning/changing regularly.
 
Back
Top