My Bolt-Together Pin Press

Joined
Dec 7, 2000
Messages
5,179
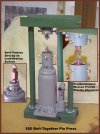
Finally got this done. Fellow forumite navajas convinced me I didn't have to weld a pin press together, but could simply bolt it all up. He was right! Roland, thanks for your help.

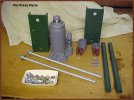
The pic will hopefully explain most of it. The anvils are hardened and will be simple to change out if needed. If anyone would like to see larger images or a pic of something specific just let me know.

The whole thing cost less than $50. The 12-ton jack is from Harbor Freight on sale for under $30. The most unusual tool I used was a tap and die set; the only tool I bought was to ease my laziness, a 3/4" drill bit. Who wants to file big holes in heavy steel? Not me, for sure. :D

Dave
 

Attachments

  • bfpinpress02sm.jpg
    bfpinpress02sm.jpg
    49.2 KB · Views: 257
Here are the parts before I put it together.
 

Attachments

  • bfpinpress01.jpg
    bfpinpress01.jpg
    47.5 KB · Views: 242
Cool tool, I'm going to build something like that in the near future to press ferals and metal sheaths.
 
Very nice Dave! It's evident that you put as much care into making your tools as you do your knives. Will a pin press help in making pins vanish into the surrounding guard/bolster material?
 
Very Nice Dave. I want one.

Looks professional. Thanks to you and all the guys on this forum.
I'm starting to see I need to get a bit more professional. Something like this press looks like a good place to start. Being a scrounger
I will try to get a second hand jack even cheaper at a garage sale.

I need to get a bit more science in me as well.
 
Thanks gents, I just wanted to show you don't need a lot of money or fancy tools to make stuff.

Guy, with this thing I can get a much better fit of pins and bolsters than previously. The pins swell nicely and on the inside too, holding the bolsters securely. One thing is for sure, I have to clamp it to the bench in use because the base is so small it tips over under the pressure of the handle.

As an aside, I haven't had trouble with the epoxy preventing the pins from filling the holes, I guess it's thin enough to be pushed out. The main thing to make the pins invisible is to have them - and the holes - clean. Someone else made another good point lately that tarnish from leaving the pins or holes exposed too long can cause it to be visible, and I've changed my process based on that excellent observation. Good, important point, wish I could give proper attribution but I've forgotten who said it.

Middle age creeps up on you then pounces...and you're left with mere vestiges of your formerly sharp wits. It's sad. :eek: The happy part is you also soon forget you forgot...

Dave
 
Really Cool!!
Now how about a tutorial with all the measurements and how to make it work;)
Bruce
 
hey fellers, hate to rain on the parade with a silly newbie question, but how does this thing work exactly? i mean, i get the principle here, but would someone mind explaining to me the process of using this thing to put in pins?

i'm new to this game and just did my first job of pinning this weekend when i attached some handles to a metal scraper blade...i put in pins made of annealed finishing nails and peened them over with a ball peen hammer...not too pretty, but it got the job done...

clearly, you fellers have a better way...i'd like to learn about it...

thanks...

(or if you can direct me to some other thread or webpage that explains pin presses, i'd appreciate it...)
 
ddavelarsen, can you tell me the purpose for that? I guess I don't really understand what it's used for. I know you said it's to press pins, but for what kind of knives. Could it be used to put slipjoints together rather than peening the heads of the pins down flush with the blasters/scales? Thanks -chris
 
Okay folks, here's my shot at explaining what this thing is for and how I put mine together. If you have any questions I'll try my best to clear them up later.

------------------------

The idea behind the Pin Press is to use a smooth and controllable force to peen the pins and swell them inside their holes, rather than the force of repeated hammer blows. This is much better on thumbs, particularly when the pins are close together! And it makes it much easier to hold the materials flush with the knife while force is being applied to the pins. The end result is a nice quiet, painless peening process!

Bill of Materials:

12 Ton Hydraulic Jack (1)
C Channel (2) 4" X 10"
3/4" Black Pipe (2) 16 3/4"
5/8" Allthread (2)
5/8" Nuts for Allthread (4)
5/8" Washers for Allthread (8)
"Frankenstein" Sleeves (2) 1 1/2" and 2 1/4"
Angle Brackets (4) 3/4" X 1/2"
3/4" Square Tube (2) 1 1/2"
5/8" Round Bar (2) 2 1/8"
1/4" 1095 Anvil (2) Hardened
1/4 - 20 Bolts (23)
10 - 36 Bolts (12)

Overall Dimensions 10" X 19"

The Pipe maintains the space between the two Channels; the Allthread goes inside the pipe and holds the frame together. The Hydraulic Jack is bolted to the bottom Channel. Note the piston of the Jack is not centered on the Channel, but is offset a bit; that's because the base of the Jack is centered on the bottom Channel.

The Anvils are hardened and tapered to a 1/4" square at the "working" surface. This is where all the force of the press is directed, and where the pins are compressed. It's important these are aligned perfectly and that the surfaces meet square and flush - otherwise your knife handle may suddenly squirt out one side under intense pressure. You don't want that.

The Square Tube is used to hold the Round Bar. Each Tube has 4 10 - 36 bolts threaded through it as set screws to hold the Bar in place. This allows the Bar to rotate to help align the Anvils. Each Bar has a slot cut in it the thickness of the Anvil with a 10 - 36 bolt threaded into it as set screw to hold the Anvil in place. Take a look at the Anvil contraption sitting on top of the Jack piston in the picture to see this all put together.

The "Frankenstein" Sleeves each have 4 1/4 - 20 bolts threaded into them as set screws to hold the Anvil contraptions in place and to align them perfectly to one another. The bottom Sleeve has 4 1/4 - 20 bolts threaded into it as set screws to press against the Jack's piston, holding that whole Anvil contraption to the Jack as the piston moves up. Note that the Anvil contraption rests on the face of the piston; the Sleeve merely holds it in alignment.

The second Sleeve is bolted to the top Channel in general alignment with the piston; the Sleeve holds the top Anvil contraption against the Channel. Again, the Anvil contraption rests against the Channel and is aligned with the Sleeve.

You can adjust the alignment of the Anvils by moving the piston until the Anvils are close to each other and alternately loosening one and tightening the opposite set screw until everything matches up. Gradually tighten all of them down, keeping the Anvils in alignment. Get everything real tight.

Note that I had to use a shim behind the top Anvil to get it perfectly vertical to match the bottom Anvil. This was because I made the slot in the top Round Bar too large!

The force of the Jack is directed through the piston, the Anvil contraptions, the Anvils to the top Channel. Whatever is between the Anvil faces will get squashed - in this case, pins in knife bolsters or scales.

Caveats: You must ensure the Anvil faces are flat and square to each other. The Anvils must be in perfect alignment to one another. If these conditions are not met you might very well end up with a bunch of knife parts flying at your face under great pressure! Bad!
 
Back
Top