My Holy Grail- W.I.P.

It's looking good. I like the smooth face of the new guard too since its edges look clean . :thumbsup:

I know it may be a bit late in the build to offer this type of suggestion, but I personally think the handle would have a much nicer flow if you shaped the black spacer down to the same diameter of the other two spaces, and even fluting it (with a groove) as well just like the others. But even without fluting it, I believe it would still look a bit nicer being the same diameter as the other spacers, as having it remain proud of them seems to throw off the overall flow of the handle/knife, at least to my eyes.

I hope I don't come across as knocking your design, just offering some constructive criticism, so please take it for whatever it may be worth :)

Keep up the good work!


~Paul
My Youtube Channel
... (It's been a few years since my last upload)
 
You don't have to worry Paul! I love criticism, otherwise I wouldn't make this WIP thread.

My plan is to make the spacer tha same diameter as the rest, I wanted to glue up everything first to make sure that everything would stay symmetrical. I hadn't thought of fluting tho and it sounds like a good idea.
 
Update!

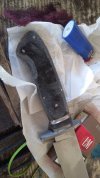
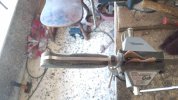
Finally, I had time to work on this knife! Kept working on the handle, finished the profile and started the contours.

44237330_738565129818334_7662202569229336576_n.jpg
44290363_319215952223947_6485129978185777152_n.jpg

Also, I started shaping the spacer.
44279840_338227043610499_1108497236230144000_n.jpg
Should I flute the spacer or not? That is the question!

I kept going up the grits.

44191154_1922323651405571_8891829372244197376_n.jpg
44202296_637690886625396_4638856359499005952_n.jpg
44285672_160469374897709_3111759442958352384_n.jpg

And a couple of pictures while at ~320 grit and some oil.

44235401_360960414449120_8497435083936890880_n.jpg
44301687_266047527379745_8519243922843631616_n.jpg

Now here is a question, my sandpaper clogs up with the horn immediately, any suggestions on that matter?
 
Looks great! Everything is really tying together very nicely, including the black spacer.

Regarding your paper clogging up, I've never personally used horn yet, but I have dealt with clogged paper quite a bit, especially higher up the grits.

What I do when sanding some more finicky materials and woods is just give the paper a quick blow or two to get the loose dust out, then I take my belt cleaner and rub it across the section of paper I'm using a few times like a big eraser. It takes a bit more time, but it also helps to waste a bit less paper than not doing it, at least some of the time.

Also, I'm pretty sure it's safe to wet sand the horn, which I'm sure would help with the clogging issue a good bit.

~Paul
My YoutubeChannel
... (It's been a few years since my last upload)
 
I made a few knives in the order that you are building this one.
Now I use alignment pins for all parts and shape and finish them before I asemble everything.
It makes life easier and improofs the end result
 
Looking very nice. :thumbsup: You might try using Abranet Mesh for sanding rather than sandpaper. I use it nearly exclusively for woodworking and finishing in particular because it will not clog up anywhere nearly as fast a regular solid papers (with any kind of abrasive material). They also have an auto finish product. The sanding mesh was a great discovery for me.

Ray
 
Thank you guys for your advice! I really appreaciate it.

Update time! (pictures are going to come later).

So, I hand sanded the first side up to 1000grit and it was beautiful! BUT! it was also soooo slippery in the hand. Even tho the handle is contoured, I felt like it was going to fly off my hand. Therefore I decided to do a satin finish.
My priority as a maker is to make blades that are beautiful but most importantly, useful.
I'm sure it's possible to do a really high polish on water buffalo horn and maintain a grippy hanle, I just don't know the way yet.

Now I'm going to finish the second side and post pictures once done.
 
Looking forward to the result! This has been a fun thread to follow so far.
 
Mediocre pictures are incoming!

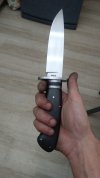
The knife is completed, the only thing left to do is a final clean up and work a bit on the hamon.

I'm going to start posting the process of the sheath. That means that these pictures are the last prior to the final reveal which will happen once the sheath is done.

44832298_2204269706564941_4506818589394731008_n.jpg
44932812_494312861084421_8051039650891956224_n.jpg
44933779_342598676490744_5208896603846344704_n.jpg 44884576_501578743679463_7893855628953649152_n.jpg

Thank you guys for following my WIP so far and for all your advices!
 
Really enjoy a work-in-progress thread. Helps us newbies get an idea of how you guys get things done. That's a clean-looking knife absolutely stunning.
 
Nice :)

You did what I did on my first large knife: If you draw a line over the spine towards the butt, there is a bumb in the handle.
That looks off.
Making an exact drawing before starting a knife helps prefent that.
 
Nice :)

You did what I did on my first large knife: If you draw a line over the spine towards the butt, there is a bumb in the handle.
That looks off.
Making an exact drawing before starting a knife helps prefent that.

That is correct. I've noticed that my knife does not have a clear line and I'm about to fix it on the final clean up.

The problem comes from the spine of the knife(red circle). It does a small dip near the ricasso.
44998299_2181437435516396_1598879121570529280_n.jpg

Also, the handle (yellow line) needs a little bit of addressing too, you can see a tiny black spot above the line protruding. The blue line on the spine is where I should work mostly and make a crisp line across all the way.
 
What helped me a lot was making drawings, then photocopy them and glue one on to 1mm thick hard foam and cut it out.
You can make an exact template that way, refining it by filing it exactly in to shape.
They are hard enough to scratch around on to your steel.
That improved my overall knives a lot.
You can also make templates for guards, spacers etc that way.
Make your guard template, draw around it with a pencil on a piece of paper, flip the template around and place within the pencil line.
If it is symetrical it fits exactly, if not it shows where to remove material from your guard
 
I've had a problem with the buffalo horn and I'd like some input.

The one between the steel spacers shrank and made a void between them. I know that buffalo is prone to shrinking, is there anything I can do about it other than changing the materials?

Thanks in advance.
 
So, here is an unfortunate turn of events. Along with the shrinkage on the buffalo spacer, a gap between the frame and the buffalo scale started to develop. The tear down was inevitable.

Taking all the advices from this thread, I'm going to keep going with the knife, again a frame handle construction but with more attention to details. I've already fixed the spine of the knife and made it smoother. Next, I'm going to rebuild the guard and the frame. When all these are done, I'm going to see what kind of material I'm going to use this time, I will try to find a piece deer antler to make scales. By the way, any tips and tricks on staining the antler?

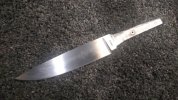
Here is a picture of current state of the knife.

45874252_291971121421108_1930783602816057344_n.jpg
 
What you can do is make the spacer a bit larger and confex, that way it stands out by design but isn't anoying

Setbacks suck, but we all have them.
Either keep going or lay that roject away for a while, make an other knife and finish it later
 
I took a break from this knife to let my mind decide what to do next.

The plan is as follows:
New guard and spacers.
Frame handle with a tapered tang.

Conclude to my handle scales material.
 
Back
Top