PID Controllers - Everything You Wanted to Know, But Were Afraid to Ask

Cushing H.

Gold Member
Joined
Jun 3, 2019
Messages
2,714
It seems like there are a few folks out there that end up getting confused with their PID controllers, even when using "Autotune" - so the attempt here will be to supply enough information for people to take a "not-behaving" PID system and get it working. Or ... to understand why it is not working, and what to do to correct it.

I will need a little time to pull this together, but in this initial post, I will try to make a few points, that hopefully I will substantiate in the later specific posts.

The first point I would like to make is that a PID controller is not a cure-all for any system it is attached to. The reason for this is that, the combination of the controller, and the widget (mahchine, oven, forge, whatever) it controls for a complete system. Change one or either of them (machine or controller) and the overall behavior of the system will change. A controller "tuned" at 2000F will not well control an oven at 400F (someone recently saw this). A PID controlled forge working well inside a workshop might well not control its temperature well when moved outside where the wind both cools the outside of the forge, and blows air through it, changing how and how fast heat escapes the inside of the forge (recently WEO experienced this).

Another point is that any system that a PID controller is managing must be reasonably balanced. By that I mean (sticking with the theme of controlling ovens) that the overall rate of heat input (at 100% of possible input), must be fairly close in magnitude to the rate at which heat escapes from the oven through its insulation. (for example, a nearly "perfectly" insulated oven can not be controlled by a PID, and likewise, a very poorly insulated oven will also have problems trying to control it with a PID) (again, I think some others have recently seen this when trying to get a toaster oven to work with a PID ... and did not succeed until adding more insulation to it)

the final point is that in using a PID controller, you pretty much need to decide on whether you want fast responses and corrections to changes in temperature, or whether you want accurate control with very little variation around a target temperature. It is not always the case ... but for the most part there is still a trade-off between these two objectives.

For the most part, I will try to use diagrams and plots to make the points .... but I do need to introduce some math - because that ties directly into the language in the user manuals and thus how you know how to configure the things. I will keep it light though, and simplify pretty significantly.

And yes, the Inkbird manual is awful. It actually, as far as I can tell, reverses the meaning of at least one parameter. Again, I will work to clarify as I go....
 
”I will keep it light though, and simplify pretty significantly.”

Pretty happy about this part ;)


Jeremy
 
”I will keep it light though, and simplify pretty significantly.”

Pretty happy about this part ;)
Jeremy
Lol. You may take solace in the number of degreed engineers who yet do not like equations. Yet it is also widely accepted that pictures and graphs are much better, and so i will use those. If i lose ANYONE, please speak up, and i will try to correct ... ok?
 
Didn't you just recently start looking into building an oven, and now you know it all?
Randy - i have been using PID’s for almost 40 years, and know the math and algorithms behind them. Some here have experienced confusion in making them work - and i offered to help - that is all. No, i donot know everything - but perhaps i know enough to help someone avoid confusion. The oven, which iam still interested in, has nothing to do with it.
 
Randy - i have been using PID’s for almost 40 years, and know the math and algorithms behind them. Some here have experienced confusion in making them work - and i offered to help - that is all. No, i donot know everything - but perhaps i know enough to help someone avoid confusion. The oven, which iam still interested in, has nothing to do with it.

I taught calculus for 10 years at a university. I have built and used differentiating and integrating circuits. I built an adding/multiplying machine from basic components. I have programmed many AI routines and currently work on some machine learning algorithms. I still wired up a PID to a toaster oven and experienced it failing to hold temp within 30 degrees no matter what I did to settings or insulation. I'm not saying you don't understand the theory of PIDs, I'm saying you don't understand the application for knifemakers.
 
I taught calculus for 10 years at a university. I have built and used differentiating and integrating circuits. I built an adding/multiplying machine from basic components. I have programmed many AI routines and currently work on some machine learning algorithms. I still wired up a PID to a toaster oven and experienced it failing to hold temp within 30 degrees no matter what I did to settings or insulation. I'm not saying you don't understand the theory of PIDs, I'm saying you don't understand the application for knifemakers.
Ok. I won’t do this. Stacy - please delete this thread.
 
I taught calculus for 10 years at a university. I have built and used differentiating and integrating circuits. I built an adding/multiplying machine from basic components. I have programmed many AI routines and currently work on some machine learning algorithms. I still wired up a PID to a toaster oven and experienced it failing to hold temp within 30 degrees no matter what I did to settings or insulation. I'm not saying you don't understand the theory of PIDs, I'm saying you don't understand the application for knifemakers.
Just out of curiosity randy - why did you not speak up when I posted a specific thread asking if folks wanted some sort of tutorial on pids?
 
I hate to rain on people's parade. I especially don't like being the freebie account harassing a paid member because things like that often ruin people's experiences with an internet forum. But I have wasted about $500 trying different things people on here have mentioned, when they really didn't know what they were talking about. Most of that money was wasted on ovens. When you have some skin in the game, then it's different.
 
Cushing, just because ONE person is a naysayer doesn't mean there's not LOTS of other folks who'd really like your PID tutorial. I don't have much trouble with them, but other folks here do - and I'm ALWAYS looking for new stuff to learn. It keeps the mind active which is good for us "Old folks" and a lot more fun than crossword puzzles.

Thank you for all your effort in teaching us. Stacy, JT, Larrin, Hoss, and others really contribute to the forum making it great.
 
Cushing, just because ONE person is a naysayer doesn't mean there's not LOTS of other folks who'd really like your PID tutorial
Sigh ... Ken you are right. I came to the same conclusion during the day (while spending endless hours waiting for my car to be repaired). I had just tried to head exactly this type of thing off by first asking if people did/did not want me to try such a thing - and nobody (including Randy3000) objected.

So ... I guess I will give this a try.

Randy3000 - you might well be right that knifemaking is different, and nothing in my experience is pertinent. I think you can have no doubt that if what I spout is nonsense that many people here will not hesitate to let that be known. In the meantime, you can just ignore the thread, or feel free to contact me directly at rchamlen@pobox.com with any concerns (and help avoid the thread becoming something other than a thread for people to learn from).
 
Ok … to start this out, just a little general discussion as to how PID controllers can (or actually do not) relate to the equipment used for knifemaking (and how that equipment is used in practice). PID controllers were originally created to control big massive industrial processes where the objective was for them to run continuously 24/7 with VERY little variation but while being able to correct for relatively small, and slowly occurring, variations in the environment. For example: petroleum distillation towers (where I first got my training on PIDs):
upload_2020-3-10_11-38-48.png

These systems have a heater in the bottom, an inflow rate of petroleum (typically at the middle or top), and outflows of the products (at various levels of the tower). The intent here (and in similar original applications) was not so much to get the process stable fast – but rather to keep it VERY stable for a long period of time while relatively small changes occurred. And yes, the “autotune” algorithms are used in this application. In this case, those changes are things like changes in wind speed (changes cooling), changes in voltage (which affects the heaters and pump rates), and changes in the composition of the incoming petroleum. The point is that these changes are all relatively small, or typically occur slowly. To give an idea of the level of control that the systems were designed for – one of the output levels might be designated to put out, say “hexane” (which is Coleman camp stove fuel). Its quality is controlled by measuring the density (“specific gravity”) of the stuff coming out – and that is typically controlled to a level of something like 0.001-0.0001 grams/cm^3. That is really small.

The take away of that, for knifemaking purposes, is that we should recognize that the “full” PID algorithm, and the “tuning” algorithms, as created, are meant to be extremely sensitive to changes, and that those changes are implicitly assumed to be relatively small, and that the objective is to hold the thing it is controlling very tightly to a target (“setpoint”) in light of those relatively small or slow changes in environment.

They are not meant to deal nicely with things like – opening an oven door wide (and letting a lot of heat escape very quickly), putting a cold chunk of steel into a heated oven or forge, or having a bunch of wind blow through the bore of a forge. If you do something like use the autotune function (which will inherently enable ALL of the PID functions) on a nicely closed oven, then Bad Things can happen (like temperature overshoot, or large oscillations around the setpoint). Sure, you might be lucky and it works … but if it does not work, that does not meant that it can not work – you just need to know what the individual parameters are really doing and how to set them so that your oven (or forge) does work.

Just to mention my experience - I have used PID controllers in a number of applications – but mostly relatively small devices actually quite similar to the knifemakers oven. I have never had success with the automatic tuning algorithms (which really are not all that “smart”), and have always had to go to manual tuning. Likewise my son, now finishing his senior year at university, has been using PID systems for about the last 2 ½ years, and he likewise has never had success with the automatic tuning algorithms – because the things were created for huge distillation towers, not for smaller ovens (in my case) or for controlling robots (in my sons case). In all honesty, I have not been surprised to hear a number of people here having trouble getting PIDs to work (because you are not building distillation towers)…..

Spoiler alert: In the end, I am likely going to recommend that people having problems are best off using only the proportional function of the controller. But that will create something of an offset from the setpoint, which can easily be compensated for simply by increasing the input setpoint until the actual temperature is where you want it to be. That approach may seem a little awkward, but it is a perfectly acceptable (and accepted) calibration approach – and also has the benefit of giving the most stable and predictable behavior of a PID controller.

(next time I need to get into a little math … sorry ☹ ).
 
Last edited:
I just want to mention that for convenience I will be lifting some images from the Wikipedia article on pid controlers ( https://en.wikipedia.org/wiki/PID_controller ). It is actually a pretty good article – anyone who wants more detail can go there.

Also, even though PID’s can be used to control a lot of different things, I will keep the explanation here to controlling temperature in an oven, as that appears to be mostly what people are doing.

Ok – now for some math….

There are actually two different (basically equivalent) ways the algorithm is written. I am actually going to start with the one that is not typically used in controllers because it is easier to pick apart and explain the different pieces. Here it is:
upload_2020-3-10_12-17-34.png

Said in plain English:

Output = proportional term + integral term + derivative term

Two points I would make about this form. The first is that “u(t)” is the output of the algorithm versus time. Typically it is meant to vary between 0 and 100 (but it can go negative, and also can go bigger than 100). Somewhere else in the system that is translated into “action” (like turning on a heating element using pulse width modulation or true proportional changes in the power to the element) … but that is outside of the scope of the algorithm itself (but I will cover pulse width modulation later). But typically, a value of “0” means the heating element is off, and a value of “100” means the heating element is full-on. A value smaller than “0” (a negative value) means the heating element is just off, and a value bigger than “100” just means the heating element is still full on.

The second point is that the proportional, integral, and differential terms are totally independent of each other, and the influence of any one of them can be turned “off” by setting any of Kp, Ki, or Kd to a value of zero. (meaning, you do not have to use the complete algorithm – you can use just parts of it … for example only the proportional part. Also, the relative influence of each of the terms is defined by the parameters Kp, Ki, and Kd, which allows you to keep any of the terms “present”, while making them more or less important than the others.

Now, lets try using just plain English to describe the algorithm (sorry, I need to use multiple lines):

Controller output = Kp * (current difference in temperature from the setpoint)

+ Ki * ( the sum of ALL previous differences in temperature from the setpoint)

+ Kd * (the current instantaneous change in temperature from the setpoint)


Just a couple things then I will stop this one post:

1) Differences to lower temperatures from the setpoint are actually considered positive values for the algorithm (while differences to higher temperatures are considered “negative” values.

2) The “sum of differences” that multiplies Ki can become negative when the temperature is higher than the setpoint for long enough (which can create some really "interesting" behavior)

3) For the derivative term, instantaneous changes to lower temperatures are considered positive, while changes to higher temperatures are considered negative. And it does not matter whether the actual temperature is above or below the setpoint (which again can create some really "interesting" behavior......).

Thats it for now – I need to go pack and ship some blades to JT . In the next several posts I will take the above and get away from the math and explain each of the terms with pictures which should make more sense. Especially – I need to get across the concept of the “proportional band”, which is absolutely critical (because it will help you adapt things to your particular oven. As we go, if I do not make that clear, please do let me know.

(also, I identified a nice little PID simulator that should allow me to make some nice plots to clarify points….)
 
Ok – lets try to get at Proportional Band

Lets go back to that “plain English” version of the PID algorithm, and set Ki and Kd to zero – so that the algorithm is using ONLY the proportional term. It then looks like this:

Controller output = Kp * (current difference in temperature from the setpoint)

Just to make things easier, lets assume we are running a toaster oven, and shooting for a set point of 400f. just to make this a little easier to see, lets assume that we have chosen the value of Kp to be 100. Also lets take the case where the actual measured temperature by the thermocouple is only one degree lower than the setpoint – ie. The measured temp is 399. So … that “plain English” equation then looks like:

Controller output = 100 * 1 = 100.

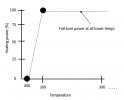
So, if the measured temperature drops by only 1 degree from setpoint, the heating element will be “full on” (by virtue of the controller output being 100). For any measured temperature lower than that (for example 2 degrees lower gives a controller ouput of 100*2=200) the controller output is greater than 100. But, as the element can never be greater than “full on”, you will just get the same full-bore heating for all temperatures lower than that. In this case, the Proportional Band is 1 degree. Visually this looks like this:
upload_2020-3-11_12-31-32.png


Lets take a slightly different set of numbers to make it clearer why it is called the “Proportional Band”. Lets choose Kp = 10, and the temperature below setpoint to be 395 (5 degrees below setpoint). The equation then looks like:

Controller output = 10 * 5 = 50. The controller output (and thus the heating element) will be on at 50% of max power.

When the temperature drops to 10 degrees below setpoint (390), the control equation looks like this:

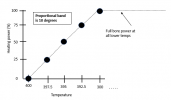
Controller output = 10 * 10 = 100. At this point the heating element is again on full-bore, and will be that way for all temperatures below that value of 390. In this case, the “proportional band” is 10 degrees.

For all temperatures between the setpoint and that 10 degree point below setpoint, the controller output will vary from zero (at the setpoint) to 100 (at 390, which is 10 degrees below setpoint), and will do so linearly (proportionately) with the distance below the setpoint.

Examples: still keeping Kp=10:

Temp = 397.5 (2.5 degrees below setpoint): output = 10*2.5 = 25 (heater is on 25% of full power)

Temp = 395 (5 below setpoint): output = 10*5 = 50 (heater is on 50% of full power)

Temp = 392.5 (7.5 below setpoint): output = 10*7.5 = 75 (heater is on 75% of full power)

Again, visually, this looks like this:
upload_2020-3-11_12-31-54.png


So … if this concept has gotten through – maybe you can start to see where this is heading. Lets say you have a knife heat treating oven, and you set your proportional band to one degree, and your setpoint is 2000F, and you have a really, really wimpy (low power) heating element. What is going to happen is the oven will heat really really slowly (if the insulation is enough), until the temperature gets to one degree below setpoint (i.e. 2999). At that point the heating element will shut off, and the oven will sit somewhere in the range of 3000 and 2999 degrees, with the heating element turning on periodically (actually the temperature will drop something below 2999 as the heating element takes it own wimpy time heating up).

If on the other hand, you had the same oven and insulation, but with a really, really, high power heating element (proportional band still 1 degree), what will happen is this: That baby is going to roar full-bore right up to the time the temperature in the oven hits 2999, then the heating element will shut off. BUT, the element is HOT, and there is a lot of heat remaining in the element, and it will take time to cool off. During that time, the oven will continue to heat, and the temperature will go above the setpoint. When the temperature drops back down to just below the setpoint, the thing is just getting into the proportional band of 1 degree width – so the element will come on just a little bit. What happens then will become really complicated and “depends” on the system, so I will not directly conjecture (but of options, it could settle down just below setpoint, or more likely it will start oscillating above and below setpoint).

Where you WANT to be is somewhere between these two extremes, which you can control by changing (making wider) the proportional band.

Those are just words describing this for now. Am out of time right now – next post will use the above along with that PID emulator to show visually what happens…
upload_2020-3-11_12-32-19.png
 
Cushing, thank you for doing this, I'm sure lots of us will gain from it, ignore those that believe they won't, there is always that one...
 
Getting back to proportional band, let me throw out one more equation – which you can promptly forget, as long as you get what it is basically saying. The equation is:

Proportional band (in degrees) = 100/Kp

(this is just a rearrangement of what I wrote above:

Controller output = Kp * (current difference in temperature from the setpoint)

But says the controller output is 100 (full output), and the “difference from setpoint” the difference where controller output becomes 100, or

100 = Kp * (difference where output becomes 100 – which IS the proportional band)

Or… if you want to do the algebra:

Proportional band (in degrees) = 100/Kp

The good news is that you do NOT need to do the calculation every time …. Just remember that a smaller value of Kp makes for a bigger proportional band.

If you want to think about it more “intuitively” – a smaller value of Kp makes the controller output rise more slowly as the difference from setpoint increases.

Because the effect that the value of Kp has is really dependent on the oven itself (how strong the elements are, how much insulation it has, etc), in the end you will just end up “playing” with the value of Kp until you see certain behavior (which I will describe below). So … you don’t need to know the equation – just remember that smaller values of Kp make the oven heat slower.

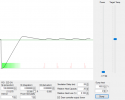
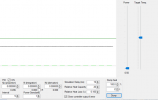
Let me give an example using that PID simulator software. You will see on the shot below (in the lower left corner) that Kp is set to 0.05, and Ki and Kd are zero – so this is simulating ONLY proportional control. Kp is really small, so the proportional band is big. We would expect the oven to heat slowly, and it does:
upload_2020-3-12_12-38-49.png


(the green bars on the bottom indicate the controller output, and you can see that even at low temperatures the bar height drops down, indicating that the energy to the heating element is already being reduced even far away from the target temperature). After running for a while, here is how the temperature settles out:

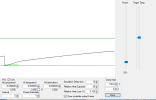
upload_2020-3-12_12-39-10.png

three things to note here: first is that with the small value of Kp, it took a LONG time for the temperature to level out. Second is that, if you look at the green bars on the bottom, the heating element is actually cycling on and off (keeping the temperature at that level). Third is that the temperature is a definite distance BELOW the target temperature (setpoint).

What you can not “see” by looking at this I will tell you:

First, that the actual temperature is a certain distance below the setpoint is expected.

(if you know the system well enough you can mathematically define what this offset will be – but for now lets just say it results from the balance between heat coming in from the element, and the rate that heat leaves the oven through the insulation. Better insulation the smaller the offset, etc).

Second – the larger the value of Kp, the smaller the value of the “offset” will be.

Third – this is actually a very stable and predictable (repeatable) situation for the oven to be operating in. no surprises – pretty much whatever you do, the oven will settle back at that temperature (but will take a while to get there).

So … and this is an important thing to note: if you see this situation and the temperature difference is relatively small (say 5-10-20 degrees), and you are OK with the time delay to get there – all you need to do is “artificially” dial in the setpoint to a higher value until the actual temperature sits where you want the oven to be. This is just fine – it is frequently done as a “calibration offset” – and in this case will give you a nice stable operation of the oven.

I don’t want to run afoul of the size limits on images – so I am going to stop here and continue in another posting
 
Back
Top