The Juice is Loose (Leatherman)

I've already started the process of looking for 1/8" pivot posts and a full-length Juice blade, but the eBay prices for used Juices (even heavily used) are way higher than I'm willing to pay for a parts donor tool. There's also nobody selling Juice parts that I could find, which isn't really surprising given their riveted construction.
Yeah the prices are pretty stupid... even on the C2 which I'm pretty sure nobody actually wants in the first place unless it's only for the parts.

There is at least one account selling individual parts, but it's kinda crazy. I recall them wanting 23-24 bucks for a used pair of scissors, for example. You may as well spend the extra money to buy a whole Juice, because at least it's going to be a better value per dollar.

Try checking again, though. Their listings weren't appearing in the search results for a while, and then they suddenly reappeared for some reason. Maybe it was caused by some sort of technical error, but I also vaguely recall hearing about how people at ebay deliberately tamper with that sh🤬 for their own purposes. I don't know how much truth there is to it, but nothing would surprise me at this point.

You can also try using a regular old search engine to get around any possible glitches or shenanigans by ebay. A couple of their parts listings should show up in the first page of results if you just search for leatherman juice parts.
 
Yeah the prices are pretty stupid... even on the C2 which I'm pretty sure nobody actually wants in the first place unless it's only for the parts.

There is at least one account selling individual parts, but it's kinda crazy. I recall them wanting 23-24 bucks for a used pair of scissors, for example. You may as well spend the extra money to buy a whole Juice, because at least it's going to be a better value per dollar.
I just ordered a full length Juice blade from probably the same account. In my view, $23 is way cheaper than I'll be able to find even a parts donor Juice.
 
I haven't found any 1/8 (0.125) inch pivot barrels longer than 1/2 (0.500) inch. The CS4 is only slightly thicker than that, so I think it should be just barely enough to get the job done.

For the XE6, I believe what people do is remove the head from a screw and then use that screw to join two pivot barrels together. You might also need to use permanent Locktite on that screw in order to make sure it won't come loose at some point. Then you'll have to trim off the excess to make the whole thing the correct length. It sounds like a lot of work, and you'll need at least 2 pivot barrels and 3 screws for each pivot that you replace, and that's only if you don't make a mistake and have to start over on a new piece to replace the part that you accidentally messed up.

Removing the factory pivots isn't any fun either, and I've heard that the reassembly of the springs can be pretty tough.
By my measurements, the CS4's knife/saw handle is about 19/32" and the corkscrew/scissors handle is about 5/8" (0.625") thick. I'm toying with the idea of using a 1/2" long pivot with spacers made from 1/8" brass tubing on either end, with the screws going through the spacers and threading into the pivot barrel.
 
I just ordered a full length Juice blade from probably the same account. In my view, $23 is way cheaper than I'll be able to find even a parts donor Juice.
Aren't there a few old first gen C2 models for 40-50 bucks? 🤷‍♂️

Half the price of the whole tool for only one single part seems like a pretty awful deal to me.

Or let's even say you would've spent as much as 75 usd on buying a whole Juice C2. The blade part that you just bought instead still costs nearly 1/3rd of that! For only one part!

It's an awful deal, especially when you consider that you could've built a whole separate stripped down Juice out of the leftover parts from the C2. Even with no external tools, the stripped down Juice still would've had a set of pliers, 3 flat drivers, and 1 Phillips driver. It would've made a great EDC companion to pair with a SAK, and it would be lighter and thinner than a Juice S2.

Like I said, buying the whole Juice is still a better value per dollar than spending 23-34 usd on just one part.

Oh... and wasn't there also a separate shipping charge on top of that? Yikes, man!
 
For those of you who have carried and used the XE6, does it fit well in the medium size Leatherman nylon snap sheath with side pockets? I purchased the bit driver adapter to go with the tool, and would like to carry them together.

Did you ever find out how well it works?

I ordered a couple of nite ize universal stretch tool holsters with the plastic swivel clip on the back. They were on sale. They should be able to hold an XE6 plus a set of Leatherman flat bits and the bit adapter. We'll see. If they end up not working out then at least they'll make good flashlight holsters. Apparently that's what a lot of people use them for.

So... here's what that looks like:
xe6-a.jpg

The bottom of the tool holster is open so you can carry and use your multitool pliers in quick-draw mode.


xe6-b.jpg

In the front is a spot where you can carry 1 or 2 Leatherman flat bit holders. Whatever you put there will only be held in place by a sturdy high quality elastic band. It's not a pocket. There is no bottom.


xe6-c.jpg

In the back is a sturdy plastistic clip and an actual pocket where you can put another plastic bit holder.


xe6-d.jpg

The clip can be rotated for horizontal carry. The pocket has a bottom.


xe6-e.jpg

The sheath can be very thick depending on what you have in it, With a Juice XE6 and a full set of bits in the front, it can stick out quite a lot. This could be a problem for some people. However, the sheath is very well made and the clip is very sturdy.


xe6-f.jpg

Here you can see there is a full set of bits in the front (2 plastic flat bit holders) with the Juice XE6 inside while the pliers are fully closed. There is obviously a lot of empty space. Maybe you could jam a flashlight in there sideways, or maybe you can fit a small roll of something.


xe6-g.jpg

There is a place on both sides for you to put a pen, or small flaslight, or bit extender, or something similarly shaped. For this picture I put a Victorinox Dual Knife Shapener on this side.


xe6-h.jpg

...and a 1/4 inch magnetic hex bit holder/extension on the other side. The green plastic piece fits over the end and lets you turn the bit holder with your fingers so you can use it by itself like a small screwdriver. It was part of an order from CountyComm.


xe6-i.jpg

Bonus.
 
Did you ever find out how well it works?


So... here's what that looks like:
xe6-a.jpg

The bottom of the tool holster is open so you can carry and use your multitool pliers in quick-draw mode.


xe6-b.jpg

In the front is a spot where you can carry 1 or 2 Leatherman flat bit holders. Whatever you put there will only be held in place by a sturdy high quality elastic band. It's not a pocket. There is no bottom.


xe6-c.jpg

In the back is a sturdy plastistic clip and an actual pocket where you can put another plastic bit holder.


xe6-d.jpg

The clip can be rotated for horizontal carry. The pocket has a bottom.


xe6-e.jpg

The sheath can be very thick depending on what you have in it, With a Juice XE6 and a full set of bits in the front, it can stick out quite a lot. This could be a problem for some people. However, the sheath is very well made and the clip is very sturdy.


xe6-f.jpg

Here you can see there is a full set of bits in the front (2 plastic flat bit holders) with the Juice XE6 inside while the pliers are fully closed. There is obviously a lot of empty space. Maybe you could jam a flashlight in there sideways, or maybe you can fit a small roll of something.


xe6-g.jpg

There is a place on both sides for you to put a pen, or small flaslight, or bit extender, or something similarly shaped. For this picture I put a Victorinox Dual Knife Shapener on this side.


xe6-h.jpg

...and a 1/4 inch magnetic hex bit holder/extension on the other side. The green plastic piece fits over the end and lets you turn the bit holder with your fingers so you can use it by itself like a small screwdriver. It was part of an order from CountyComm.


xe6-i.jpg

Bonus.
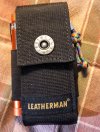
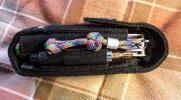
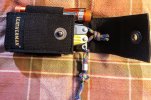
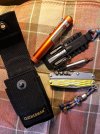
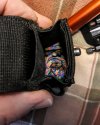
Looks like that will work well for carry. To raise the folded tool higher in the sheath for ease of access, I place a folded, wrapped hank of paracord in the bottom of the sheath. This protects the bottom of the sheath, and gives me about 8 feet of emergency paracord that is not in my way or loading my pockets. Edited to add pics. 20221212_194853~2_resize_89.jpg20221212_194916~2_resize_97.jpg20221212_194931~2_resize_76.jpg20221212_195005~2_resize_8.jpg20221212_195037~2_resize_64.jpg
 
Last edited:
To raise the folded tool higher in the sheath for ease of access, I place a folded, wrapped hank of paracord in the bottom of the sheath. This protects the bottom of the sheath, and gives me about 8 feet of emergency paracord that is not in my way or loading my pockets.
Great suggestion. I must admit that the XE6 can be difficult to extract when the pliers are closed and the whole thing is pushed all the way to the bottom of the holster. That's why it's preferable to carry it with the pliers open while in the holster, for quick draw access. Putting something in the bottom of the holster solves that issue while allowing you to also make use of the extra space which is not taken up by the Juice. 👍

Edited to add pics.
Nice. The medium Leatherman sheath certainly looks more compact than the nite ize holster. 👌

But... you are losing the ability to quickly clip and unclip it, and I also have to wonder if you are able to insert more than one plastic bit holder at the same time. The nite ize holster can carry up to 3 of them at the same time by having 1 in the back and 2 in the front (giggity), so you can have the bit adapter + up to 7 double sided bits, and then a full additional set of 20 double sided bits on top of that (not counting the micro bit). Obviously that ends up being super bulky, but the point is that you do have the option to hold them all if you wanted to, and being able to clip and unclip the holster at any time makes it a lot more manageable.

Also, I failed to point out a seemingly minor and easily overlooked feature of the nite ize holster. There's a small loop of fabric sticking out above the pocket in the back. You can run a piece of cordage through this and then run it through the holes in the top of the plastic flat bit holders. This prevents you from dropping your bit kit. I think that might be the reason why Leatherman designed the flat plastic bit holders with that hollow tab at the top.

Anyway, cool stuff. I'm glad the sheath worked out for you. :cool:
 
spoon.jpg


This was simply the result of me getting frustrated. I'm not entirely sure what comes next.

Progress!

spoon.jpg


I have not put in the springs for the inside screwdrivers yet. There's a special trick for that, so I'm not too worried about it.

The scissors are also not in place yet. I'm actually not 100% sure that they'll fit because of the short length of these pivot barrels. I might have to swap the position of the scissors with the knife or the saw to make them fit.

This has been educational and a great practice run for something else that I would like to do...

I think I know why the flat drivers are so tight on a lot of these Juices and why they won't loosen up in some cases. The pivot isn't actually peened too tight. It's just that the holes in the flat drivers are so small that they can't rotate freely enough. They don't all have the same size pivot hole either. It varies, so the hole can be a little larger than normal in some flat drivers or a bit smaller than normal for others.

edit: update
spoon-b.jpg


So the scissors just barely fit with some careful fiddling, but I'm still not sure if they'll be okay with regular use. When you cut with them, it tightens the screw next it, which negatively affects the spring action. The tightness of that screw needs to stay within a very narrow sweet spot for the scissors to work well.

Hopefully when I add loctite it will fix the problem. I'm also thinnking that maybe I'll need to sand the pivot holes in the scissors and the spring lever arm to enlarge them, which might also help to stop the scissors from being able to cause the screw to tighten.

The next step is to add the springs for the inner screwdrivers.

edit: update 2

It's done. Inner tool springs are in. One of them broke. It was my fault.

If you are putting the inner screwdriver springs in after the Juice is already assembled, just make sure the springs are fully seated before you open or close the pliers. If you feel too much resistance, STOP immediately. You are in danger of snapping a spring in half, which could cause damage/injury to you or someone/something nearby.

I'm unharmed. I have spare Juice parts too, so it's fine. I just want to warn people to be careful and don't make the same mistake that I did. The springs can seem like they're fully seated when they're not. They can be slightly off and you won't see it, but you can feel the extra resistance. That's probably going to be your only warning sign that something is wrong.

I did end up moving the scissors. They work great now. They even do a half decent job at cutting paracord if you get it in the right spot. The issue with the screw tightening by itself seems to have gone away, and the spring arm no longer has a small sweet spot where it stops working if the screw is outside of that narrow range of tightness.

Loctite will be the final step to keep everything dialed in.

No ore pictures. You already pretty much know what it looks like anyway.

Bedtime is now. Peace. ✌️


edit: yeah... after sleeping on it... this thing is way too fiddly. I don't like it. I think I'll tear it apart and turn it into a thinner model like the S2, SC2, or something similar with the saw replacing one of the outer tools. Then I won't need to worry so much about it coming apart on me. 1/2 inch long pivots are a little too short for a CS4, it seems. The corkscrew layer is definitely too thick and the scissors layer might also be too thick. Maybe 1/2 inch pivots would still work for a KF4. I'll have to try that next.
 
Last edited:
I've come to a similar conclusion regarding my CS4. The corkscrew and can opener just have to go.
 
I've come to a similar conclusion regarding my CS4. The corkscrew and can opener just have to go.
I've gone the other route. I threw both scales back on over the corkscrew side and left out the other layer on that arm. The plier arm with the corkscrew layer plus the scales seems to be the right thickness for half inch long pivots.

For the other arm I'm going with the saw/awl layer by itself, and also adding in both scales. But the scales for that arm are thinner, and the saw layer is also thinner, so I'm putting washers underneath the scales to take up the slack. I also scratched up those scales when I was disassembling the Juice, so I'm going to remove the anodizing from them. Hopefully that will make them look better.

So basically it's going to be a knifeless build for outdoorsy stuff.

edit: hmmm... I could probably use the unused sideplates as spacers... it would require modifying them, but it's probably a lot better than using washers!
 
Last edited:
spoon-a.jpg

Removal of the anodizing didn't go as well as I anticipated. There were several stubborn deposits left which I then had to scrape off by hand. It was a bit like trying to remove hard water deposits. As a result, the scales got scratched up, but it was bound to happen anyway.


spoon-b.jpg

Putting the scales on the back when there's no tool layer there means the nail nick cutouts sit directly over the top of bare metal, but it can't be avoided.


Safe holidays, all.


edit: more pictures

spoon-c.jpg


spoon-d.jpg

Here's what using a liner as a spacer looks like from the side. The extra liner is mostly hidden under the scale, but the liner directly underneath it is made more visible.


spoon-e.jpg

Here it is again from the other side. There's a small gap between the modified liner and the unmodified liner. This could probably be fixed by gluing them together with something like J-B Weld.

Another option is to put the extra liner lower down, underneath the saw layer instead of putting it on top. But it might still form a gap.


spoon-f.jpg

On the bottom are two cutouts in the frame which aren't matched by the scale. Since the scale is thin aluminum, it could make these two spots fragile. Perhaps the scale could be modified to match the cutouts in the frame, or it could simply be replaced by another modified liner. You might also fabricate a thin metal piece to go between the scale and the frame, which would strengthen the two spots around the cutouts in the frame.


Final thoughts:

Using pivot barrels on a Juice doesn't really seem to be worth all the effort since you can't get anything longer than 1/2 inch without going through the trouble of making it yourself. Not everyone is capable of making their own threaded pivot barrels.

It's cheap and easy to get 1/8 inch diameter brass rod. You can cut the rods to any length you desire, and peening isn't difficult or complicated.


edit: Okay, this time I finally sorted it all out! Hey, its a process. ;)

spoon-g.jpg

1. No scales on the back side. The scales have problems when there's no layer under them, so they have to go.

2. Swap the corkscrew layer with the saw layer. This keeps the lanyard ring out of the way of the saw in a spot where it can't interfere with anything else either.


spoon-h.jpg

3. Scales on the front, washers underneath. This lets you put extra spacers in a spot where they can't be seen.


4. Put the modified liner under the saw layer. It looks way better in this location and you almost don't even notice it now. 👍


Done! That was a pain in the butt, but I think I finally solved all of the major problems. Anyone else with half inch long pivot barrels should be able to copy and adapt this formula to make their own custom Juice with other tool combinations, such as corkscrew/scissors, saw/scissors, scissors/knife (which is basically an S2), knife/saw, etc. You just need to have saved the scales when you took apart your Juice.
 
Last edited:
Here's another example of a custom Juice built around a set of 1/2 inch long threaded pivot barrels (1/8 inch outer diameter).
spoon-a.jpg

I guess you would call this a "Juice KF2" since it's basically a Juice KF4 but without the plain and serrated knives. It should pair up well with a Victorinox Compact.


spoon-b.jpg

Again there are no scales on the back side because it doesn't make sense to have scales there without having tool layers under them. I also ended up adding some washers to the back. It doesn't look half bad, so I think it's an okay option if you need to put spacers somewhere.


spoon-c.jpg

Here is a side shot where you can see that I put modified liners under the tool layers, exactly the same as I did before with the saw layer on the previous custom Juice. You can also see the washers on the bottom from a different angle. They're almost like little stubby table legs for the Juice to rest on whenever you set it down somewhere.


The process for making one of these is as follows:

1. Acquire the pivot barrels and screws.

2. Disassemble your Juice. This will probably be a very frustrating process...

3. Check the fit of your pivot barrels. If they're too big, lightly sand the inside of the pivot holes on your Juice parts until the pivots fit. I suggest using a small rolled up strip of p320 sand paper. This process won't take as long for each individual part as you might think. It can be as short as only a few minutes for each one, but it will start adding up when you put the total time spent on every single part together.

4. Modify the liner(s) for use as a spacer. I used a hacksaw and a file. Pretty straightforward. Just cut the side off and smooth it out.

5. Assemble your juice without the springs. Make sure everything is spaced out correctly. Rearrange things as you need/want. Take your time. Experiment if you want. Once you are satisfied, move to the final step.

6. Gently tap all of the springs into place. This is deceptively simple. Once you know how to do it, it's super quick and easy. Just don't be dumb like I was on my first attempt. I broke one of the springs by not paying close enough attention to it.

That's it. Once the springs are inserted, you're done, but you will probably also want to consider adding some loctite or a similar thread locking compound to the pivot screws.


edit: one of the advantages of using threaded pivot barrels and torx screws is that you can tear down the multitool and rebuild it differently if you're unhappy with it.

spoon-d.jpg

What I've done was to simply rearrange the tools so that the lanyard ring isn't in the way of the file anymore. I made a similar mistake with the first custom Juice, but ultimately I ended up fixing that one too.


spoon-e.jpg

There's no good reason to post this picture. I just think it's cool that you can still see the pliers through the handles when the tool is closed. I like the way it looks.


one last note:

I have just now discovered that the order of the flat screwdrivers should change depending on which handle you put them in. If you don't get the order right, then sometimes the tip of the pliers will get wedged and half-stuck between the flat drivers. It's not really a big problem, but it can be a little annoying.

You only need to remember two rules:
1. The longest flat driver always goes in the middle.
2. The other two flat drivers should always be positioned so that the angled side of their tips are facing towards the middle.

This specific arrangement creates a space for the tip of the pliers to rest inside of the handle without getting stuck.

Here's a picture:
spoon-f.jpg

Depending on which handle you put the flat drivers in, the shortest flat driver either has to be on the outside of the handle or it has to be all the way on the inside, behind the other two flat drivers.
 
Last edited:
Back
Top