Here the perfect practical example, the Spyderco Yojimbo 2. Its edge length is 75mm, and with this knife model you are forced to start flush on the grinding wheel because the obstructing knife's ricasso/bolster would be in the way otherwise. Let's assume that the edge is 100.0% perfectly mean-straight (because maybe it was factory-ground on a 150mm wide large grinding wheel lol). And let's assume that your grinding wheel width is 45mm, i.e. narrower/shorter than the edge length. Then i am claiming that repeated grinding sessions on this wheel will seriously concave the edge, no matter what you try! In fact, even after the very first wheel grinding session one could see the concaving effect through a 100.0% mean-flat reference surface, with light shining through the concavity. I am not claiming that wheel grinding sessions will not sharpen the entire edge length; they will. All i am claiming is that wheel grinding the Yojimbo edge on a 45mm narrow wheel will instantly ruin the 100.0% perfect straightness of the edge. Solution? If you want to keep the ex-fac perfect straightness, then either grind on a 80mm+ wide wheel or grind the blade on a "wide" 100.0% mean flat benchstone in such a way that each point of the edge gets equal grinding time, i.e. simultaneous grinding contact.
My thoughts on this topic in detail:
I was wondering about the exact maths when you start the wheel-grinding "flush", i.e. the heel is resting on the wheel with the heel being flush with one edge of the wheel, before you start drawing the entire straight blade length along the wheel thickness w1. knifegrinders video shows that grinding on a wheel could lead to a concaving of the (straight) blade section. i agree.
in order to avoid the concaving effect, in the video wootzblade
suggests that we "spend more time grinding the heel". i doht fully agree. let's consider the extreme case like the Yojimbo, i.e. a knife blade-handle-geometry which forces the user to start the grinding "flush", and the blade shape has a long straight blade section ending in the heel. so from the very start the wheel width is fully "covered with blade steel" and you leave that blade heel section lying on the grinding wheel. then as soon as you start drawing the blade in the proper direction, the heel point (at x = x0) loses contact with the wheel whereas the "opposite" wheeling point (at x = x0+w1) still gets grinding time T. And the slower you draw the blade, the much more extra dwell time that is. in fact, that point gets the maximum of grinding time of the entire blade length. That point, or the section between the heel point and that point, will eventually develop a recurve. To be crystal clear, after a wheel grinding session, the straight blade section will not be 100.0% straight anymore; this can be easily confirmed by a subsequent honing test on a mean-flat ceramic stone. Never mind the grinding wheel, this phenomenon is equally true for grinding a straight blade heel section on a guided sharpening system (Ruixin, EdgePro, Lansky, KME, etc) or even on the 204MF: whenever the "grinding width" is so much narrower than the blade length, then it becomes impossible to maintain the mean straightness of the (straight) heel section.
wootzblade
suggests that we "spend more time grinding the heel". i doht fully agree. let's consider the extreme case like the Yojimbo, i.e. a knife blade-handle-geometry which forces the user to start the grinding "flush", and the blade shape has a long straight blade section ending in the heel. so from the very start the wheel width is fully "covered with blade steel" and you leave that blade heel section lying on the grinding wheel. then as soon as you start drawing the blade in the proper direction, the heel point (at x = x0) loses contact with the wheel whereas the "opposite" wheeling point (at x = x0+w1) still gets grinding time T. And the slower you draw the blade, the much more extra dwell time that is. in fact, that point gets the maximum of grinding time of the entire blade length. That point, or the section between the heel point and that point, will eventually develop a recurve. To be crystal clear, after a wheel grinding session, the straight blade section will not be 100.0% straight anymore; this can be easily confirmed by a subsequent honing test on a mean-flat ceramic stone. Never mind the grinding wheel, this phenomenon is equally true for grinding a straight blade heel section on a guided sharpening system (Ruixin, EdgePro, Lansky, KME, etc) or even on the 204MF: whenever the "grinding width" is so much narrower than the blade length, then it becomes impossible to maintain the mean straightness of the (straight) heel section.
Here are the maths and the computational confirmation that my formula is correct:
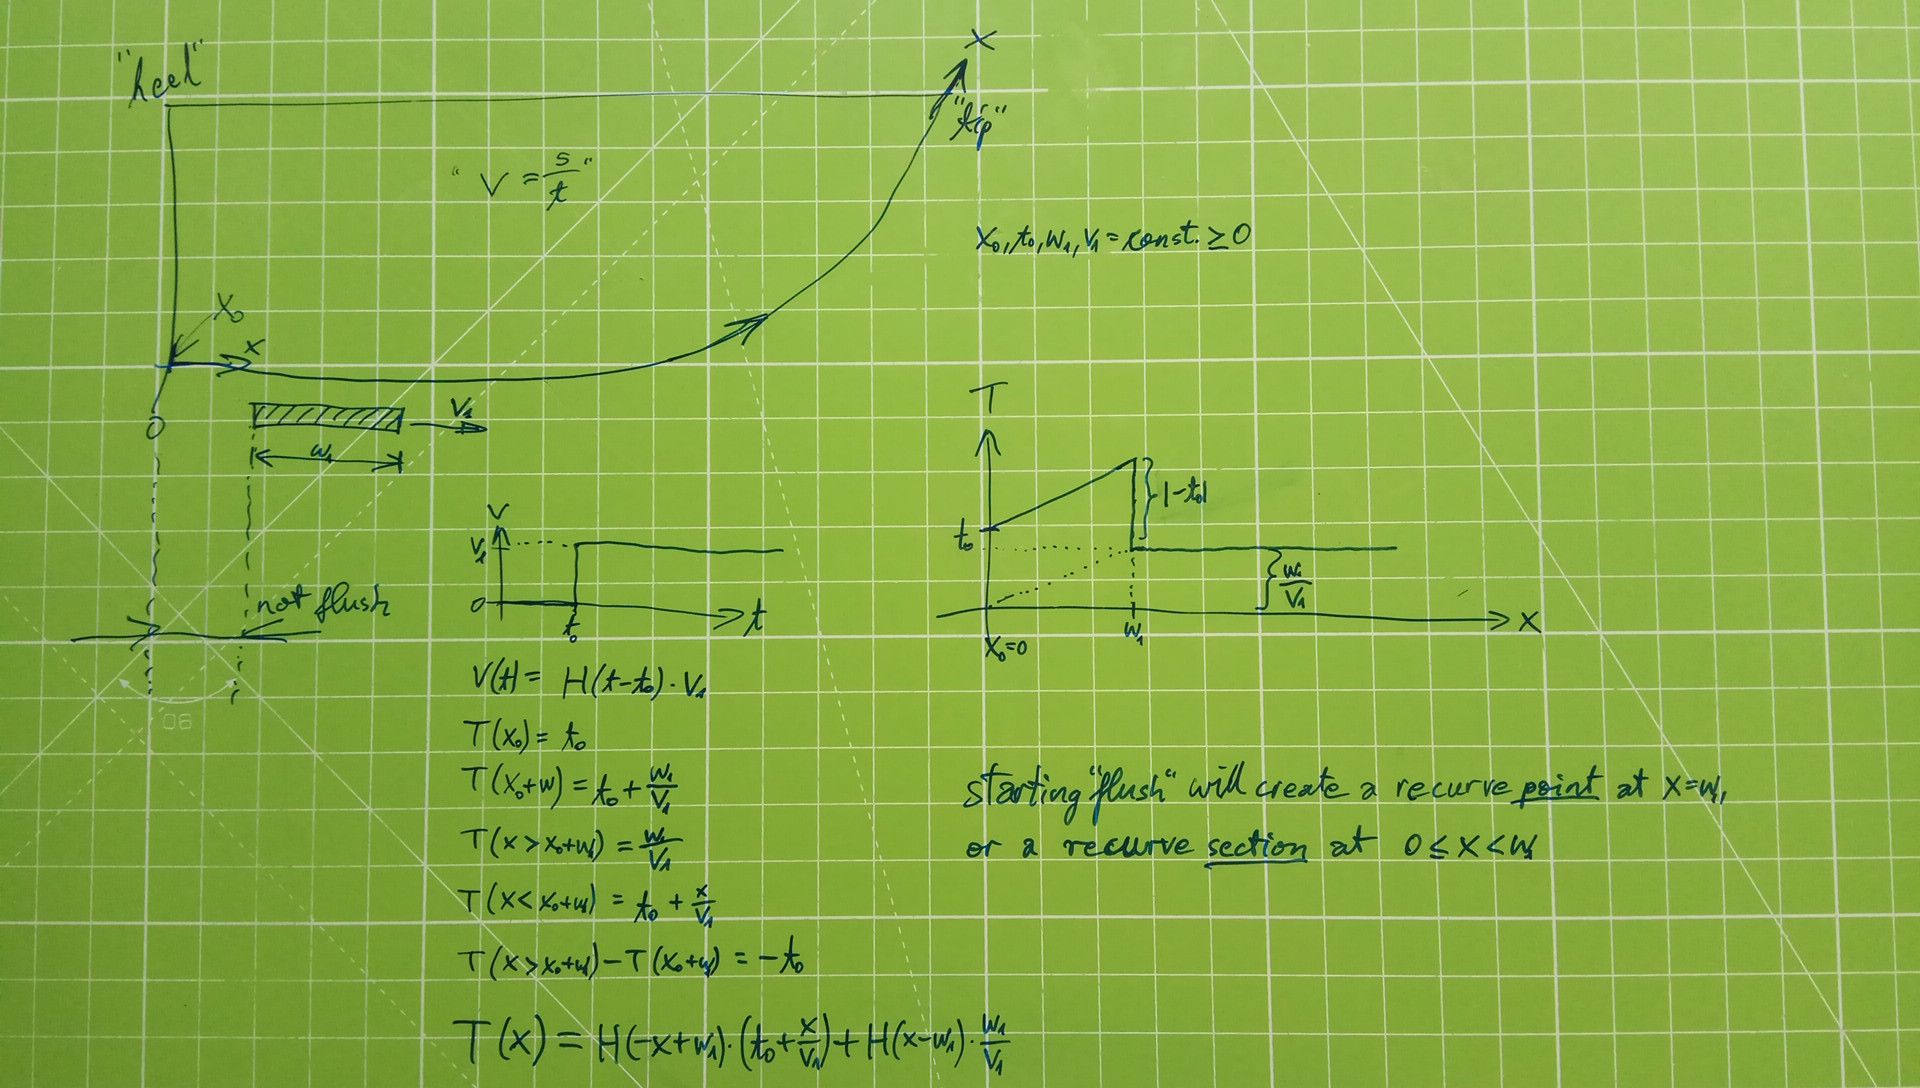

I don't expect everyone to understand the contents of the above two pics. The conclusion of the graphs/maths is: whatever you try to vary (making t0 shorter or longer or zero, increasing or decreasing v1), there is absolutely no way of grinding each point x for an identical amount of time T(x).
Actually there is. Just take a knife where you're not forced to start "flush", like a Santoku knife or a typical Japanese chef knife. Or check the last pic of my Berndes modding post; before the mod the Berndes geometry would have forced me start wheel-grinding flush, after the mod i could draw the blade across the wheel width in such a way that each point x gets an identical amount of grinding time T(x), so its straight blade section would remain mean-straight even after repeated wheel grinding sessions.
maybe the take home message be: trying to distribute grinding time equally over the entire edge length, i.e.
")
Do you have similar wheel-grinding experiences or other practical solutions for this "maths problem"?
My thoughts on this topic in detail:
I was wondering about the exact maths when you start the wheel-grinding "flush", i.e. the heel is resting on the wheel with the heel being flush with one edge of the wheel, before you start drawing the entire straight blade length along the wheel thickness w1. knifegrinders video shows that grinding on a wheel could lead to a concaving of the (straight) blade section. i agree.
in order to avoid the concaving effect, in the video
Here are the maths and the computational confirmation that my formula is correct:
I don't expect everyone to understand the contents of the above two pics. The conclusion of the graphs/maths is: whatever you try to vary (making t0 shorter or longer or zero, increasing or decreasing v1), there is absolutely no way of grinding each point x for an identical amount of time T(x).
Actually there is. Just take a knife where you're not forced to start "flush", like a Santoku knife or a typical Japanese chef knife. Or check the last pic of my Berndes modding post; before the mod the Berndes geometry would have forced me start wheel-grinding flush, after the mod i could draw the blade across the wheel width in such a way that each point x gets an identical amount of grinding time T(x), so its straight blade section would remain mean-straight even after repeated wheel grinding sessions.
maybe the take home message be: trying to distribute grinding time equally over the entire edge length, i.e.
T(x) = const., for all x
is h*ll of a challenge! at least in theory. Do you have similar wheel-grinding experiences or other practical solutions for this "maths problem"?
Last edited: