CAK rehandle (dial up don't!)

oldschool45

Gold Member
Joined
Oct 15, 2007
Messages
1,176
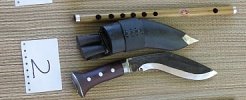
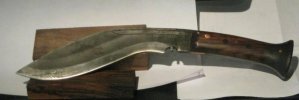
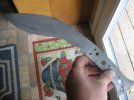
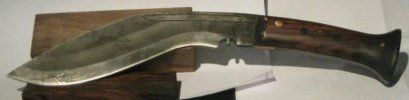
I rehandled my 12" CAK by Murali Kami
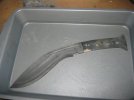
First picture is before and the 2nd pic is the after.
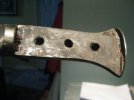
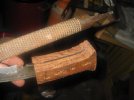
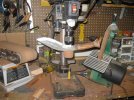
3rd Pic (here) is getting the wood handles off. I partially drilled the pin out but realistically they will punch out if you go in the right direction using enough punch & hammer. The scales came off fairly easily. Don't get me wrong laha is tough stuff and will last for generations. It just doesn't hold up well once you get the pins out and get a sharp chisel in there.
At this point you could stop and leave the bolster & pommel in place and just replace the scales with another wood or synthetic. I had delusions of solid copper; bolsters, pins and pommel. It didn't happen because the skills to do that are beyond my patience at the moment:grumpy:
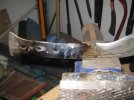
4th pic is removing the Pommel. A bit of heat with a torch and its not much trouble. The bolster came off much the same way a little heat and big pliers.
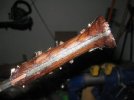
5th pic is where I sweated a piece of copper onto the blade so I didn't have a gap underneath. The Kami's actually cut a notch in the blade where they start the bolster and then wrap a sheet of white metal or brass around the blade to form the bolster. I think they do this and then shape a horn or wood handle to fit under the bolster and secure it there with laha.
I have a lot more respect for the Kami's now that I have dismantled one of these and seen the work involved in making it.
 

Attachments

  • before.jpg
    before.jpg
    16.1 KB · Views: 227
  • after.jpg
    after.jpg
    20.4 KB · Views: 218
  • 1.jpg
    1.jpg
    16.7 KB · Views: 228
  • 2.jpg
    2.jpg
    60.4 KB · Views: 202
  • 3.jpg
    3.jpg
    56 KB · Views: 235
After getting the handle fully removed. I called in a favor from an auto mechanic friend of mine and sand blasted the blade (1st pic this post)
Next was getting it de-greased and a bath for a few hours in White Vinegar (2nd pic this post) This is purely aesthetic and is called a forced patina. You can also use gun bluing. I went a step further and did a ferric chloride etch after the vinegar.
3rd pic this post is after the FeCl etch)I then wiped the blade down with mineral oil.
4th Pic this post is the roughing out of the "new" handle with a wood rasp. The holes that the Kami's make in the chiruwa handles for the pins are actually much larger than the pins. My guess is they use laha on large handle scales set the pins then shape the handle scales down. I couldn't find pin stock large enough for the holes that were there so I added 5 more for aesthetics and to make sure I could line up my handle scales consistently. I actually used walnut dowel to replace the original pins then used copper (electric wire actually) as my set pins. There is no adhesive or epoxy at this point because I finish the scales entirely then apply them with epoxy later.
5th pic is thinning the handle down. The wood is a 3/4" thick board of cocobolo
 

Attachments

  • 4.jpg
    4.jpg
    58.7 KB · Views: 158
  • 5.jpg
    5.jpg
    47.8 KB · Views: 168
  • 6.jpg
    6.jpg
    22.7 KB · Views: 159
  • 7.jpg
    7.jpg
    43.6 KB · Views: 176
  • 8.jpg
    8.jpg
    40.1 KB · Views: 162
3rd Page
with the temporary pins in place I finished shaping the handle. You can do this by hand with smaller rasps and sand paper. I prefer to use a drum sander attachment chucked up in my drill press and a 1" belt sander. I you have a respirator or dust mask available use it! I was hacking up wood dust & spit for about 2 days after I was done. With the temporary pins in I went out to my wood pile a few times to test the handle shape and made a few adjustments. When I was happy with it I started at 120grit sand paper and worked my way up to 1500 grit. That is what you see in the first picture here.
We all have our DOH (Home Simpson moments) the 2nd pic here is mine. You are supposed to wipe up excess 2 part epoxy off with paint thinner or mineral spirits. I had my epoxy mixed applied and pinned before I realized I was out of mineral spirits to clean it up.:barf: That one mistake cost me 3 hours to finish that handle and remove the epoxy by sanding out that nice 1500 grit finish:grumpy: If your not making mistakes you aren't trying hard enough.
The last pic brings us back to the finished blade.

Things I learned here that might help others trying it. 1) be patient don't rush it you'll regret it. 2, dull or tape the blade up, at one point I had vacuum line tube duct taped over the edge, I didn't learn this one the hard way I was smart enough to do it so as not to get cut.3, if there is one tool I would not give up to do this job it would be the vice (6" Wilton) it goes beyond an extra set of hands and actually becomes a tool onto itself. If anyone wants the details I'll discuss them. Please take any of my other power tools away but don't take the vice. I have bent, formed into a u shape 7/16" aluminum bar 2"wide around a 2.5" diameter mandrel using that vice and my own weight, it ain't going anywhere:D
Thanks for looking
Ray
 

Attachments

  • 9.jpg
    9.jpg
    83.5 KB · Views: 182
  • 10.jpg
    10.jpg
    42.1 KB · Views: 229
  • after2.jpg
    after2.jpg
    16.8 KB · Views: 236
I like the progress and effort you put into it.
Hope you enjoyed it and it looks like it's ready for action!

:thumbup::)
 
Nice job on this and yes, use a respirator/dust mask... I spent a couple days hacking out goop after doing this the first time too... :D
 
OldSchool45, did you notice any difference in balance after leaving out the bolster and pommel?
 
Jay, Its actually been my favorite "dog walking" knife for a few weeks and it goes on my hip while doing lawn work.
Warty, the sad thing is that the respirator mask I use for indoor shooting ranges was sitting on my bench in plain sight the whole time:barf:
Dan, leaving the bolsters and pommel off might have shifted the weight a hair forward but not drastically. If I had used solid copper for the bolsters it would have made it handle heavy. There just isn't a whole lot of metal between the bolsters and pommel to throw the weight off and it would be less pronounced in a bigger blade. I really like a metal pommel to protect the butt of the handle if you drop it. Please don't ask me how I know.
 
Oldschool,

I really like the cocobolo's finishing.
Time to start working on my 12" Salyan.
It's made by Sher the Tiger and i felt the handle's too short for my grip.

Other than that i think it chops well on smaller branches due to it's 1/2" thick spine.

Your CAK bites!
 
Jay the finish on the cocobolo is a satin finish Tung oil. Coat it let it dry rub it with 0000 steel wool and repeat till you get tired. I'm going to have to break down and get a gallon can on Boiled Linseed Oil here shortly and try that too. Cocobolo actually works a lot like plastic because it is so oily and resinous. In my experience both cocobolo & birdseye maple will polish themselves up without any oil after being finished with 600 grit sandpaper or higher.
The 12" CAK is what I carry in daylight hours around the yard. The neighbors all know I make and use large knives so it doesn't really bother them to see me walking around at 11pm with the 20" AK or M43 and the dogs doing kata or stretching my muscles before going to bed. I guess they figure its fair warning to the boogieman:D

Jay post the thread you got the 12" Salyan in and let me see what ideas I might have for lengthening that grip. I have big hand with long fingers but I actually prefer a thinner diameter handle which is why the new handle on this 12" CAK is noticeably smaller in diameter than the original. I trimmed metal off the full tang handle when I was going through it.
 
Congrat on your successful work oldschool! Interesting project with nice finished handle.

Let's explore if Corby rivets can fit the 3 big holes in the tang.

Hi Jay,

Let us know your plan on the Salyan handle. I also have gone through some handle project (traditional style) and I can share what I've learnt.
 
Really nice work there, oldschool, and thanks for sharing it. Who knows, I might even learn something. (That Cocobolo looks nice.)
 
Thanks everybody.
stickfred, I only paid $15 for the board I used and I still have most of it left. If you want to try it shoot me a PM or an email with the length scales you need and I'll drop them in a flat rate box for you.

hunglvq, I'm all for the corby bolts but I think you might still have drift because of the uneven pin holes. I'm working on a utility knife for a very good friend of mine and I will likely use canvas micarta I'll order some corby bolts and see how it would work.
 
Last edited:
DanSmithy hows this for blade balance?:D
 

Attachments

  • bladebalance.jpg
    bladebalance.jpg
    47 KB · Views: 45
moogoogaidan, the beer the CAK is balancing on is 4th from the last of my last batch. The new batch that we brewed Thursday night is identical to the one in the picture, yeast are having their party as we type and should be bottled LaborDay weekend and be drinkable the next:D
 
nice tutorial. to balance that beer, perhaps some whiskey :)


Bladite
 
Back
Top