• The rules for The Exchange can be found here. Please read and follow them. Stop using Paypal Friends & Family and follow our best practices to prevent getting ripped off or having a bad deal.

Engraving kits - ALL SOLD EXCEPT MONSTER BALL VISE

Stacy E. Apelt - Bladesmith

ilmarinen - MODERATOR
Moderator
Knifemaker / Craftsman / Service Provider
Feedback: 9 / 0 / 0
Joined
Aug 20, 2004
Messages
36,469
These kits are for hand engravers. These are top quality , brand new gravers selling from $5 to $15 each. Other items are professional grade. These kits are less than 30 cents on the dollar with free shipping.

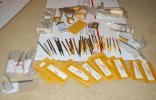
MASTER ENGRAVERS KIT - "A" - about $1200 retail value THIS ONE SOLD - MORE KITS BELOW

Kit contains :
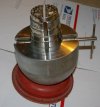
15# gravers maxi-ball and leather base
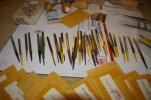
50+ gravers - these sell for over $ 400 total. There is every graver you will most likely need, plus some you may not know about.
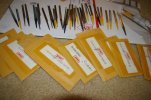
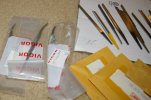
Bag of graver handles
GRS graver handle and interchangeable graver collets
Crocker graver sharpener
Bench stone
Fine Norton stone
4 millgrain tools 6,8,9,13
Complete beading set
15 extra beading tools
Professional diamond tweezers
Utility tweezers
2 pair of 3-C tweezers.
Chasers cement
Block of China White
2 Square end pushing tool
U end pusher tool
BONUS - 73 high speed burrs - OVER $200 worth of metal working burrs from 1mm cone burs to 7mm wheel burs.

EVERYTHING FOR $350 with FREE SHIPPING
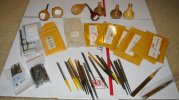
 

Attachments

  • KITS for Sale 011.jpg
    KITS for Sale 011.jpg
    51.7 KB · Views: 114
  • KITS for Sale 009.jpg
    KITS for Sale 009.jpg
    34.9 KB · Views: 106
  • KITS for Sale 016.jpg
    KITS for Sale 016.jpg
    55.6 KB · Views: 98
  • KITS for Sale 017.jpg
    KITS for Sale 017.jpg
    56.9 KB · Views: 75
  • KITS for Sale 018.jpg
    KITS for Sale 018.jpg
    48.2 KB · Views: 79
Last edited:
Next kit -PROFESSIONAL ENGRAVERS KIT - "B"
ALL SOLD - $800+ Retail value
The graver assortment is the same as the above kit. The difference between the "B" kit and "A" kit is the gravers ball, the Crocker, and The beading kit.
Kit includes:
50+ gravers
bag of handles
3 millgrain tools
15 beading tools
Chasers cement ( one kit has an extra universal graver handle instead)
China white
73 HS burrs
hand held gravers/setters clamp/vise
2 pair of 3-C tweezers
Square pushers

See photos of Master Kit for close-up of gravers.

$200 EACH - ALL SOLD- FREE SHIPPING
 

Attachments

  • KITS for Sale 015.jpg
    KITS for Sale 015.jpg
    68.8 KB · Views: 54
Last edited:
ENGRAVERS KIT "C" - ALL SOLD[/COLOR RETAIL VALUE - $400
Great for those who are adding to their sets or just getting started.

Each kit includes:
27 or more gravers
bag of handles
15 beading tools
75 High Speed burrs
Pusher tools
two pair 3-C tweezers

$100 - ALL SOLD
 

Attachments

  • KITS for Sale 013.jpg
    KITS for Sale 013.jpg
    53.7 KB · Views: 73
Last edited:
THIS IS THE BIGGEST ENGRAVERS BALL YOU EVER SAW
- $150 WITH FREE SHIPPING in the USA

This came from the Winchester factory, and was used from the late 1800's to the early 1900's for engraving guns. The way it was used was a wooden set of chocks was cut to fit the rifle/shotgun/pistol/knife .The gun/etc was placed between the blocks and the bolt tightened. The ball weighs #50 plus, and sits on a base ring. The chasing engraving was done with hammers and burins. It can be used for any type of engraving.

I have two of these and only can use one. I added a small vise that is bolted on a block of wood and clamped in the vise. On some large projects I cut out fitted blocks just like the factory did 100 years ago. I am tossing in a spare vise that you can mount on a block and use it for knives and all sorts of things. One thing for sure, the workpiece won't be moving around as you engrave on one of these beasts.....plus it is a great piece of history for your shop.
I couldn't find it, or I would have posted a photo, but I cut a set of blocks to fit an old junker shotgun receiver and used to keep it in the vise for looks when not in use.
 

Attachments

  • gun engravers ball 001.jpg
    gun engravers ball 001.jpg
    64.9 KB · Views: 86
  • gun engravers ball 002.jpg
    gun engravers ball 002.jpg
    43.6 KB · Views: 87
Last edited:
Thanks Bruce. As you well know, you can spent $100 on a seven graver starter kit.
 
Thanks Bruce. As you well know, you can spent $100 on a seven graver starter kit.
I know, engraving is my next great adventure. I have a graver max but haven't tried it out yet. Can these gravers be fitted to the graver max?
 
Last edited:
All gravers come as shown in the photos. You then cut/break and grind the tip and shank to the shape and size needed for your hand and/or the type of power graver you use. All engraving books have the info on relieving and shaping gravers.

A GRS GraverMax will be good with these gravers. Many folks who have a GRS system get two gravers from one stock graver by breaking it in the middle. The GRS tools only need short gravers. The use of the GRS collets and handles/hand pieces makes engraving easier, as you just snap out and snap in a new graver tip as needed. I have a carousel of gravers for mine and do not have to worry about trying to get a little more use from a graver before re-sharpening. I put the dull/chipped ones on the lower portion and keep the sharp ones above.
Fitting gravers to a hand handle is the same process, and is the first section in most engraving books.

Either purchase a graver sharpening lap setup ( GRS makes a good one), or make one. Sharpening the gravers perfectly is the real secret of engraving. Dull or improperly shaped gravers are the reason many people buy engraving equipment and then give up on learning in a few months.
Also, you don't start out engraving a hunting scene with dogs and pheasants on a piece of 1095. Practice and practice until you learn the hand control. I suggest that you get about 50 pieces of 1/8" brass cut into 2X2" squares. Practice nothing but lines and then scrolls on these until both sides are completely used up on all 50. Then start doing a full layout with leaves and flowers.
If you are going to engrave steel, start with the brass, and when you have it down pat, make up 10 or 20 square pieces of mild steel ( 1030 or whatever) and start practicing on them.

For those who don't want to get a ball vise yet ( which is a really necessary tool eventually) you can cut the top off a 16# bowling ball and mount a small drill press vise to hold the work. Make a base ring from a 6-8" rubber wheel/tire with the rim removed ( harbor freight). Cut a 12" circle from 1" thick wood, and mount the base ring in the center, and set the ball on the tire. This isn't pretty, but works. Google "Bowling Ball Engravers Vise" for more ideas.

The beading tools and millgrain tools can be fitted to the small round wooden handles by drilling a proper size hole in it and making a press in fit. These tools are great for making background effects and details in engraving. Some people like to mount the millgrain tools in a longer handle and hold it just like a graver.

The pusher tools are for tapping down gold inlay into the channels cut by the graver. They can be used for many other things,too.

If you have a graver that isn't a shape or size you need or use, grind it into the size/shape you want. Small flat gravers can be made from extra line gravers, etc. You will quickly see that there is no thing as too many gravers.
 
Stacy, sadly I spent most of the play money I had left on an Airshield by Trend or I would have bought one of the kits. I still had a question, do you sell the Crocker graver sharpener by itself and would you recommend it to sharpen short gravers for my Gravermeister? (Haven't done any sharpening yet). Thanks.
 
Now that I think about it, I would also take a C kit if you could hold it for me until the end of September, beginning of October.
 
I might be interested in one of these. What would be a good starter book for an engraving beginner that you would recommend?
 
Paul, this is the reference as far as engraving books. I have it myself.

Art of Engraving: A Book of Instructions by James B. Meek
 
"A" kit goes to Frank

I'll hold one "C" kit for Patrice

PM sent to Unky Gumbi
 
Patrice,
I really recommend that you get the GRS Power Hone package if you can afford it. The QC sharpening jig and fine control of the power hone allow any graver shape to be made. It is especially good for the final relieving of the edge. To get the most from the Gravermeister, you have to have well sharpened, polished, and perfectly angled gravers.
However, since it costs 2/3 of the price of the Gravermeister, I can see why folks resist that. With a little ingenuity and about $400-500, one can buy the graver holder from GRS or ebay, get some laps from ebay, and build a simple sharpener somewhat like the power hone.....but unless you are good, it won't work like one.
A crocker is not really suitable for sharpening the GRS QC gravers.

As you have discovered, the accessories and gravers can surpass the cost of the engraving system several fold.
For those who are contemplating getting into engraving, the cost can run well over $5K by the time you get a good power graver and all the things you need.
Gravermeister ( or other system) $1500 , sharpening system and laps $1000, engraving ball $300-500, gravers $ 100-1000, handles or QC tool holders $100, trays and racks for gravers $50-100, microscope and light $500-3000, Engraving stand/bench/base $50-500, misc. supplies $100, ....etc.

These kits can be used to learn the basics with very little extra expense.
 
Thanks, Stacy, for the opportunity to give the engraving a try. I have had a spark for about 20 years and you made it into a raging fire. I did have the James Meek's book but gave it to a friend many years ago. I will get another. Frank.
 
Stacy, how do you have time to do anything? Between making up kits for newbie knifemakers, putting together kits like these, offering help and suggestions, making fancy dinners and whatever else. I don't know how you do it. Oh.. thanks though :)
 
Back
Top