Home Built Surface Grinder

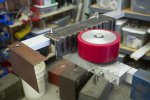
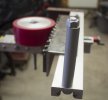
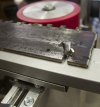
Exciting times. This build is very nearly finished! I ended up re-drilling on the chuck to make it straighter before I dress it on the wheel. This will help to not grind a lopsided amount off of one end. It will also make dressing go faster, I believe. I also added a wingnut to one side so that I can do tapered tangs (I am also thinking about how I could taper scales to a high degree of symmetry to make handle shaping easier). I came up with using some PVC pipe on top of the handle bolt, just to make an easier grip. I'm pretty happy with how that turned out.

After this build, I've decided that I should be done drilling aluminum for a while 🤣

Things left to do:
1. Bolt the 2x72 frame to the table
2. Surface grind the chuck (need to take off a bit of material to get closer to the magnets anyway)
3. Raise the shield a bit so that the belly of a blade couldn't ramp off the edge and fly across the shop if the wheel launches a blade
4. Mount a cheap dial indicator
IMG_3702.jpgIMG_3706.jpgIMG_3709.jpg
 
Exciting times. This build is very nearly finished! I ended up re-drilling on the chuck to make it straighter before I dress it on the wheel. This will help to not grind a lopsided amount off of one end. It will also make dressing go faster, I believe. I also added a wingnut to one side so that I can do tapered tangs (I am also thinking about how I could taper scales to a high degree of symmetry to make handle shaping easier). I came up with using some PVC pipe on top of the handle bolt, just to make an easier grip. I'm pretty happy with how that turned out.

After this build, I've decided that I should be done drilling aluminum for a while 🤣

Things left to do:
1. Bolt the 2x72 frame to the table
2. Surface grind the chuck (need to take off a bit of material to get closer to the magnets anyway)
3. Raise the shield a bit so that the belly of a blade couldn't ramp off the edge and fly across the shop if the wheel launches a blade
4. Mount a cheap dial indicator
View attachment 1655732View attachment 1655733View attachment 1655734
The slot for tapered tangs is great. Do you have a stop somewhere so you can always get back to the zero position that you used for surface grinding the chuck in step 2?

Be careful when you first start using it. I am a bit concerned about the strength of the welds on that chuck.
 
The slot for tapered tangs is great. Do you have a stop somewhere so you can always get back to the zero position that you used for surface grinding the chuck in step 2?

Be careful when you first start using it. I am a bit concerned about the strength of the welds on that chuck.
The top of the bolt hole is the zero stop.

The welds are amateur looking but I was pretty heavy handed with it. Should be plenty strong.
 
The top of the bolt hole is the zero stop.

The welds are amateur looking but I was pretty heavy handed with it. Should be plenty strong.
I think it would be more useful to have the stop on the other side, that way you can put shims in between to set the taper.

I don't know much about welding other than it's not as easy as it looks. Getting thick material like that to stick together is difficult for me and my tack welds normally don't hold very well. Just be a little careful with it and don't stand on the wrong side of it in case one of the welds breaks.
I'm afraid I don't really understand what you mean by it being more useful to put the stop on the other side. I'm having trouble visualizing the difference. Do I need shims if I can set the table angle to twice the first one for the tang?

That is a good point. I've never had issues with thick steel but I'll keep an eye on it. I always burn through thin steel though.
I guess it was not at all clear what I was trying to say. If you want to set your taper angle with shims, you need to be able to get the shims in there somewhere. I don't see a way to do that if the bolt is your stop. If instead, the edge of your angle iron bumped against a stop, it would be easy to just put shims in. I put a red blob in your picture symbolizing a bolt head that could act as a stop. On some SGA's, there are two stops, one at half the distance from the pivot than the other, so you can use the same shim and get double the angle. Of course, you can also use two shims of equal thickness.

hO4iSZA.png
 
I guess it was not at all clear what I was trying to say. If you want to set your taper angle with shims, you need to be able to get the shims in there somewhere. I don't see a way to do that if the bolt is your stop. If instead, the edge of your angle iron bumped against a stop, it would be easy to just put shims in. I put a red blob in your picture symbolizing a bolt head that could act as a stop. On some SGA's, there are two stops, one at half the distance from the pivot than the other, so you can use the same shim and get double the angle. Of course, you can also use two shims of equal thickness.
I think I understand now. I thought I could just slide the angle iron using the slot and tighten the wing nut to set the desired angle. I was under the impression that was how these SGAs work for tapering but I must have misunderstood.
 
I think I understand now. I thought I could just slide the angle iron using the slot and tighten the wing nut to set the desired angle. I was under the impression that was how these SGAs work for tapering but I must have misunderstood.
You can do that, it will just be more difficult to hit a specific angle. If nothing else, you can just clamp a temporary stop about where I drew it, set the angle with shims and then undo the clamp every time you need to set the angle for tapering.
 
You can do that, it will just be more difficult to hit a specific angle. If nothing else, you can just clamp a temporary stop about where I drew it, set the angle with shims and then undo the clamp every time you need to set the angle for tapering.
That's true. I'll have to play around with it and see what works. Thanks for the feedback!
 
Attempted to dress the chuck today. I'm thinking I need a 2.5" belt for dressing. Trying to track over the belt doesn't seem very accurate. I tried surface grinding a blade and it seems from my calipers that I'm within 1 or 2 thousandths already. I'll need to work with the SGA some more to verify those results, so I'm not ready to post pictures and call it a win just yet.

I ended up adding a stop pin after finally understanding why I need it.

Thanks to everyone for all the feedback and for posting your builds for guys like me to piggyback on. I had a lot of fun on this project. Using a different cross feed, I had to come up with some of my own solutions. I'm not sure I like the cross feed. It's a little wobbly even after adjusting the gibs. Doesn't wobble much if at all in practical useage though.

I also don't think anyone else has used angle iron to make a chuck so far. We'll see if that turns out to be a good or bad idea. Even dressing the face didn't really put much stress on the welds. You shouldn't be jamming the work into belt/wheel anyway. It'll stop the motor in my experience.

I like how everyone has put their own twist on these. Keeps it interesting.
 
Has anyone built this as a standalone unit? N Natlek built one https://www.bladeforums.com/threads/diy-surface-belt-grinder.1782558/post-20800235 and I'm considering it too. I have a spare single speed motor. My grinder doesn't go horizontal but built as a standalone I can have it horizontal with a heavy switchable magnetic chuck. The only thing I'm still thinking on is how to raise and lower the chuck, any ideas in addition to what natlek did? Also I would only be able to surface the middle section of the chuck since 4" is the narrowest I've found..
 
imill3567 imill3567 I've been thinking about trying build a stand alone with a solid steel wheel. Something like this may work? I'd love to see some more designs if anyone has done this..
I'm also thinking of steel or aluminum wheel. I've also considered whether it should be mounted direct on the motor or to a shaft with bearings and a pulley on the other end to the motor. I'm thinking that would work but also somewhat worried you'd be cantilevering all of the weight of the sliding assembly and chuck, right? A baseplate would be held in the jaws and sliding assembly mounted to that with enough space in the y direction to allow the slide to pass by?
 
What kind of grinder is it and how difficult would it be to make it go horizontal?
It's a Northridge Mod-E. It wouldn't be that hard to make a hinge for it like J. Keeton J. Keeton did or something else but a standalone unit could be more rigid I'd think not hanging out on a tool arm and wouldn't be more work or anything. Would be useful to have horizontal in general though...
 
It's a Northridge Mod-E. It wouldn't be that hard to make a hinge for it like J. Keeton J. Keeton did or something else but a standalone unit could be more rigid I'd think not hanging out on a tool arm and wouldn't be more work or anything. Would be useful to have horizontal in general though...
I am in the process of building a tilt-stand for my grinder. It is basically done, just need some mounting holes in the base plate and some corners need to be rounded. The grinder is a modified B bjansen design, pretty similar layout to the NRT. I used shoulder bolts and bushings for the hinges. With a contact wheel in the tool arm slot, it is perfectly balanced and I can change it from vertical to horizontal and back with my little finger.

I ordered a linear rail a few weeks ago and plan to start building an SGA after the holidays. Seeing how it took me almost two years to finally put the tilt stand together, it might be a little while before I get it done...

H4lw2Bd.jpg
 
I'm thinking this may work for moving the rail/chuck in the z direction for a standalone.
Not sure what kind of backlash might be present in one of these but it could be directly under the chuck which is what I'd like.
 
I'm coming back to this thread with a bit of an update for you guys. I have decided to rebuild my SGA to address a couple issues.

The 1st is that the z axis table I'm using is too weak for the weight of the slide and chuck and has a lot of flex, so I'm working on building my own (I'll post pictures this weekend) which is using 1/2" thread with two 1/2" guide rods, and it is extremely rigid so far. I expect that by the time I get everything put together it is going to be very stout and likely overbuilt.

2nd is the wheel. 75 duro is simply too soft an SGA. So to address that, I asked Sun Ray if they could make a 6x2.5" inch wheel out of just aluminum, and to my surprise, they said they can do it for $100. I'm wishing I had asked about an all metal wheel in the first place as it would have been better and cheaper, but I didn't know it was on option. I will however, be making use of the polyurethane wheel for grinding handles and other general work, so all is not lost.

Editing to add that I highly recommend Sun Ray for wheels, especially knowing now that aluminum wheels are an option. I love supporting small businesses that create USA made products, and the people at Sun Ray have been nothing but polite and fast moving. They get 5 stars from me :thumbsup::thumbsup::thumbsup::thumbsup::thumbsup:
 
“Editing to add that I highly recommend Sun Ray for wheels, especially knowing now that aluminum wheels are an option. I love supporting small businesses that create USA made products, and the people at Sun Ray have been nothing but polite and fast moving. They get 5 stars from me”


I totally agree. I’ve ordered from them a few different times over the years and their customer service is great.


Jeremy
 
First, thanks to everyone who contributed to this thread! I built the same unit as Stromberg knives, and have been very happy with it for a year or so. Until now I used it only for rough work, and didn't really need more precision than say 0.1mm across the piece. Flattening roughly forged billets, cleaning/thinning stock, etc. Now I would like to make some slipjoints with the washer construction (no mill yet) so I would like to squeeze out as much performance as possible. I will go to a disc grinder if needed, but I would prefer a nice parallel surface I can dial in on a granite plate and some hand lapping. (if possible)

Initially I had some play in my xy table and got pretty mediocre results. Variance on a 150mm piece was around 0.05-0.1mm, and the surface was very wavy. So I took everything apart, lapped the brass insert, tightened all screws, etc. Now I have no play in the table whatsoever. Next I will regrind my chuck with a fresh P120 belt just to make sure it is as flat as possible. Do I have to do something else for max precision?

So, how do I get the flattest surface with it? Fresh P120 belt, grit removed from the splice, and the steel ground after heat treatment? Or before? Can I get a wave-less finish, or just reduce them? Should I go higher than a ceramic P120? If yes, then with what kind of belts?

I figured I should ask before starting a never ending series of experiments only to find out that I got something fundamentally wrong 😅
 
Back
Top