Leather sheath advice.

Ken C.

Jack of all trades, master of none.
Staff member
Super Mod
Joined
Jun 14, 2000
Messages
15,393
Thanks to G2 and Lifter I am starting to make leather sheaths. :D
They have been coming out good so far. The only thing that troubles me is the sewing. I use the 1,3, and 4 prong chisels that make a wide line. The problem is that if I have to pound through 3 layers of 6-7 oz. leather the holes in the first layer are HUGE! Do they make a small, long, round set of chisels? Also, what size thread do you recommend and where can I get it?

Here is a pic of some I did the other day.
 
K.V.

I am an amature myself but I was tought a trick for making the stitch holes. I get a needle put it in my drill press and drill the holes with the needle. The pressure and the spinning needle go straight through. Sometimes smokes a bit. A soft wood backing also needed or some free space for the needle to get past the taper to the straight shank.
 
Ken, I just use a drill bit in my drill press with a block of wood for a backer. I stitch with 80 pound dacron line and use a 3/32" drill bit. You'll need to find the right size bit to match the line you use. I bought one of the little spiked wheels from Tandy that you use for hole spacing but it puts em too close together so I just got used to eye balling it. I do use a grooving tool that you can adjust how far it cuts the groove from the edge of the sheath. That way I know my stitching will be in the center of the spacer piece of the sheath so the blade won't cut it.
I put a leather sheath making tutorial together a while back that might help you some. Heres a link to the web page.
http://www.picturetrail.com/gallery/view?p=999&gid=727051&uid=516969&members=1
 
Just noticed that I forgot to upload the pic.
 

Attachments

  • cook sebenza sheaths_2.jpg
    cook sebenza sheaths_2.jpg
    33.6 KB · Views: 365
I use a method similar to those guys, mine is a nail with the head ground off; the hard part is making sure to go through square to the welt. I use a pounce wheel to mark the spacing, and run it inside a trough I scored in the leather with a tool whose name I don't know. Bruce Evans has a great tutorial on sewing sheaths that got me started.

Now I'd like to know any tricks for lining up the drill as it goes through so that I can make it come out square to where it went in; this is the biggest problem I have, my sewing line on the top of the sheath is nice and straight but sometimes wanders around on the back because I've let the nail go through at an angle...

Any ideas for eliminating or reducing that?

Thanks,
Dave
 
Tim Lively's new video "Knifemaking Unplugged, Vol. 1" showed a neat way to stitch.

They used a leather sewing needle chucked in the drill press. Without the motor on, they used the leverage to punch the threaded needle through the sheath. The thread on the back of the sheath was passed through the newly made loop, and then the needle was drawn up, locking the stitch. It looked pretty slick.

Buy the video! It's got alot of other great tricks & tips.
 
Use a scrap of plywood as a sled for your sheath on the drill press table.

Put one, two, whatever, thickness of leather scrap under the the sheath until the center welt lays parallel and square to the drill press table. Use the wood sled to move everything around while drilling, keeping the leather shims in place. This will keep the holes parallel as you work down the edge.

Or, like a friend who made holsters for decades told me, people think the uneven holes/stitches are a sure bet its hand stitched and he charges extra for this over using the sewing machine.
 
Good going Ken, keep stitching!

As to some of your questions, about keeping the holes lined up, you need to make sure you initially form the holes, I use a four prong and a three prong, three prong for going around corners or radius of the sheath. THEN once they are put in, I use that black handled what used to be a small screwdriver, I took and ground it down into an awl that I use to hammer through the leather, I've found that drilled holes sorta look like...well, drilled holes and didn't care for that look, this takes longer but I feel looks nicer over all. As you pound that through, keep the screwdriver STRAIGHT up to keep your line good.

In this pic you'll see the following from Left to Right
Four prong stitching tool
Three prong stitching tool
a quarter for reference
My Bone folder, when you hammer down the stitching tools, I press
against the leather to hold it STILL while I pry up the stitching tool
also that is what I use to form around the knives during a fitup session.
My Awl-n-Awl sewing tool with some thread laced through the small needle...
That black screw driver that I ground down into an awl
A leather awl, now that one has a diamond shaped blade, I use that one to open holes up to start the thread, also at the end of the stitching line, I'll use that to open up the second and third holes from the end to allow for the thread to be BACKED stitched for security.

So that's that...hope it helps!
 

Attachments

  • stitching.jpg
    stitching.jpg
    49.7 KB · Views: 605
I've been working leather years longer than high carbon metal, and as much as I hate to disagree with L6 who's given me lots of help, I will. Don't use a drill! If you really want holes get a hole punch. Neater and cleaner. The thonging chisels are for laceing, not stiching, as I've been told. This is not the only way, just the way I do things.
The stiching is almost the last step. After the sheath is glued and shaped (the grinder with course grit belt is a real labor saver) dampen the leather again. I don't like those tools that cut a grove for the stiching, just an indention made with a dull nail in what looks like an edge marker. Then use your stiching wheel to mark your stich spaceing. I like to start at the bottom because that's where spaceing is most noticeable. Finally you're ready for stiching the holes.
I use a broken ice pick chucked in the drill press with it running slow. It makes removing the punch easier. I've used a nail with success, the ice pick was just easier to shape. Don't be afraid to make a big hole like a 6 or 8 penny nail, because the next step will close up the hole. Dampen the leather again! Stich using two of the dull type needles pulling tight on every stich. Warning, this tends to make sore hands! Then with the leather still damp, or dampened once again, pound the stiching with a small mallet. You don't want to beat it to death. The idea is to return the leather tight around the stiches.
Slick the edges, touch up any tooling, color it and your done. I realize that it seems like a lot of steps but the result will look better for the effort. This is not the only way, or necessarly the right way, just what works for me.
Sorry to be so long winded. I can't seem to explain in words what it only takes minutes to show. I appolige for the spelling and typing.
Still learning, Lynn
 
well i am a bit of a
wise guy kidder.my question is if the video is about knife making unplugged. how do you watch the video? :p
 
K.V.:

Buy the books, buy the right tools, and do it the right way, just like anything else.

There's not going to be a lot of stress on the stitching in a sheath, usually. If you stitch the belt loop on the back, then you really ought to do it right.

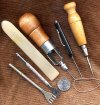
You use a proper awl to make diamond-shaped holes for the thread. If you look at leather needles for sewing machines, these also make the diamond-shaped holes. The reason for this is to keep each stitch from lining up with the next one, so that the stress points aren't all in one line. It adds a little strength, and may add several years' life to the project.

Buy, build, beg or borrow a stitching horse (or a stitching pony) and that'll help keep everything lined up. Tandy has some 1 and 3 prong stitching pliers that'll punch the holes. I haven't tried them, but they look like they'd do a nice job on thinner leathers.

I've tried stitching damp leather once or twice, but I don't recommend it. Leather tends to have soft spots in it, and if it's wet when you pull your thread tight, you can pull the stitch right out, where you wouldn't have on dry leather. It just depends on the thickness of the leather and the stitch spacing. As stated, the stitching is about the last step, and few things are more frustrating than having to scrap something in the final stages.

Overstitch wheels come in 5, 6 and 7 stitch per inch spacing and only cost about six dollars apiece. I use these religiously, and people often want to know what kind of sewing machine I have. Done right, hand stitching outshines almost all machine stitching, not to mention the wonderful layer of calluses it builds on your fingers. :)

Like I said, the pocket of the sheath won't have much stress on it, so the method you use there isn't necessarily critical. If you develop good methods from the start, then you'll be in the habit when something critical does comes along.
 
Originally posted by Lynn
I don't like those tools that cut a grove for the stiching, just an indention made with a dull nail in what looks like an edge marker.

I'm still torn on the grooving. I'd bet that the theory is explained somewhere. I'm curious now, so I'll have to get my books out and see. :)

The skin is the softer side of the leather, so I don't know if they groove it to remove the part that's most likely to compress and let the stitches loosen up, or if they're thinking that the skin will be the first to tear. On the other hand, I have to wonder if not grooving is going let the soft leather distribute the stress more evenly and keep it from tearing.

I cheat on the inside of the sheath, where I stitch the belt loops on, and use a little saw blade in the moto-tool to do my grooving fast. I like it nice and deep there, so the blade won't wear through the thread, and the little saw does a nice job.

I like the idea of the drill press. I'm going to get one and modify an awl to fit in the chuck, and use that to punch holes (motor off).
 
I want to thank you all for the great advice. Though it seems everyone has a different way of stitching I will take each into consideration for future projects. At the moment I am using the flat standard chisel and punching it about halfway through the leather. My next step is to use a small finishing nail in a drill to finish the rest of the hole. It works very well and the results great. I plan to buy some diamond chisels to replace the other ones I have.
 
The problem I have with the diamond shape awl is that it cuts the hole where the plain awl 'opens up' the fibers on the leather. They tend to 'heal', returning the leather to the origional shape and have less chance of tearing.
If you find the leather is inconsistant, as Burke2 has pointed out, it could be because of incorrectly tanned leather but is usually because I have not dampened the leather evenly. I have wraped the leather in damp towels to assist with the softing. There's a word for that process that escapes me right now. Senior moment?
I would encourage anyone intrested in leather work to get at least 2 books on the subject. The reason for at least 2 is the different openions that you will learn. Like I say, this is my openion, not the only correct answer. If what you are doing works for you don't change!
Still trying, Lynn
 
Originally posted by Lynn
The problem I have with the diamond shape awl is that it cuts the hole where the plain awl 'opens up' the fibers on the leather. They tend to 'heal', returning the leather to the origional shape and have less chance of tearing.

Could be. It could be like square nails and round nails, too. Square ones cut the wood, whereas round ones split it. The round awl might just be tearing the leather over a wide area, as opposed to making a clean cut in one very small area. But the main point of the diamond shaped hole is to offset the stitches slightly so they don't form a shear line.

Look at industry, though. They're not likely to go to the expense of designing a machine needle especially for leather if it's not necessary, or substantially better. Round needles work well in cloth, because you can part the threads and fibers, which are laid in neat and orderly. Leather is more like a solid mass.

Originally posted by Lynn
If you find the leather is inconsistant, as Burke2 has pointed out, it could be because of incorrectly tanned leather but is usually because I have not dampened the leather evenly.

It's often because of the way the skin wrinkled when the animal was using it, too. I usually flex a side of leather a little bit whenever I start to work with it, just to get a feel for where the soft spots are. Unless it's a sole bend, I haven't found one yet that wasn't denser in some places than others. The sole bends probably are, too, but they're so stiff that I can't really tell.

Originally posted by Lynn
I would encourage anyone intrested in leather work to get at least 2 books on the subject. The reason for at least 2 is the different openions that you will learn.

I agree completely. Never take just one opinion.

Originally posted by Lynn
Like I say, this is my openion, not the only correct answer. If what you are doing works for you don't change!

But never stop trying to improve. :)
 
I'm new to these forums and have seen a lot of discussion on this topic so I'm going to throw in my two cents worth. I've been doing leather work for forty years and I do it full-time as my business so I have little experience with it.

First suggestion is get the book " The Art of Handsewing Leather' by the master himself Al Stohlman. It's available from Tandy or the Leather Factory. Read it and learn.
Second I agree whole heartedly with Burke2 and Lynn, only minor differences in the procedures. Some of the differences from them and the book are due to arthritis so you can see I'm looking for the easiest yet best way of doing this.

Gonna be longwinded but here goes - like Lynn said it takes awhole lot longer to put into words.
1) Make and finish the face of the sheath whether a fold over or two seam.
2) groove the edge - all professional leather workers do the and it doesn't weaken the leather as long as you don't cut too deep. It will help keep your stitches even and helps set the stitches so they won't wear as easily. Even the heavy sewing machines have a groover attachment on them.
3) Use a stitch wheel and mark your stitches - for most sheaths (6-8oz leather - an ouce of leather is 1/64" of an inch by the way) I use a 6 stitch to the inch wheel.
4) Make a single hole punch from a diamond awl blade - polish it on the buffing wheel. Hammer punch all the holes in the face only - keep a block of beeswax handy and wax the awl frequently. This makes it punch cleaner holes and makes it easier to pull up and out. A slight twist is all it takes. Make sure you line up the flat sides of the diamond with the side of the groove - don't line up the points of the diamond down the center - this may lead to tearing.
5 )I make the back side nd welt of my sheath slightly widers than the face, so that way when I contact cement the whole shebang together the back/welt sticks out slightly. Use a belt sander with 80 grit and sand the edges flat and perpindicular, barely touching th front face. It's best not to sand until you've let the glue dry overnight.
6) Run your groover around the back side. Now chuck the sheath in a stitching pony or horse (the book above shows how to make a horse that can be clamped to a chair and if anybody wants I can email a copy. I can also send plans for a simple pony). If you glue some thin leather to the jaws of the horse/pony it helps keep from marking your leather. Now take your hand awl and using the holes punched in the face push your awl through the welt and back. Push slowly and watch the back side and if it starts coming out crooked pull back and adjust your awl up, down or sideways. After all holes punched front to back you turn the sheath around and push through in the opposite direction-this eases the hole on the back side.
7) Then LIGHTLY dampen the seam(s) and carefully run your stitch wheel up and down the punched whole. This helps even everthing.
9) For sewing I use the two needle method with unwaxed linen thread. I use 5 cord but if you want heavier (I don't see the necessity and I sew a lot of sheaths and holster and have never had one break out at the seams unless abused) you can get 7 cord. I get it from Mid-Continent Leather Supply 800-926-2061 ask for their catalog. The thread comes in about 1000 yd spool for around $35.00 and it will probably last the average worker a life time. For the 5 thread I use "0" size harness needles from tandy or if 7 cord get th e"00" size. To wax my thread I use a trick taught to me by an old shoemaker. I amke up my own version of "hard" wax. Take a pound of beeswax and a pound of pine pitch (you get both at Jas Townsend and Sons on the net). Melt them together in an old cockpit or double boiler (very flammable so be careful) and let cool slightly. Pour into some ice cube trays fro conventient sized blocks (after solidifying cool in the fridge and they'll pop right out). This mixture makes the thread 'stickier' so when you pull it up snug it locks into palce and won't bag. Don't yard on your stitches-just pull snug-firmly and evenly. I start my seam with two back stitches and end with 2 1/2 (back stitche th top thread three stitches and cut bot threads off on the backside.)
10) Tap over the seams lightly with a mallet or hammer. Then lightly dampen the seams and run your overstitch wheel carefully up and down the seams front and back. this evens and burnishes the stitches.
11) Sand the edges LIGHTLY with a worn out 150 grit belt. The take your edge rounder (#1 or #2) and round of the edges. I edge burnish by dampening slightly and use a piece of slick antler to rub vigorously.
12) Put on whatever finish you want and Voila your done!
Linen threadaonly comes in natural so if you want it darker cut off a hank and dip it in a shade darker leather dye. Then pull it through a soft cloth to clean off any excess and let dry.

Any way that's it.
Respectfully yours
Chuck Burrows
 
First off please excuse the typos in the previous post.
Second to prevent cuts/calluses on the little fingers take a pair of light weight buckskin gloves - best are those that have the tightener at the wrist and they should fit snug! Cut off the thumb completely and first three fingers just past the second joint.
Also forgot to add in the first post when using the hand awl keep the blade polished and use the beeswax Using this method I can punch through about six layers of 8 oz with relative ease.

Agai respectfully yours
 
Back
Top