New Wicked Edge Go WE60 & WE66 Obsidian

It always surprises me how having a critical opinion of a new product (or part thereof) is condemned by those who have a close connection to the said product.
There was a time when Clay would welcome all feedback and appreciate that someone was interested enough to contribute.
I was once considered as a Beta tester for Wicked Edge but would hate to feel like I should only contribute praise and not also point out some of the shortcoming's.
It all leads to a better product in the end!
 
No, he's acting like a troll. There's a difference between constructive criticism, and trolling.
 
You know, some people have weak grips because of old age, arthritis or whatever
Yes they do, and i should know i have had 2 operations on my dominant hand which caused severe weakness, and i have to have 2 more, but there is a good chance i will be deceased because of the waiting list. So yes, i am old with weak hands, before you start having cheap shots and making accusations find out about someone's situation. I don't ever recall having a go at you because you have a disability, so show me the same respect.
 
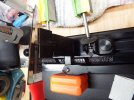
Thanks for posting some pics 000Robert 000Robert . Looks like a nice addition to Wicked Edge!

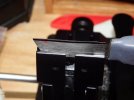
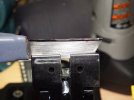
Question about the clamp - One side is attached to the base, and the other side moves freely to conform to blade grinds, if I understand it correctly. With a blade that has a lot of distal taper, I assume this means that the blade ends up sitting slightly angled in the clamp? If one clamp is fixed, and the other moving into position while clamping, my logic says that it will clamp slightly offset, can you see if this is the case?
 
Last edited:
Gentlemen, please stay on topic and avoid taking the thread down unnecessary byways so that we may avoid removing posts and handing out warnings, or removing posting privileges.
 
Thanks for posting some pics 000Robert 000Robert . Looks like a nice addition to Wicked Edge!

Question about the clamp - One side is attached to the base, and the other side moves freely to conform to blade grinds, if I understand it correctly. With a blade that has a lot of distal taper, I assume this means that the blade ends up sitting slightly angled in the clamp? If one clamp is fixed, and the other moving into position while clamping, my logic says that it will clamp slightly offset, can you see if this is the case?

I have not seen that. Both vise jaws are the same basically - one is fixed, and one is floating. You screw the top screw in until both jaws are snug against the blade, then tighten the blade down by tightening the bottom screw. The fingers of both vise jaws will flex the same as the blade is being tightened thereby keeping the blade straight up and down. All that the bottom screw does is tighten the blade, not move it.
 
With a blade that has a lot of distal taper, I assume this means that the blade ends up sitting slightly angled in the clamp?
This is an issue that has been around since the start, you are meant to visually be aware of this and counter act by eye.
Holding it as vertical as you can while adding tension to the jack (bottom) screw.
Many "packing" materials were recommended to also assist with grip, chamois etc.
The jaw grip "tip" design is new this time around with three fingers, when the first vices were made (in China), the vice tips would bend when clamped.

A new cam vice design was created as a solution, but added way too much to the cost for entry level customers.
So is only available in the more expensive models, this issue is well documented on the internet by many users.

Of course the new cam vice is now being adapted to the WE60 Go as we speak, as it's a very nice design and well made.
Even though some still complain of not being able to tighten enough.
It will be interesting to see how much it adds to the price, but well worth considering.
I'm keen to see if micro angle adjustment will be added to the new ball joint bracket system in the upmarket version.
 
To those that may not be aware of it, the new Wicked Edge WE66 Obsidian sharpener went on sale today! It is the complete sharpener with the DualCam clamping vise and the Micro Angle-Drive system for easy and fast angle adjustments.
 
000Robert 000Robert
the new Wicked Edge WE66 Obsidian sharpener went on sale today!

WE66, all I can say is WOW, it looks to be brilliant.
BUT, I would need to sell my house to then be able afford to buy one. ($799.00 plus $90.00 for the aluminum base, up from $275.00 for the WE60)

Dearer than the WE130, price prohibitive I feel.
 
Last edited:
000Robert 000Robert
the new Wicked Edge WE66 Obsidian sharpener went on sale today!

WE66, all I can say is WOW, it looks to be brilliant.
BUT, I would need to sell my house to then be able afford to buy one. ($799.00 plus $90.00 for the aluminum base, up from $275.00 for the WE60)

Dearer than the WE130, price prohibitive I feel.

I would imagine that the fallout from Covid has a lot to do with the price. Everything is costing more. But it's still all made in the USA. The WE60 is a very nice sharpener for those on a tight budget.
 
Here is a brief article that I wrote on the new Wicked Edge WE66 Obsidian sharpening system. I hope that yall like it.

Wicked Edge WE66 Obsidian


The new Wicked Edge WE66 Obsidian is here and she’s a beauty!
WE66-1a.jpg


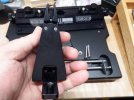
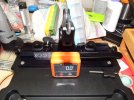
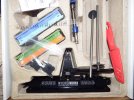
As you can see in the photo, the Wicked Edge WE66 Obsidian comes in obsidian black. I love the obsidian black color on the sharpener. The WE66 Obsidian sharpener came assembled and packaged well with two sets of stones; 200/600 grit stones, and 800/1000 grit stones. It also came with a vise key, depth key, alignment guide, practice knife, 8.75” guide rods, 2 ball joint shields, six o-rings, c-clamp, package of paperboard shims, a card with the QR code and URL so you can go online for WE66 instructions, and a nice Wicked Edge sticker.
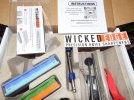

WE66-2a.jpg


In the photos I already have the ball joint shields installed on the guide rods using four of the supplied six o-rings.
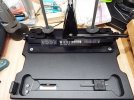

WE66-25a.jpg


The Wicked Edge WE66 Obsidian sharpener comes with the DualCam© vise and Micro Angle-Drive© slides. The Micro Angle-Drive ½”-16 standard thread adjustment screws are as smooth as butter with hardly any noticeable backlash.

The Wicked Edge WE66 Obsidian is designed to be a great sharpener that is light and compact so it can be used at home or taken with you wherever you go. Using the pre-drilled mounting holes, it can be affixed to a table or work surface with screws or to the aluminum base that you can buy from Wicked Edge. Or you can use the provided c-clamp to clamp it to a table or work surface.

I love the aluminum base that I have my WE66 Obsidian affixed to. It is a very nice base for the Obsidian. It has a special spot for the depth key and cutouts to keep small things in to keep from rolling around and getting lost. I know that I have the sharpener positioned wrong on the aluminum base, but I like it that way.

The WE66 Obsidian sharpener base measures about 9 11/32”L x 2 7/8”W x 29/32”H. The vise stands about 3 3/4” above the base. The Micro Angle-Drive screw knobs are about 10 ¾” end to end.
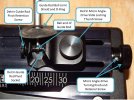

WE66-27a.jpg

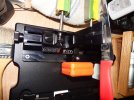
Above is a photo of the Micro Angle-Drive slide. The WE66 Micro Angle-Drive slide is attached to the Micro Angle-Drive adjustment screw using a nut and two screws that can be seen in the next photo. The Micro Angle-Drive locking thumb screw is a Delrin screw and only locks the angle slide in place.

The guide rod is still held between the Delrin guide rod pivot retention screw and the Delrin guide rod pivot socket as it is on the WE60. Without the guide rods or the plastic balls that come installed from the factory between the pivot retention screw and the pivot socket, the pivot sockets can fall out of the pocket that they fit into.

I put a drop of grease behind my pivot sockets and pushed them into their pockets, and they stay put very well. I’ve turned my WE66 base all around and even dropped one of the slides onto the platform base and the sockets have stayed put.

I like the fact that both sides of the Micro Angle-Drive slides operate independently of each other which facilitates utilizing asymmetrical grinds.
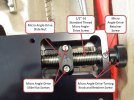

WE66-5a.jpg

You can see in the photo above how the Micro Angle-Drive slides are attached to the Micro Angle-Drive slide screw using a Micro Angle-Drive slide nut and two screws.

The Micro Angle-Drive screw retainer screw takes a 3/32” hex bit and the Micro Angle-Drive slide nut screws take a 7/64” hex bit. The Micro Angle-Drive screw knob retainer screw takes a 5/64” hex bit.

The slide lifts up about 0.1° when you tighten the thumb screw, but you can alleviate that by snugging the slide down enough to take the play out but loose enough to turn the Micro Angle-Drive easy, then tighten it down good after you have your angle set where you want it. It really hasn't been a problem for me.
 
WE66 Obsidian article cont.

WE66-6a.jpg

The DualCam vise attaches to the base with two screws that take a 1/8” hex bit - the same size as the small end on the supplied vise key.

WE66-12a.jpg

A side view of the Wicked Edge WE66 Obsidian DualCam vise.

WE66-28a.jpg

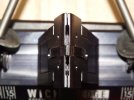
In the photo above we are looking down at the top of the Wicked Edge WE66 Obsidian DualCam vise jaws while closed. The DualCam vise jaws have one vertical slot in each side to aid in flexing around distally tapered blades and full flat ground blades.

The jaws are 1 ½” wide which is the same size as my WE130 vise jaws. The Low Angle Adapter, Scissor Attachment, and Chisel Attachment are compatible with the new DualCam vise jaws.

WE66-14a.jpg

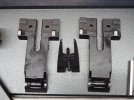
You can see in the photo above that the DualCam vise jaws are removed from the DualCam vise. You can see the vertically cut slots in the jaws and the urethane center piece that helps prevent dust and dirt from getting down into the inner working parts of the DualCam vise. I cut the fingers off of mine later to get better photos of the blades clamped in the jaws.

In the bottom of the DualCam vise jaws there are cutouts to receive the rotary cams that spread them apart when clamping a blade.

The DualCam vise jaws also only have one hole for the depth key. That is used for knives that are one inch or less from the spine to the edge. For blades that are more than one inch from spine to edge, just let the blade spine rest on the shelf at the bottom of the jaws.

WE66-29a.jpg

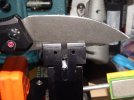
To check how acute of an angle that I could reach with the WE66 Obsidian I’m using my Kershaw Launch 1. It is probably about the average size of the knives that most people EDC. The blade is 3.5” long.

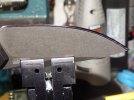
I clamped it in the jaw depth key hole at the rear of the spine and tipped the tip of the knife up a little bit. The blade is distally tapered and is right at 0.120” at the jaws toward the spine heel and 0.112” at the other end of the jaws toward the tip. That’s about 0.008” difference and the clamp holds the blade very tight.

The edge of the blade is a tad over 1” above the clamp at the heel side.
 
Last edited:
WE66 Obsidian Article cont.

WE66-30a.jpg

You can see in the above photo that I am able to get to 12dps with the WE66 Obsidian sharpener without the stones hitting the vise or the tops of the jaws. That is pretty good. The slide is almost bottomed out as far as it will slide inward.

For this article I’m using my own stones that I have that are already broken in well. I didn’t see a need to break in the new stones just for the article. But in this article, I do stick to the grits that are included with the WE66 Obsidian except for checking the angles. For that I’m using my 3000 grit stones.

WE66-31a.jpg

Here is a photo showing my angle cube zeroed on the base. I guess I should’ve cleaned my knife up better before I started taking pictures.

WE66-32a.jpg

In the photo above you can see the mark on the edge bevel of my Launch 1 where the 3000 grit stone rubbed off the sharpie at 12dps. I had previously reprofiled the bevels to 17dps.

WE66-33a.jpg

In this photo I have the supplied practice knife clamped in the WE66 Obsidian sharpener. I clamped it at the depth key holes with the tip at “B” on the alignment guide.

The edge at the end of the jaw toward the heel of the knife was only about ½” above the top of the jaws. Clamped this way I could only get to about 16dps before the stone started rubbing the vise jaws.

I would have to hold the blade by hand higher than the depth key holes or use the Low Angle Adapter to reach more acute angles. The Low Angle Adapter does not come with the WE66 Obsidian and must be purchased separately.

WE66-34a.jpg

Here is a view of the practice knife from the other side.
 
WE66 Obsidian article cont.

WE66-35a.jpg


In the photo above and the next photo I have my leather knife clamped up. It is a small full flat ground blade that is difficult to clamp in my Wicked Edge WE130 vise because it is so small.

Those of you that read my article on the WE60 know that it held my leather knife very well. The clamp on it is only 1” wide whereas the clamp on the WE66 Obsidian is 1 ½” wide like the WE130.

But the WE66 Obsidian held the little blade pretty good. I could turn it a tad from left to right if I twisted on the blade hard enough, but that is way more pressure than the blade will undergo by just sharpening it. It shouldn’t be a problem.


WE66-36a.jpg

You can see in the photos that my leather knife is not very deep in the vise jaws. Yet the vise jaws have the blade clamped good. The edge is about 3/8” above the clamp toward the heel. I could only reach about 18dps before the stone started rubbing the vise jaws.

I have to say that I love the Wicked Edge WE66 Obsidian sharpener. It clamps very well, and it is a lot easier to clamp than my WE130 is. The new DualCam vise in the WE66 Obsidian is a sweet clamping system and a definite improvement.

I also love the Wicked Edge WE60. It is more suited to the smaller blades but can also handle blades a ¼” wide or more at the spine. But it takes longer to clamp the blades up and to set the guide rod slide angles. With the WE66 you can clamp up and set up the sharpening angles on a blade very quickly.

So I guess which Wicked Edge sharpening system that is best for you will just depend upon your needs and your lifestyle. You can’t go wrong with any Wicked Edge sharpening system as far as I’m concerned.

This article was written by 000Robert – Robert Calk Jr.
 
Thank you, good article Robert, love the quality engineering and machining that WE is doing now.
Great design features, they have certainly come a long way since inception.

Price is the obstacle, but I see a market big enough to justify this.
 
In the US, not Australia though my friend, way too expensive here! ;)
As stated before i think, we don't have a big enough market for them and at the price, no way. I don't post here anymore, but enjoy reading your posts, so Have a Merry Christmas mate, take care and stay safe. 🎅.
 
As stated before i think, we don't have a big enough market for them and at the price, no way. Have a Merry Christmas mate, take care and stay safe. 🎅.
Same to you and on into the New Year!

We both know it's a luxury item here in Oz and to fully accessorize after the initial pain, costs a sheep station, and/or your left one! 🎅
 
Back
Top