-
The BladeForums.com 2024 Traditional Knife is ready to order! See this thread for details: https://www.bladeforums.com/threads/bladeforums-2024-traditional-knife.2003187/
Price is$300$250 ea (shipped within CONUS). If you live outside the US, I will contact you after your order for extra shipping charges.
Order here: https://www.bladeforums.com/help/2024-traditional/ - Order as many as you like, we have plenty.
You are using an out of date browser. It may not display this or other websites correctly.
You should upgrade or use an alternative browser.
You should upgrade or use an alternative browser.
Recommendation? Saya for wakizashi
- Thread starter Synov
- Start date
- Joined
- Feb 27, 2005
- Messages
- 8,284
I have been wondering the same and for the same swords. Google-fu is failing me because most saya makers are making them for Japanese kitchen knives or for traditional swords.
Your best bet would be finding a blacksmith that takes commissions and asking them if they're willing to make a replacement saya for you. It likley still be expensive but not as expensive as having a Japanese smith make you some.Can anyone recommend a saya maker for a modern/non-traditional wakizashi?
- Joined
- Feb 27, 2005
- Messages
- 8,284
Sayas are an exercise in woodworking, not blacksmithing. I've looked, there are not a whole heck of a lot of people just making sayas, and of those who are, they mainly fall into the category of those for kitchen knives, which are not constructed in quite the same way and obviously have a huge difference in scale, or for traditional swords, where the habaki is a key component in saya fit and where almost anyone who's good has all the work they can handle just with traditionals without having to deal with us yahoos with our fancy tool steels and our micartas.Your best bet would be finding a blacksmith that takes commissions and asking them if they're willing to make a replacement saya for you. It likley still be expensive but not as expensive as having a Japanese smith make you some.
Synov
Gold Member
- Joined
- Jan 21, 2023
- Messages
- 1,090
Thanks. I don't mind if it's expensive, I would like a nice one. I would prefer to go with someone in the US though.Your best bet would be finding a blacksmith that takes commissions and asking them if they're willing to make a replacement saya for you. It likley still be expensive but not as expensive as having a Japanese smith make you some.
- Joined
- Feb 27, 2005
- Messages
- 8,284
There are people who specialize in making sword sheaths for Western-style swords... but they're expensive. DBK Custom Scabbards makes medieval scabbards starting at $2,200.Thanks. I don't mind if it's expensive, I would like a nice one. I would prefer to go with someone in the US though.
Synov
Gold Member
- Joined
- Jan 21, 2023
- Messages
- 1,090
I think scabbards require a lot more work since they have metal and leatherworking. An unadorned wood saya may be even less work than a leather sheath.There are people who specialize in making sword sheaths for Western-style swords... but they're expensive. DBK Custom Scabbards makes medieval scabbards starting at $2,200.
- Joined
- Feb 27, 2005
- Messages
- 8,284
Yeah, I agree, I just can't find someone to do it, like you.I think scabbards require a lot more work since they have metal and leatherworking. An unadorned wood saya may be even less work than a leather sheath.

SimplyMinded
I'm Tolerated!
- Joined
- Oct 22, 2021
- Messages
- 8,548
Which modern sword? Is it custom?Can anyone recommend a saya maker for a modern/non-traditional wakizashi?
Synov
Gold Member
- Joined
- Jan 21, 2023
- Messages
- 1,090
A Carothers K20.Which modern sword? Is it custom?
toker
Basic Member
- Joined
- May 1, 2010
- Messages
- 4,887
That's going to be a really custom job and the maker will probably need to have the sword in hand. I'm in the same situation you are with the K20. I've watched numerous videos on how to make a saya and it doesn't look like a particularly difficult process. The problem is that I need a lot more woodworking tools than what I have. So I plan on working with my friend who does it professionally to make a more modern saya.
I'm still going back and forth on the design. Still debating if I should just buy a kydex or leather sheath from Cpirtle. His Pirate Steampunk design looked great, but it's sold out.
I'm still going back and forth on the design. Still debating if I should just buy a kydex or leather sheath from Cpirtle. His Pirate Steampunk design looked great, but it's sold out.
- Joined
- Feb 27, 2005
- Messages
- 8,284
You would know more than me, but isn't the fit of the saya in large part to the habaki? The K20 is a full-tang sword with a flat ricasso , so I was kind of wondering if a traditional saya maker would even bother with them.There are shops that sell replacement saya for Nihonto (inckluding Wakizashi) in Japan, But
their standard sizes are based on traditional types.
So not sure if a "non traditional" wakizashi would fit.
I believe the Habaki creates the seal between the saya and the blade. Although i dont know how specific the rest of the saya has to be to the blade, the sori (curvature) of the blade might also be pretty important. (other than length obviously)You would know more than me, but isn't the fit of the saya in large part to the habaki? The K20 is a full-tang sword with a flat ricasso , so I was kind of wondering if a traditional saya maker would even bother with them.
Synov
Gold Member
- Joined
- Jan 21, 2023
- Messages
- 1,090
I have reached out to some local woodworkers and kitchen knife saya makers and several have expressed interest. I'll let you know if any of them pan out. They could make a small fortune on the upcoming K20 pre- order. Maybe I'll get a referral fee 
Yes that is correct. I did not realize your non-traditional sword had no habaki. Sorry.You would know more than me, but isn't the fit of the saya in large part to the habaki? The K20 is a full-tang sword with a flat ricasso , so I was kind of wondering if a traditional saya maker would even bother with them.

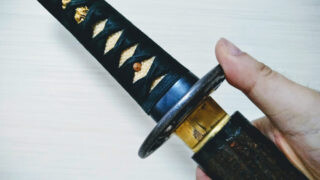
I see that there have been discissions regarding the Carothers K20 and making Sayas.
I assume the K20 comes with this, or similar Kydex saya.

Last edited:
- Joined
- Feb 27, 2005
- Messages
- 8,284
That's my picture, they don't come with sheaths of any sort. The kydex is by AZWelke, and it works pretty well, and certainly is fine for storage, but sword scabbards to knife sheaths are like swords to knives... There's a lot more going on in design and construction than just simply making it bigger. Nothing against Al or Chad, but I think swords really need wood-core, lined scabbards, and there are not many folks making them, and fewer still making them who don't already have full order books and plenty of waiting work for traditional Japanese swords or European swords by Albion.Yes that is correct. I did not realize your non-traditional sword had no habaki. Sorry.
I see that there have been discissions regarding the Carothers K20 and making Sayas.
I assume the K20 comes with this, or similar Kydex saya.
Oh that's your photo. And I had AZWelke make a kydex sheath for one of my Fallknivens.That's my picture, they don't come with sheaths of any sort. The kydex is by AZWelke, and it works pretty well, and certainly is fine for storage, but sword scabbards to knife sheaths are like swords to knives... There's a lot more going on in design and construction than just simply making it bigger. Nothing against Al or Chad, but I think swords really need wood-core, lined scabbards, and there are not many folks making them, and fewer still making them who don't already have full order books and plenty of waiting work for traditional Japanese swords or European swords by Albion.
So, does the Caiothers K20 ship with no sheath at all? If so that would be weird, not to mention kind of dangerous.
I didn't see any saya on the carohers website.
I agree with you entirely as to that sword just begging for a wood saya.
Last edited:
- Joined
- Feb 27, 2005
- Messages
- 8,284
They come a bit like Busse does. It's the best shipping for big fixed blades I've ever seen. Cardboard wedge goes around one part of the blade near the end to protect the blade, then the whole thing is zip tied by that point and the handle to a larger heavy cardboard backer that folds in half and is taped shut to help hold it in place. Then it gets laid on top of heavy bubble wrap with another layer of bubble wrap on top in the box, and there's a piece of plywood at the tip end of the box to prevent punctures if it somehow comes out of the zip tie and cardboard frame.Oh that's your photo. And I had AZWelke make a kydex sheath for one of my Fallknivens.
So, does the Caiothers K20 ship with no sheath at all? If so that would be weird, not to mention kind of dangerous.
I didn't see any saya on the carohers website.
I agree with you entirely as to that sword just begging for a wood saya.
For all the non-sword CPK that I've been around for, they come stock with Mashed Cat kydex sheaths and Tekloks.
Stacy E. Apelt - Bladesmith
ilmarinen - MODERATOR
Moderator
Knifemaker / Craftsman / Service Provider
- Joined
- Aug 20, 2004
- Messages
- 37,863
Synov -I thank you for reaching out to me with your request, but as I said in my reply, I'm trying to find the time to do the saya for the blades I already have finished.
Here is my suggestion for the basic process for making a saya. You can do this yourself, ... or give this tutorial to a woodworking friend and have him do it. I modified my tutorial a bit to make it work best for your K20.
WOOD -
Get a 2"/50mm X 1"/25mm X 24"/60cm board of Basswood (in the UK it is often called Lindenwood or Lime - any light and soft wood will work.) Alder is also suitable.
Sand the ends flat and smooth.
Put one centerline across the kojiri (tip) end, and multiple lines about 5-6mm apart across the koiguchi (throat) end. These lines don't need to be exact, they will just be for alignment in assembly.
On a table saw with a finish cut blade, cut the board in half down the center into two 1/2"/12mm slabs. Don't sand the newly cut surfaces. Leaving them as-cut will allow the grain to match as much as possible. It also makes for a better glue joint. The inside of this cut is where you will carve the channel. When rejoined the seam will be nearly invisible.
TOOLS -
While a saya-shi will have a bench full of specialized files and chisels, you only need a few basic tools to carve the blade channel. If you go slow and check often, you can get a good fit.
A wood straight end carving blade/chisel with about a 1/2"/12mm wide edge and a small to medium size fine-cut wood rasp or narrow micro-plane can do the job. I have also use a small X-Acto razor-plane. You may find what you need at a yard sale or pawn shop. The rasp and chisel need the shank bent in a relaxed "S" to raise the handle so you can push them down the channel. You can buy them this way or get a knifemaker/blacksmith friend to heat the shanks of straight tools and bend them. You could do it yourself with a propane torch and a vise. Just keep the cutting end cool to maintain the hardness/temper. You want any cutting tool edge sharpened very sharp and honed.
LAYOUT and CARVING-
Before starting, put a single layer of blue painters' tape on the blade surfaces. Trim it flush at the ha and mune. This will protect the blade's ji while fitting and give just enough clearance once the tape is removed.
Lay the blade on the cut side of one board with the tsuka against the end marked with the multiple lines and draw around it with a pencil. This is the channel area. Measure your blade and determine how deep the mune side must be carved. I believe your K20 wakizashi is close to hira-tsukuri, so the mune side will be the depth you cut down. The ha side will be only slightly relieved. Basically, you are cutting a triangle recess. Go slow and check the blade as you deepen the channels. To make this project easier, on a hira-tsukuri shape blade you only need to inlet one board. It isn't the perfect traditional way but works fine on a non-traditional blade. It is many times easier than making matching channels for a shinog-tsukuri blade.
When cutting the channel, leave a little extra clearance and length at the kissaki. An extra millimeter of clearance and about 6mm of length in the channel is good. This way the blade does not bottom out in the saya.
Again, as you shape the channel go slow and check often.
CAUTION - If you use any sandpaper in shaping the channel, you must blow out and wipe down with a tack rag on both wood pieces very carefully, as one grain of abrasive left behind can make a permanent scratch on your blade. Wash your hands, change clothes, and clean the work area before final glue-up!
Once the channel is cut in the board so the pair can be clamped together with spring clamps and the blade slides in and out snugly with the tape on it is ready for assembly. Blow it out one more time for peace of mind.
Remove the tape and lay the bare blade in the channel, marking a line around it 1/4"/6mm from the edges. Extend the lines past the kissaki to allow for a strong kojiri. Cut the channeled board on those lines on a bandsaw. Place the cut board on the uncut board, aligning the end marks, and clamp with medium tension spring clamps about every 6"/30cm. Double check that the blade will slide in and out as desired. If all is good, apply a light film of Titebond II glue along the edges of the channel piece and clamp to the uncut board and reassemble/clamp again, aligning the marks. (If Titebond is not available, only use a high-quality natural color wood glue. Never use epoxy, Gorilla Glue, or other types of glue.)
Slide the blade in and pull out. Wipe off any glue and reinsert. Repeat insert-remove-wipe off-insert until the blade comes out clean. Set the saya assembly aside and clean and oil the blade immediately. Double check the fit after an hour, inserting in and out maybe a dozen times or so. Clean and oil the blade again.
After the glue is fully cured, cut the excess of the other board following the curve of the channeled piece. You now have the basic saya block.
SHAPING -
Plug the open throat with a tightly fitting wad of paper towels. This will keep stray grit from getting in the saya.
From here it is rasping, planing, and sanding the massive block down to the required thinness. A micro-plane is a great tool for working down the saya, along with a medium rasp, and a very sharp small hand plane. 120 grit sandpaper is what you want for the fine tuning. Once you are getting close, switch to 220 grit paper. This is a nerve-racking time in making a saya, but going slow will get you there. I do not recommend using a belt grinder for anything but the basic rounding and reducing of the shape. Once rounded off a bit use only hand tools and sandpaper. If you are not skilled on a belt grinder, stick with hand tools all the way. After using a blet grinder blow off yourself and the saya well to avoid taking any grit to your work area.
Start by sanding the mune and ha edges smooth. Don't move them in much yet, they will move in as you do the final shaping. You need about 3mm/1/8" left along the ha/mune edges when all is done to have a secure joint between the two sides. Shape the sides evenly as you go and slowly bring it into the shape you are looking for.
Examine from both ends and sight down the saya as you go. This will hopefully keep you centered and spot high/low places.
TIP - Tapping on the saya with a fingernail, or tiny wooden mallet made from a couple dowels, will make a sound that can tell you how thin it is getting. The pitch will rise as the walls thin. You can tell thicker places by the sound and keep the thickness even as you reduce the size.
Once it is as thin as you want it, sand to the final grit - usually 400.
Clean the work are and yourself, then brush off and blow off the throat end. Remove the paper towels, blow out again, and check how it looks with the blade in it. If still too fat, re-plug the throat and do some more careful sanding.
FINISHING -
From here you can cover the shira-saya with thin leather or lacquer it as desired. Ther are some very nice looking and very thin garment leathers in many colors and textures that work well for this. Ostrich pattern is a nice one for sheaths and saya.
Going Farther_
On non-traditional blades with no habaki, I usually add a 1"/25mm wide inlay of 4-5 oz. vegetable tanned leather at the koiguchi. This allows for some degree of blade retention. Cut inlays in the throat channel and the mating area on the other board to seat the leather, so the blade gently slides in through them. Some folks oil this with a few drops of choji to lightly oil the blade as it goes in or out. Opinions on that vary, but I usually do it.
If adding wooden or horn ends at the koiguchi and kojiri, shorten the saya appropriately after the two sides are assembly but before the shaping. You can fit them after the saya is thinned and shaped before final sanding.
Final Comments -
While this was written about using a more traditional material, I realize many folks want a special wood for their saya. Try and avoid very hard woods or any wood that may have sand or gravel in it. Buckeye burl and other root burls would require a lining to the saya. Other woods have resins that are corrosive. You can line problem woods with thin vegetable tanned leather or felt.
Don't be too upset if you sand through the saya. It happens to all of us. You may be able to salvage the failed one by a covering with leather. If not, start over and be more mindful as you sand. Keep the failed one to measure against so you avoid the mistake again. Depending on where you sanded through it, the failed saya may be shortening for a tanto.