How To Slipjoint tutorials and advice

Joined
Feb 19, 2018
Messages
660
I would like to start this off by stating that i am no expert on this topic. In fact i have only made a few slipjoints at the time of this posting. I have been able to accomplish this thanks to the efforts of others sharing their knowledge and experience. I think since i have benefited from others so much i would like to offer my own learnings and encourage others to share as well. Hopefully after some time we have a detailed step by step tutorial with multiple ways to complete each process. I would also like to highlight any mistakes i have made to help others avoid the same. As of right now it is my intention to compile this information into a pdf with pictures and provide it to anyone who wants it for free. I will also provide my cad files. If anyone else posts tips and ideas here i will ask their permission prior to including them in my final document. Dont expect the pdf for a while as i still have alot to learn. If anything about this thread or my intentions is against policy here please let me know. If everything is good i will update this as often as reasonably possible. If anyone has any specific questions feel free to ask them here. I am hoping we can all learn together.
 
TUTORIAL POST #1
for my first real post I would like to recommend some materials I found very helpful. Without them there is no way I would have been able to complete my first slipjoint. I highly recommend you acquire them. All of these individuals have way more knowledge on this subject than I do.

First and foremost I would like to recommend the YouTube video series by AR custom Knives. I believe his username here is Drew Riley Drew Riley . Here is a link to part one of his video series:
. The videos are easy to understand and provide an excellent visual aid. I am very grateful that he took the time to make them. If you only have time to review one of these recommendations this is your best bet.

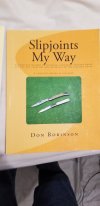
Next up is a book, slipjoints my way by Don Robinson. this book has tons of great info about every step involved. Some reviews on the book complained that it involved the use of expensive equipment. While Don does have a pretty sweet shop the book is useful to people with many different setups. the book is priced well and is worth every penny.

Here is a link if you live in Canada: https://www.amazon.ca/Slipjoints-My...=1542071052&sr=8-1&keywords=slipjoints+my+way

And here is one for the U.S https://www.amazon.com/Slipjoints-M...preST=_SX258_BO1,204,203,200_QL70_&dpSrc=srch
20181111_191211.jpg

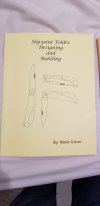
The next item is another book, slip-joint folder designing and building by Steve Culver. This book is invaluable if you want to design your own patterns. if provides information I have yet to find anywhere else. If you want to make your own unique designs this is a must buy.

Here is a link for Canada: https://www.amazon.ca/Slip-joint-Fo...eywords=slip+joint+folder+design+and+building

And for the US https://www.amazon.com/Slip-joint-F...8&qid=1542071496&sr=8-1&keywords=steve+culver
20181111_191209.jpg

Next up is a DVD, How to build a slipjoint by Chris Crawford. This video is useful because it provides some alternative methods to those from the books. I think if your short on cash the books are more important and AR Customs videos are free. However; this video series is great. If possible I would pick it up as well. Its great to have several methods for everything. I was able to use some of what each person had to say to come up with a process that worked for me.

Here is a link: https://www.knifemaker.ca/How-to-Build-a-Slipjoint.html (knifemaker.ca is a great place and deserves support I highly recommend them)
I will post a pic below I cant seem to add any more to this post

Last but not least is here on the forum. There is a lot of great info on individual topics. If you cant find something look around and I'm sure its here.
 
Last edited:
Sorry no pic of the DVD. If anyone really needs it let me know. For some reason I cant upload it at this time. If anyone else has some recommendations please post them below. my next post will be on materials and tools with comments about alternatives, cost and how necessary they are.
 
If posting any of these links is in violation of anything or if any of the authors want anything removed I will do so. It is not my intention to step on anyone's toes. If anyone has any concerns at all please let me know ASAP. If not I will continue on. Thanks again to everyone who has taken time to make these materials and to everyone who contributes to this thread.
 
Slipjoints are fun to make and challenging to do well at a high level.
I took a class from an ABS MS so I got up and running pretty quickly.

however I find slip joints require a very methodical approach, the order of operations is important and one has to know what the next operation is. At least this is what I have found if you want to be efficient at them.

Thus I'm also making up my own step-by-step guide with pics for myself.
Of course after some time, you no longer need such a guide but I need one now.

thanks for the info you posted
 
Cool, thank you for posting and sharing! I'm hoping to start on a slipjoint soon, and am ordering those books you recommended.

I'm going to send you a PM about those CAD files!
 
Slipjoints are fun to make and challenging to do well at a high level.
I took a class from an ABS MS so I got up and running pretty quickly.

however I find slip joints require a very methodical approach, the order of operations is important and one has to know what the next operation is. At least this is what I have found if you want to be efficient at them.

Thus I'm also making up my own step-by-step guide with pics for myself.
Of course after some time, you no longer need such a guide but I need one now.

thanks for the info you posted
I agree 100%. One thing out of order and the whole knife can be ruined. Hopefully we can all share our mistakes and find the best methods moving forward. In my experience if your going to totally ruin the knife it will be when you set the positions (open, halfstop, and closed). I plan to cover this in great detail because it has bit me more than once. It really sucks to throw out a knife you have hours into already.
 
Cool, thank you for posting and sharing! I'm hoping to start on a slipjoint soon, and am ordering those books you recommended.

I'm going to send you a PM about those CAD files!
Glad to here you got the books, you wont be disappointed. I emailed you my latest cad. I updated it yesterday to show greater detail. I plan to use this design for my tutorial. Feel free to use it and modify it however you like. I will make a post later today about tooling and materials. After that I plan to begin the tutorial. Hopefully others can weigh in as we go.
 
GET PDF FILE HERE TO PRINT TEMPLATES
UPDATED APRIL 12, 2019

Hello everyone,

Here is a pdf of my latest cad file. I cant upload a dwg file but if you send me your email I will get it to you (EDIT: I ADDED A GOOGLE DRIVE LINK BELOW WITH THE CAD FILE). The file is 1:1 so it is ready to be printed and used as a template. I am open to suggestions about the design and I am willing to change it based on feedback. If anyone is having issues with it let me know. In case you plan to you use it prior to the tutorial I will warn you there are three springs in my file. One is un-sprung and is used to set the stops and the other has spring tension. The one with tension is light blue. I have added a third spring that represents a rough profile. If you cut out your spring based on this profile you will have material left over in all the key areas. If you cut out the design spring you will have no tension. I will go into this in detail later. There are lots of ways to set the tension, this is just what I have come up with so far.

NOTE: ONLY THE CAD FILE HAS ALL THE DIFFERENT SPRINGS. THE PDF HAS THE ROUGH PROFILES. IF YOU PROFILE TO THESE DIMENSIONS YOU WILL HAVE EXTRA MATERIAL LEFT OVER IN ALL THE CRITICAL AREAS FOR FUTURE STEPS. IF YOU REQUIRE ADDITIONAL INFO LET ME KNOW. A LEATHER SLIP TEMPLATE HAS ALSO BEEN ADDED TO THE PDF. IF YOU REALLY WANT TO GET THE MOST OUT OF THIS I HIGHLY RECOMMEND DOWNLOADING DRAFTSIGHT AND LOOKING AT THE DWG FILE.
 

Attachments

  • TUTORIAL PDF.pdf
    2.8 KB · Views: 484
Last edited:
If and when you really want to wreck your head making slipjoints take up making
multi blades. Without the book by Terry Davis, and Gene Shadley I seriously doubt
I'd be making slipjoints today let alone paying my bills with it for the last 10 years.
Ken.
I can only imagine. any details on that book would be greatly appreciated. I would love to check it out.
 
Glad you found my tutorial helpful. There's a few things I probably could have presented better, and one of these days I would like to do another tutorial with some real editing and better angles. I just don't have the equipment just now.

At any rate, I think this thread is a good idea. I know there are probably quite a few more resources available now than when I first started learning to make slipjoints. It's good to see different perspectives and methods and find what works best for each maker.
 
GET DWG FILES HERE
UPDATED APRIL 12, 2019

Here is a link to my google drive. I have placed the dwg file there. Hopefully this works.
https://drive.google.com/open?id=1AoibZO2KvLfZlrjC682lOuLmtUGa4rmt
In order to use this file you will need draftsight (I am told AutoCad will work too). This is a free cad software that is very similar to autocad.
If the file is updated or modified during the course of this tutorial I will update it here. If you are unable to access the file send me a message.
 
Last edited:
Thanks,

Just ordered Steve Culvers book
 
TUTORIAL POST #2
The intention of this post is to cover tooling for the project. I will provide my opinions on each item. I invite others to do the same. Hopefully this post will help people get properly equipped to take on the slipjoint. Some items are nice while others are required. If I missed anything let me know.

OK, first up is a surface grinder. In my opinion this is the biggest financial hurdle involved in making slipjoints. I personally use an Oregon blade maker surface grinder attachment paired with my kmg. I am in the process of restoring a 50's vintage surface grinder, but I have yet to try it out. I do believe that Oregon blade maker goes by a different name now. I know these attachments can be frowned upon by elitists but mine has yet to steer me wrong. It is also nice to get a belt finish (no hand sanding required). This attachment is designed to work with their own grinders but it also works with my kmg, no modifications needed. I cant speak for other grinders compatibility but hopefully someone else can weigh in. The TW unit seems very nice as well but it is a lot more expensive. If you have room for a dedicated unit and you can source one this is likely the best option.
Here is a link to the attachment I use https://originblademaker.com/product/belt-grinder-2x72-attachment/
As with any Surface grinder you need to take small bites. There are certain techniques involved in using this to its fullest potential which I will detail in that part of the tutorial. I do imagine this can be done without a surface grinder but it will suck. Hopefully someone with experience can comment. If you plan to do this without one You will need a granite surface plate and some patience. You will need precision stock. It is paramount that both the spring and blade are flat and parallel, they also need to be the exact same thickness. If you can accomplish this without a surface grinder then your good to go, also I am scared of you. Anyone with that level of patience should not be messed with.

Next is the grinder itself (and lots of belts). Pretty much any grinder will do. Grinders are like trucks, it seems everyone has their favorite. I don't think you can go wrong with any brand name 2x72. you can get away with a 1x30 if you want. the slipjoint doesn't really need high horsepower. As with the surface grinder you could use hand tools. you can file the bevels and profile manually. I wont speak much to this because I have never tried it.

Bandsaw next. I have a 64.5inch saw that I like. I know others have used portabands with great success. I am assuming that if your looking into this you already have made some fixed blades. Nothing new here. If anyone wants more info on bandsaws I will expand this section. One piece of advice I will give is not to attempt to use a cheap wood cutting bandsaw. Get one that is designed to cut metal. Again, you can do this by hand if need be. You can use a hacksaw or an angle grinder.

Drill press. You will need to put holes in your knife. This, in my opinion is the first mandatory item. I will explain why later on in the tutorial. Luckily you don't need an expensive machine. I use a WEN drill press that I got off amazon, delivered to my door for about $100 CAD.

123 Blocks. Also mandatory in my opinion. These are cheap. Get some, you will find a million uses for these.

You will need some drill bits as well that are specific to this project. Luckily to complete the knife in the CAD file you will only need 2 sizes (3/32" and a #41). This is directly out of Don Robinsons book. I will elaborate later, but basically 3/32 is .0937" and a #41 is .0960. These two sizes allow you to counterbore for peening at the end as well as give you a little extra room in your pivot. If you read his book he explains it well. Get a few of each. High speed steel is fine no need to splurge for carbide. I sourced mine from McMaster Carr. If your really a perfectionist you could get a 3/32" reamer but I don't think it is necessary.

A RFI (rise and fall indicator) is nice to have but not required. you can make your own (refer to AR customs videos) or purchase one. I elected to purchase one from USA knifemaker. Theirs is great because it has the ability to simulate spring tension. I will explain this in the tutorial. It will save some time and makes the overall experience more enjoyable.
here is a link https://usaknifemaker.com/rise-fall-indicator-premium-knifedogs-brand-tool.html
This indicator is designed to work with the 3/32" pins used in this build. No modification required. It may seem expensive but this is not a mass produced item. Also USA knifemaker is awesome and deserves support (in my opinion).

A set of calipers couldn't hurt. Not mandatory but nice to have.

A small ball peen hammer. Don Robinson recommends 1/4lb so that's what I got. Knowing what I know now I would say that any small hammer will work for this.

Optical center punch. This is required. Your holes need to be bang on and this is the best way (short of a milling machine) to accomplish this that I am aware of. I have a cheap one that I got off ebay. expect to spend $50 to $100 for a basic one. If anyone knows a workaround let me know, but as far as I can tell if you attempt this without one it could be frustrating. For the sake of your sanity I would get a cheap one.

Files. Get files. you will need at least one flat file and one small triangular file. You get what you pay for here.

OK, im pretty sure that covers the tools specific to this project. (im sure I missed some, I will edit this post as needed)
 
Last edited:
Back
Top