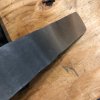
Takedown Damascus Bowie WIP

Joined
Nov 15, 2005
Messages
1,201
Hey guys, I'm working on this bowie and figured I'd post a WIP... Sounds like fun. This is my first take down and my first raindrop damascus... so if yall see anything that I should be doing differently let me know! I'll probably be asking some questions to you pros during the build.

This is my initial design... I think I'm going to extend the guard lower past the edge instead of being even:

zI2X2tbl.jpg


I'm going to be using 1080 and 15N20 for the damascus. Here I'm cleaning them up on the SGA:

thMJodcl.jpg


cXiq8hzl.jpg


N6qPOexl.jpg


13 layer initial stack:

i9kWUeWl.jpg


sLcXzBJl.jpg


E6CMi29l.jpg


YxXX7hFl.jpg


6pfydV6l.jpg


fpx21qJl.jpg


E7NDzu1l.jpg


qqsX48Kl.jpg


zeb5YJTl.jpg


52 layers:

YWVuwwUl.jpg


KrCEokIl.jpg


wvqhsjol.jpg


d1zfzXll.jpg


yuM0TwZl.jpg


s7uj39Il.jpg
 
208 layers:

4tE2kk6l.jpg


AW1mEkAl.jpg


1/4'' holes:

ZQGl9rql.jpg


b5hPOPnl.jpg


jOlykjvl.jpg


MlBhDhDl.jpg


DH0cRAml.jpg


This is a little thinner than I had planned........ may need to cut and stack again to get the thickness up

8ThGpjql.jpg


Especially since I can still see circles.... Gotta keep grinding this piece I think:

5Vp2ZCll.jpg
 
Some thoughts and musings..... please chime in if yall have opinions!

1.) I was originally planning to have a spine between 0.225 and 0.2500 in thickness on this blade... Since my billet right now is 0.24 and I have to still clean it up some more on the grinder, and forge the blade; I think I'll have to stack it one more time (in half) what do yall think about this plan?

2.) For a person like me, with low forging skills, what target size stock should I start with to forge my blade? (~8'' blade, ~1/4'' spine, ~1-3/4'' wide target blade)

3.) I'd love to hear some "steel conservation" tips while making damascus. (techniques, tools, SOPs, etc). I think, and correct me if I'm wrong, that forging to a uniform thickness is a game changer in the amount of material that needs to be ground in between stacks. I spend a great deal of time on stack #2 and #3 with my kiss blocks getting the billet uniform, and I feel like this minimized the amount of material I needed to remove. Any other tips?!

4.) Semi-related question to #3: Do yall clean up the edges during stacks? I have been (as you can see with the picture above with the magnet holding the stack)


Cheers,
 
Following with interest, I enjoy your videos they are informative and helpful.

It doesn’t seem right to cut and stack after you made your rain drops. But I’ve only made a handful of Damascus billets.

I think I’d take the finish up a to 200-400 and etch to get a better look at the billet and those circles, but would probably forge it without doing another stack.
 
From my meager knowledge 'n experience I agree with both of the above. I've tagged this thread to follow and see what folks say. It seems like the pattern should be the last step before final grinding. I don't think I would stack again, it's .2" which might clean up I'm not going to offer any advice because I have such little experience - I'll follow the thread to learn from the experts.

Don't you just LOVE your press :)
 
3: Do yall clean up the edges during stacks?
Sometimes (depending on my mood, mainly), but there is a significant benefit from grinding all edges flush, especially when using a press for forge-welding.
Anytime you do forge-welding when the pieces aren't exactly the same, unless you are extremely careful and skilled, you will get cold shuts/scale lines along the seams. And never think you can forge out a crack or seam, you will only be able to forge it deeper into the billet. So grinding all pieces flush will help minimize these seams. Any this is more important (IMO) when going for mosaic-type patterns opposed to the more random patterns.
Lately, I've been grinding my initial 15-25 layer stack of 1080/15N20 clean on all sides, but not subsequent cut and stacks, because in the initial stack, I could end up with 24 cold shuts or seams, but the rest of the stacks will only have 2-4.
what target size stock should I start with to forge my blade?
Totally dependent on your abilities and tools. The larger the starting stock, the more material you have to move around. The smaller the stock is, the more risk you have of not having enough....
Personally, I worry more about what the final forging size should be taking into account thickness losses from scale, forging marks, etc. Lately, it seems like my pieces lose about .015" per side when going from the anvil to the surface grinder to give me true flats. That usually takes care of all decarb for the pattern as well.
I'd love to hear some "steel conservation" tips
-Keep a reducing atmosphere in the forge during the entire forging process to minimize scale formation
-Be extremely diligent with brushing scale off the billet and your press and anvil
-Make stick tang knives instead of full tang ;)
It doesn’t seem right to cut and stack after you made your rain drops.
According to Jim Hrisoulas in his book "The Pattern Welded Blade", his technique is to drill holes, flatten, cut, stack, re-weld and then drill holes a 2nd time before forging the profile for a raindrop pattern. I haven't used his method, only drilling the holes at the end. I bet it would look good if you doubled your billet, and maybe even drilled a few more shallow holes? (if you have enough material, that is).
Another thing I've done on my last few raindrops was to use 2-3 different drill bit sizes for the holes and I like that.
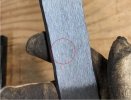
Especially since I can still see circles.... Gotta keep grinding this piece I think
Is this what you're talking about? The edges if the drill holes?
5Vp2ZCll.jpg
If so, I'm not sure I'd worry about that, especially if it looks like that will go away during your final grinding. One way to minimize this is to chamfer the drill holes to relieve the hard corners just like you do with a ladder pattern.
 
Last edited:
Thank you BillyO for your advice, that's why I'm following this thread. I'm learning.
 
Thanks everyone for the advise and tips!

AVigil AVigil I'll that that to heart and target 3/16ths on the thickness. Nice thing about that is that I think I should be able to start forging the blade from this current billet without the restack

K Ken H> The press is amazing!

weo weo The flush grinding does seem like a good idea! And thank you for all your tips in your post above. I'm going to attempt to "forge thick, grind thin" due to my lack of forging skills and my desire not to mess this one up. I think I may take off a few more passes on the SGA before I start to see if I can minimize the circles a little. The depth of the holes was not deep enough for my counter sinks to engage I need a bull nose version next time.


Good news is, I think, that I have a solid and large enough billet to forge the blade from! So that's a win. :)
 
In your sketch on the right side the sketch shows what is almost an open space where the ends are folding over. That illustrates my experience - if a stack has "dips" between layers it's really easy for a shunt in the weld to happen. Perhaps not every time, but sometimes. I find it better to use a smooth ground flats so there is no space between layers.
 
Looks good! Nice job on keeping the drops relatively circular during the forging. (Not sure if you saw the pics I posted somewhere a while back of using my drawing dies to stretch out a raindrop billet and ended up with ovals.)
 
Looks good so far...waiting impatiently for the final pics.
 
That's one of the best things about forging damascus, watching the pattern in the heat as you forge! 😁

I know, it’s kind of your own little sneak peak of what’s going on that no one else gets to see.

It’s also pretty fair to say a lot (I’d probably venture to say the majority) of pattern damascus is forged into billets then cut and ground to shape purposely as not to distort the pattern created.
 
  • Like
Reactions: weo
I'll agree with a lot, but I'm not sure about "the majority"...it all depends on what pattern/effect one is going for. There are many folks like me (I hope) that prefer blades where one can see the how the forging manipulates the pattern, even better when the pattern relies on the forging.
 
Back
Top