A look into the Sarki's art...

Ferrous Wheel, thanks for your kind reply. Two things (between ourselves) that will interest you: Firstly, referring to your remark at the top about your being a technical writer, I myself teach Technical Writing as a subject at my College. Secondly, our motto compares with yours in a ferrous sort of way: FERRO AGENDUM EST. Stay well.
 
Hi, Johan! Sounds like we have much in common! I will post pics soon, and I'm getting ready to send my scanned notes to Uncle Bill to post. Still writing my dissertation on the whole process, but this will show some of my design ideas.

Keith
En Ferro Veritas
 
I can't tell whether you guys are going for authenticity or improving what the sarkis (and many other cultures) did for a long, long time. It's just wood shaped and burrowed out and covered with a local leather. The leather on my pieces has varied from goat, to water buffalo(cow or caribao) to elephant and I'd bet there's even some rhino floating around too.

I have had a couple of kukris with just the wooden scabbard left and it always amazes me that the wood is thin and the knife fits so perfectly. They did a helluva job.

I don't know if the tape is still produced, but Gurkha House made an excellent film called "Gurkha Steel". There is a bit on the sarkis and it's all pretty crude stuff using a kukri to do the outer shaping and a gouge to fit the knife. It's an excellent piece of work showing the making of a kukri and worth having. www.gurkhahouse.com
 
If ever there was a videotape that I have viewed many times over, then it's the one referred to by John. It leaves one astounded at what the kamis and sarkis achieve using the tools available. It all points to one thing, CRAFTSMANSHIP (coupled with tradition). That's why it's worthwhile to collect and study kukris. (I don't really think you will be able to get that tape anymore, though...)
About improving on the work of the sarkis: I have found many instances where the work of the sarkis (and the kamis for that matter) have left something to be desired. But I think that is understandable because human beings vary in their ability, and the circumstances under which they work are not always favourable or identical. I have a number of khuks in my small collection, and I can place them in order of perfection. (My best one is a beautiful 18 inch Ang Khola with engraved buttcap.) But I am in the fortunate position of having seen, studied and handled an truly ancient khuk of exquisite beauty, of which the craftsmanship has left me utterly astounded. Fact: the work of the kamis of generations ago, is generally better. The kukris are better finished, the sheaths are more perfect and much lighter. Maybe it's unfair to compare ancient khuks with modern ones. But that's only my 2 cents worth.

(For those interested in khukuri accoutrements: I received two identical modern India-made khuks as a gift from a friend in the USA. They look much like genuine SN1's, or BAS's. I had a wooden shield made for them, and attached them crossed on the shield with blades pointing down and chos pointing towards one another. Between the handles I affixed a plastic-laminated colour photocopy of a drawing of a WW II Gurkha soldier wielding his khukuri. At the bottom of the shield I fixed a little silver plate with the date and name of my friend who sent me the khuks. It really makes a wonderful display on the wall of my study!)
 
Sounds like you got the goods.

Don't ever let 'em go.
 
Hi, all:

I've got my notes and some pics of the finished YCS scabbard, scanned and ready for posting. Uncle Bill, can you post if I send them? Right now they are .BMP format, but I could convert them to .JPEG for space saving.

Anybody willing to post if Uncle can't?

Keith
 
Email sent, some pics from my redesign of YCS scabbard. I'll explain them after they're posted.
Thanks!
Keith
 
...some pics from my redesign of YCS scabbard. I'll explain them after they're posted. I can also include some design notes, if anyone is interested.
Thanks!
Keith
---------------------
*The Lay-flat design worked like a charm.
*I used the wooden form, but discarded the wooden flap from the tool keeper, as much of the width of the rig came from that.
*I made it a 'lefty' rig, with the option of switching the frog around for righties.
*Painted the sheath with acrylics to match.
*I used a seam around the entire edge of the sheath
*I lined the throat of the sheath with rattlesnake skin.
 
I'll get them up asap. Just got a couple of hundred pounds of khukuris in via DHL so we're overloaded.
 
Eeexcellent! (rubbing hands together in an unavory fashion)

Any Dui-chirra models??? I'll keep my eyes on the PGAs...Villagers?...Buddy lookin' fer a villager.

Keith
En Ferro Veritas.
 
I'm too busy resizing and posting your pix to look and see what we got. Here's first pix. Probably not in order.
 

Attachments

  • keith1.jpg
    keith1.jpg
    25.2 KB · Views: 515
Hi, All:

Let's go thru the pics that Bill has posted. Thanks for you time and effort in this endeavor, Uncle!

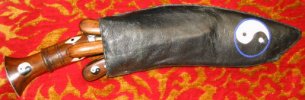
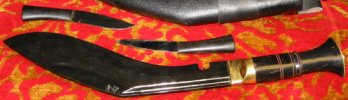
Pic 1: A shot of the throat of the YCS sheath, reworked. Note the rattlesnake skin at the throat, and further in, you can see the black kydex liner. The tool keepers are detailed in pic 4. Also note the diamond and yin/yang pattern on the face of this scabbard. This scabbard is made for lefties, like me.

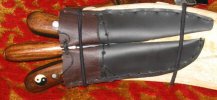
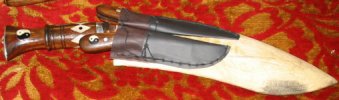
Pic 2>: A pic of the back of the YCS scabbard rework. Frog removed to show the way the tools line up under the leather.
Note that the two kardas fit in spine-to spine, as opposed to the normal alignment. The Awl fits nicely between the kardas, so I decided it didn't need its own sheath. Pic 4 shows what this tool keeper section looks like before adding strapping tape and final leather cover.

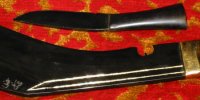
Pic 3: The BONUS pic! This is a close up of the 18" Sher AK that I just blued it its entirety, along with the matching karda, also blued. The blueing took so well to these pieces that they are really black. Note the gold gilding in the sword of Shiva. Inner part of cho is also gilded. Looks good at night!

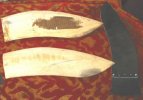
Pic 4: This pic shows the basic construction i did for the tool keeper section of the YCS sheath. Each karda gets it own mini-sheath of kydex with a leather collar sewn on. First sew the leather to the flat kydex, then bend it around the blade for sizing and do the long edge sewing. I then sewed the collars of the sheaths together, and the awl fits snugly between and under the karda sheaths. Then take strapping tape or duct tape, tape it in place on the wood scabbard forms, and sew on your outer leather. See Pic 8 for wider view.

Pic 5: This pic shows a few of the elements of the scabbard. The top wood form is showing the inside of the sheath, in which I noted some cardboard glued into the sheath. The bottom woood form is the outside, and you can see the indentations from the sarki's tooling of the old leather. That became the back of my lefty sheath. The black thingy on the right is one of the kydex scabbard liners, with a leather throat tab attached. I dropped that off in favor of rattlesnake skin, tho. The kydex is attached by nylon thread to the throat of the scabbard, under the snakeskin.

Pic 6: BONUS pic! This is a full shot of the 18" Sher AK I blued and gilded. Karda also Blued. I did this to prevent/slow rusting, as I use this one a bunch. This one cuts coins and other metals with ease! This was sold as a blem, and true to Uncle Bills word, the grain lines never went anywhere. I tried to get this khuk tofail, but to no avail.

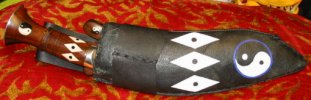
Pic 7: A front pic of the finished custom YCS sheath. Note the nylon thread on the frog, as opposed to the lacing. I did this because the redesigned sheath was too small to use the original frog, so I essentially "took in" the waistband of the frog to fit again. Proof that the redesign lowered the profile of the sheath! Note that I matched the diamond&yin/yang pattern on the handle in acrylics on the sheath. That old leather sucked the paint right up.

Pic 8: A wider view of elements in Pic 4. You can see the spine to spine karda mini-sheaths, and how they will align on the scabbard. After laying these out, I just warpped the whole sheath in strpping tape to check the fit, then did the leather over that. Strapping tape is excellent stuff for this. Even if the adhesive fails, you've got fibers wound all around the scabbard, much like Filipino scabbards.

Well, that's 8of10 pics that I sent to Uncle. I the others show up, I'll discuss those too.

I have BMP files of my design notes, if anyone is interested. I may try to get them in JPEG so I can send to Uncle, but they're pretty big files.

Keith
En Ferro Veritas
 
Thanks Ken and Bill for the pix.
Cool job!!!
The whole concept is really nice and your pix are a great help!
Kydex is hard to find over here so I will have to do the mini scabbards in leather. I'm not to enthusiastic about the taping part, I'm working with thicker leather that I wet and then stretch over the wooden core, so I may proceed in a slightly different way there:
1) tape the tool holders to the core. 2) stretch the leather over the core with the tools holders in place. 3) once the leather is shaped, stitch the tools holders to the leather and cover the core.
I have the procedure in my mind but I will have to try it, if it doesn't work I will go by your system.
Ciao
Fausto
 
Back
Top