Leather Pouch Sheath Dimensions - Critique Wanted!

Joined
Nov 15, 2005
Messages
1,194
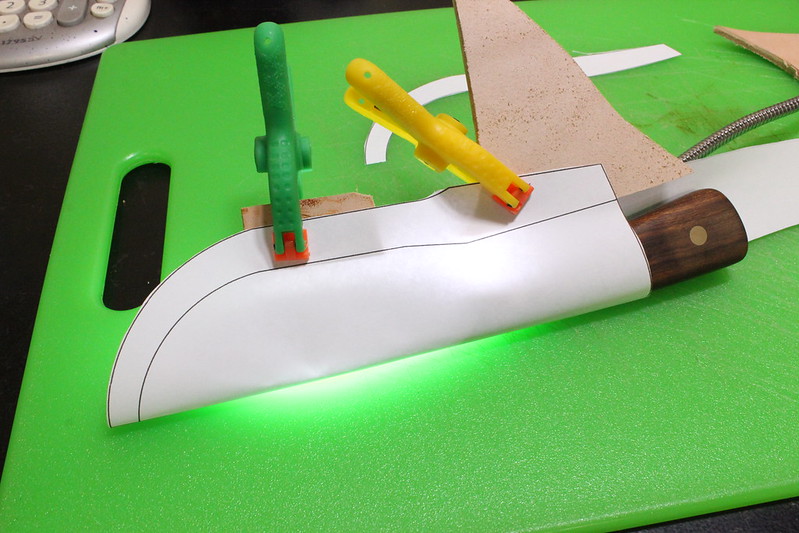
So I'm planning on crafting a leather sheath for this knife!

Knife distentions (PDF) here:
https://www.dropbox.com/s/xxf2gyypusejfeo/JKeeton - Skinner.pdf?dl=0

I was wondering if you pouch sheath makers have some rules of thumb for things like:
  • Distance between template edge and welt
  • Welt retention section spacing from template
  • Distance between template spine and center line
    • Based off leather thickness for the fold?
  • Pocket size for the handle
Thanks for any tips!
JKeeton

PS: If the answer is: Try it out then adjust the next one... that's fine; I'm just looking for the best possible starting point to reduce iterations!

This is the design I currently have speced out.


Whole Layout:


Handle Section:


Belt Loop Section


EDIT:

I meant to have this picture as well:

 
Last edited:
After working in an art studio since before computers, I always cringe when I see measurements with decimal points, like 4.1550.
:D :D :D
They sure are hard to find on a ruler!

You'll have to print that and cut it out to see if it fits.
What I usually do is trace the face of the knife, then right next to it lay the knife on the paper edge up and trace that. Then right next to the second tracing, trace the back of the knife. It'll look like a mirror image with the edge on view in the middle.
Once you cut that out, with a little extra all around, for sewing and glue, and you have your template. Tape or glue it shut and see how the knife fits. Maybe tape the edge of the knife too :)

A template for the inside of the sheath. If you trace it to the outside it'll be too small.

It's some trial and error. Used manilla envelopes are cheap as are heavy brown paper bags. Mess it up and make another.
After a while you get the hang of it and get darn close on the first try.

I once had a new age Art Director give me measurements of an existing box that I was going to dress for him.
As they were written:
"18 inches + 1 big line and 3 little lines"

Not picking on you JK, I'm just an old guy who spent over 40 professional years with a ruler in his hand so I see the world a little different.
 
What Ebbtide said. Make the mock up first. As far as clearance goes I want about 3/8's of an inch, (I'm old like Ebbtide) between the cam on the welt and the widest part of the knife that has to travel past it.

h6A5cKP.jpg


I want the total distance between both black lines and the the widest part of the knife to be about 3/8's. Certainly some guesstimate based on experience but in that neighborhood. Ya get this right and this is what ya get:

https://www.instagram.com/p/BtKcsUfjAeM/

When your customers are doing this for a living:

q50tFx2.jpg


And this on a day off, (look above his left front pocket), retention and getting the sheath right is important.

FtNZ4dx.jpg


I commend ya for asking how to go about this, You are well on the way and those first couple of sheaths look great.
 
Ebbtide Ebbtide I'd take the effort to change the default settings if I were say presenting this in a work environment or if this were used in a program for mass consumption, but for me working on something at home it doesn't bother me. Obviously I won't be trying to nail any of those numbers. I won't even annotate it on the final. The annotation was purely for this form post. I was just drawing it so that I can print it out. :D

Thanks for the tip about laying the knife edge up!

I drew that into the template (See below). Looks like I'm pretty close! Maybe a little tight on the retention portion of the welt (0.1''). Horsewright Horsewright had mentioned that you can file this down some during final make up on his pancake sheath tutorial. So it sounds like I could make this sheath up then adjust the retention cam with some light filling during wet forming.


And Horsewright Horsewright , thanks again for your examples! Do you mean 3/8'' over all clearance? (aka both sides combined?)
 
Yep. I'd have a little steeper ramp on the cam of the welt for that knife.
 
My suggestion would be; Some things are better left to kinesthetic learning.

Step away from the computer, go get yourself a pencil (with an eraser) and some paper. Trace around your knife, draw your pattern, cut out the pattern, mock it up, and make adjustments from there.
 
My suggestion would be; Some things are better left to kinesthetic learning.
Step away from the computer, go get yourself a pencil (with an eraser) and some paper. Trace around your knife, draw your pattern, cut out the pattern, mock it up, and make adjustments from there.

I see the CAD portion for me like drawing the pattern. I can print and test fit as many times as I like and it's 100% repeatable. But before I put it in CAD I drew it on paper as a starting point. I realize it will be trial and error, but I just want to minimize the iterations by starting from a solid spot.

I'll steepen up the ramp, print this guy out, and give it a go! Thanks for the help!
 
Be sure to post pictures even if it ends up not fitting. Plenty of extremely knowledgeable folks here to help and bounce processes off of!
 
"I just want to minimizethe iterations by starting from a solid spot"

No such thing. Skill in leather craft .. and knife making or any kind of hand made craft comes with practice. Patterning a sheath is maybe 10% of the process. You can CAD the perfect example of a pattern and during the execution portion of the build, you ef the whole thing up.
 
Allrighty, so I got started... Although I think I'll have to restart and repeat these steps with a new piece (You'll see why with the last picture)

Sorry If I miss name anything... I don't know what I'm doing!

*Cut out Template and "test fit" with the knife


*Cut out template on leather (got it a little wet in an attempt to flatten the piece)


*Beveled the edges (inside and out)


*Grooved the center on the inside of the sheath to help with the eventual fold


*Grooved a stitch line and used pricking irons to mark where I'll drill my holes


*Beveled and Burnished the inside edge of the welt


*And then noticed this catastrophe! :eek::poop: ... I must of set it down on something dirty. I've tried to clean it off with Bick 5 without success...


I'll clean off the workstation and repeat those steps tomorrow! Hope to get further...

Next step(s) was to:
  1. Glue in the welt on the non-loop side
  2. Fold over the loop and mark where it should land on the body of the sheath
  3. Glue the loop
  4. Drill the holes in the loop and stitch the loop
  5. Fold over the sheath and glue other side to the welt
  6. Drill holes and stitch
  7. Sand and Burnish edge
  8. Wet Form to knife
  9. Neatsfoot Oil then Bag Kote

Some questions:
  1. Do you guys treat the inside flesh of the sheath with anything? I should probably do this before closing the pouch.
  2. Should I case my piece right away to get it to lay flat (coming off of a shoulder roll)
 
"I just want to minimizethe iterations by starting from a solid spot"

No such thing. Skill in leather craft .. and knife making or any kind of hand made craft comes with practice. Patterning a sheath is maybe 10% of the process. You can CAD the perfect example of a pattern and during the execution portion of the build, you ef the whole thing up.

Got to start somewhere. I'd rather start with the first 10% being "perfect" so that I can focus on the other skills at hand to build! Thus reducing the iterations. I don't think there is harm in trying to set myself up for the best chance of success! Maybe it's just a difference in our approach, and that's ok.

I'm not saying practice isn't important. But failing to plan is planning to fail. I'd rather plan a little more and not waste material. If it take me 5 goes to get a good sheath instead of 10, that's a win. And I like to plan... It's a fun part of the process for me.

Another example: I was into long range shooting for a while. First thing I did was make sure to buy a rifle that's "better" than I am. So that I knew if my groups were off it likely was my fault. I knocked out that "10%" of the equation right off the bat so I could focus on technique.

Edit: I'm an engineer by trade, and there is no doubt my approach is based off of this. My job is generally to visualize where we're going, maybe run a theoretical test case/model if possible (cheaper than real life test), create a plan (generally good enough to get you 80% to the answer), test in the real world, analyse the results, improve process, repeat!
 
Last edited:
You didn't have to tell me you're an Engineer. I assumed (i have several Engineer friends that suffer from the same thing you're doing). You are over thinking and trying to plan every single thing down to the 1000th. Stop. You will never know you created the perfect pattern on CAD cause you have yet to make a sheath.

Go make a sheath and stop playing with your CAD.
 
Just saw you started one .. good, go finish what you started. Nothing stays new and shiny so screw the smudge or dye it black. You need the practice, so finish it. No need to burnish inside edge the welt.
 
Just saw you started one .. good, go finish what you started. Nothing stays new and shiny so screw the smudge or dye it black. You need the practice, so finish it. No need to burnish inside edge the welt.

Good to know on the inside of the welt. I'm going to restart this one. After further observation there isn't enough clearance for the handle. Good thing I smudged this one early.

I won't concede that I'm over thinking it :rolleyes: :thumbsup:. You draw with pencils and I draw with CAD; same thing.
 
As a side note. The drawing I made for this knife was based loosely off the CAD drawing I made for the sheath I made last week. The knife had a much more narrow handle.

Maybe I'll attempt a correlation based off handle circumference so I avoid this issue in the future! ;)

This is the sheath I made last week.. Got the job done, but in reality I think it's the wrong design for the knife (Old Timer with a swooping tip). Mr Dave Ferry's pancake design with the welt going around the tip would likely be better!

 
Last edited:
Finish the piece with the stain. All the steps take practice. We learn by doing. :D

ETA: I've digitally designed plenty of things that were printed and built. Boxes, pamphlets, books, free standing brochure holders, etc.... all built and designed in increments that matched my trusty ruler, .125 etc.
You never know when you have to go back and forth between centuries :) :D
 
Last edited:
J, don't bevel the inside edges along the welt line...that'll just make more sanding along the edge to get it smooth (you'll have a gap where the welt is glued down).
Also, it may be just me but I have found that it's difficult to get the cams in the welt to work well unless the ricasso or finger guard is wider than the blade (like in horsewright's knife). Otherwise the edge of the blade will cut it when inserting the knife.
Keep it up, each one will get better!
 
Yeah the cleaner is Behr All In One Wood Cleaner. I got it at Home Depot. Its used for cleaning decks. I bought a gallon like ten years ago for $10 or so and still have half the bottle left. I just splash a little on a paper towel and rub it on the grungies and watch em go away. I'll then wipe that area with a another paper towel and clean water. It'll take care of 99 percent of grungies. Pro Carv in your water helps too, helps prevent grungies. Years ago every saddle shop or leather working shop had oxalic acid around. Stuff is kinda dangerous but it worked to take away the grungies. This deck cleaner has oxalic acid in it but in a very diluted solution. Much safer.

Yeah no need to do the burnishing on the inside of the welt. On the cam, it is easier to do it for a knife as I pictured but not impossible for the edge/heel type knife as I call em. The secret is to keep your stitching line back about a 1/4 inch from the edge of the cam. The knife edge will cut into the cam but it will make its' place in the welt without damaging the stitching. It is trickier to get the fit right on this kind of knife but doable. Also where an edge meets a welt on some knife styles the welt can be reinforced with superglue as I do or Paul Long uses JB Weld.

Get ya some Wyo Quick Slik from Barry King. Not only does this stuff rub edges well but can be used to smooth out the nap on the roughout side of the sheath if desired. To get it flat, and I do this after I cut it out, I'll dunk it in my Pro Carv water really quickly and pull er out and when the color starts coming back into it I'll slick it with my stick. This will flatten it out. Also take your leather roll and roll it inside out from the way it came for storage. That seems to help a bunch as well. For instance most sides of leather when they get shipped in are rolled with the roughout side in. I'll lay em out on the cutting table and roll them roughout side out before sticking em on the storage shelves.

Try using a Sharpie for any marking you do on the inside of the sheath. No ink transfer and ball point sure can. Ink is one thing the super duper to the rescue deck cleaner WON'T take off.

I use to gouge the inside of the sheath before folding but I don't anymore. Just not necessary. However, before folding I do get them pretty darn wet, particularly down by the tip. I'll mark the welt stitch line, crease the top and edge and rub the top and if its getting the maker's mark on the back side I'll stamp that. Then I'll set em aside or out in the sun and let them dry completely before continuing with them. While they are drying I'll cut out and tool the pancake sheaths. Always something else to do around here while something is drying.

Awesome information. I'll have to get some Wyo Quick Slik! Good tip on the superglue trick too!
 
Back
Top