when you do you image editing, start by first taking the camera image and saving it as a .psd file in PS5 (your image editor). Next when you have done the work such as adjusting color, contrast, cropping, unsharp mask, then save the file via "save as" with a new name. Next do a resize to 800 x 600 pixel. There are other settings in PS that I don't know about as I don't us PS but I use Microsofts Digital Image Pro 10 but Coop is an expert and he can explain all this better than I. Next do a Save As with the same file name but this time change the file extension via the drop down menu to .jpg. (not all image hosting sites will use proprietary files like the Adobe PS .psd file.) This is the file you will upload to photobucket. Now I don't know if Photobucket does allow images larger than 640 x 640 but if they do when you post you will have even bigger images than mine. Coop usually uses a 750 x (Y) when he posts as I recall.
Now, be sure when you are doing the initial images, that you use the largest image size your camera will produce with the least amount of .jpg compression so that you are starting with as big a file as possible before doing any editing.
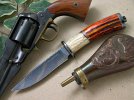
A couple of things I notice is that you seem to be getting a mix of light which is likely that while using incandescent, you also have strong daylight coming into your work area. on the blue backgrounded folder one blade is yellow and one is lightly blue. The bolsters are also a mix of light. Something also seems to be giving some flare to the image and I find that the images are not totally sharp.
Sharpness is a factor of the lens and the f stop as well as the use of unsharp mask in PS.
As far as background, I think you also may be getting some reflectance of the background onto the knife. Try to use matte backgrounds if possible. I have one background I like but have this same problem
I tend to use the same background material all the time whereas Coop is so good at finding and using his backgrounds to subtly accent the knife. It is quite impressive.
to to the Knife Network site and there are also lots of threads there about knife photography-- in fact a whole section devoted to the subject and contests that folks can participate in. Coop and others are in that venue too.
There are a few other folks doing some nice knife images and I'm sure each have techniques they have learned from others and techniques they have developed themselves. Hopefully they will share the info too.
here is another background I sometimes use
Roger P when he does his images at my place will use some other backgrounds that I have also which I don't use much.
Sometimes I will do this idea
I have two file sizes of this image as I have gotten lazy and Fototime allows for 1 GB of space. I upload a 1600 x 1200 image and they resize to what you see 640 x 480 but if one goes to the fototime site, when one clicks on this image, the bigger one is available. Unfortunately, it does show just how poor my cutouts are compared to what Coop does.
If you look on the handles thread in custom you will see how I have manipulated some backgrounds. Here is one where I have mixed a color image with a b/w image of the same knife.
both images where taken in color. The basic image was converted to b/w but the cutout was left in color. You say "what color"? Well look closely at the ivory of the handle by itself and you will see where the ivory is beginning to take on a beige color tone.
These are all things you will start doing later one once you have mastered the image taking portion of the task.