Stabilizing Wood: Physics, Chemistry, Materials, Techniques, and Performance: "Just the facts Man"

What about shaking the chamber?

It sounds funny but I find when I’m under full vacuum (28.9 inches in my set up), that I can shake loose a few pockets of air by smacking the chamber (surface tension being broken?).
I also notice seems to help the wood absorb the resin a little faster.
Yeah, i think that makes sense. The little bubbles will get pinned to the outside surface, and shaking them can disturb them enough to get them to let go (just like bubbles on the side of a glass of sparkling water ( water “with gas” for those in Europe). If you dont bang those loose, when you apply pressure some (a lot?) of the bubbles will just get pushed into the pores, causing problems just like that air was never pulled out of the pores. Letting the system sit under pressure would reduce those clinging bubbles ... but banging on them is faster

Great observation/ idea - i would not have thought of that!

I’ll be throwing the vacuum chamber on a ultrasonic cleaner to see how much of a difference it makes.
 
The bubbles in an ultrasonic cleaner are not really “bubbles” they are pockets of cavitation. That’s how the cleaning action works. When the bubbles “pop” they actually implode, causing suction that pulls debris away from the surface.
 
The bubbles in an ultrasonic cleaner are not really “bubbles” they are pockets of cavitation. That’s how the cleaning action works. When the bubbles “pop” they actually implode, causing suction that pulls debris away from the surface.
Under standard atmospheric sure, under full vacuum? I would think you’re just speeding up the process.
 
Next posting - resin viscosity
What gets in the way of filling the porespace with resin? – Resin Viscosity

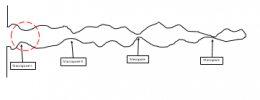
At the beginning of these postings I focused a fair amount on the pore throats (the “choke points”) in the porespace, which I depicted with the following picture:
upload_2019-8-7_10-27-23.png
The reason for this is that I knew coming down the pike (so to speak) was the issue of surface tension at those choke points – that surface tension representing an absolute block, regardless of time under pressure, to further penetration of resin into the porespace.

But, the discussion around just the pore throats (and surface tension) misses another potentially important point: even if you are able to “push” resin through a pore throat, it takes time to allow the resin to flow through the pore system.

Think of this like flow through a pipe or garden hose. Typically, the flow looks something like this:
upload_2019-8-7_10-27-37.png

(technically I have taken some liberties here, and so this picture is not totally correct – but lets just use this for now). Here, the black lines are the outer surfaces of the cylindrical “pipe” the fluid is flowing through, the blue is the flowing liquid, and the red arrows are meant to indicate the speed of flowing fluid at that location in the tube. You see that the fluid flow is fastest in the center of the pipe, and slowest near the walls (and is actually zero at the walls themselves). Technically the shape of the velocity is a parabola. The liberty I took in the picture above is that I implied there is an “interface”, or meniscus, at the front of the flow … but even if the pipe is completely filled with fluid from the entry to the exit, this “parabolic flow” is the case.

It is perhaps (hopefully) intuitive that: if you increase the pressure, the fluid will flow faster; that if the fluid is more viscous it will flow slower (for a given driving pressure); that if the tube is longer, there is more friction at the walls, and so the fluid will flow slower, etc. In our wood, for very small pores, and a pretty viscous fluid, that flow could in fact be pretty slow….

Under certain circumstances, which we can reasonably take to be the case here, this flow is described by a well-known and highly accurate equation called the Poiseuille Equation (I wont even go in to how to pronounce that!):

Average velocity = (driving pressure * radius-squared) / (8 * viscosity * length of pipe)

(I have rearranged a little from the typical way this equation is written to focus on the velocity through the pores). Here we can assume the pressure is just the outside pressure, because there should be a near-vacuum inside the pores. We know the radii of the pores, and we know the viscosity of the resins. The only remaining piece of information we need to calculate velocity is the “length of the pipe.”

As an assumption, which I would propose is “worse case”, I would propose that we assume the length of the pipe is equal to the largest dimension of the piece being stabilized (just in case there is a pore near one surface, but happens to not be connected to that surface – but instead is “filled” from the far side of the block. Seems that most people cut wood for drying into 2” x 2” blocks – and I previously confirmed that a 2” x 2” block is the largest piece that K&G will stabilize. So I will here assume that the “length of pore” to be filled with resin (as a worse case) will be 1”.

We can use all that to calculate the velocity of the resin penetrating the pores of various size – and thus the time needed to completely fill those pores. I don’t know what the answer to that is yet – but will post this piece now, then do those calculations and post the results.
 
EDITED - this calculation has been replaced by a later one assuming (per input) a 6 inch penetration distance, which assumes the resin primarily enters and spreads along the direction of the grain, which is typically in the long direction of the block).
What gets in the way of filling the porespace with resin? – Time
There are lots of possibilities of combinations of pore sizes and resin viscosity to pick on for a calculation ... so lets just try starting with a couple that are pertinent to the home stabilizer only able to make use of one atmosphere.

for viscosity, the BVV PC504 is labeled with a viscosity of 2 centipoise
the cactus juice is labeled with a viscosity of up to 6 centipoise (three times more viscous that the PC504)

BEST CASE:
using PC 504 to fill the 10micron and 1 micron pores
time to fill pores:
XXX see later post (PC504, 10 micron pores, 1 atm pressure)
XXX see later post (PC504, 1 micron pores, 1 atm pressure)

WORSE CASE:
using Cactus Juice (6 centipoise viscosity):
time to fill pores:
XXX see later post (cactus juice, 1 micron pores, 1 atm pressure)

So ... if this holds, I would hold the blocks under the liquid solution for maybe a XXX before removing them and starting the heating to solidify the resin.

This is just a theoretical prediction - and I am sure reality will intrude somewhere to modify it :). specifically, I am not sure how to resolve this difference with Lanternnate's comment that wood turners will hold walnut under pressure for up to a week before heating the wood (unless they use much larger pieces of wood????). - but it would not hurt to try the longer time!

I have not done any calculations at higher pressures (like K&G can reach). From the above, hopefully it is clear that the higher pressures, in addition to allowing the resin to pass through the smaller, the resin velocity through the porespace is faster. so the higher pressure also buys K&G the opportunity for a faster cycle time on their process (and higher throughput).
 
Last edited:
It might be necessary to recalculate. I think most folks cut scales with the "pores" running the length as opposed to height or thickness.
 
It might be necessary to recalculate. I think most folks cut scales with the "pores" running the length as opposed to height or thickness.
Hmmm. Probably right. Thanks. Scales are what, probably 5” or so? But what max length blocks do people tend to stabilize?
 
Not sure about max. I would believe average would be 3/8 - 1/2 thick, 1 1/2-2 wide, and 4.5- 6 long. Others may disagree...
 
It's recommended to stabilize blocks then only cut into scales after heat curing the stabilizing resin.

Even then, say with burls, the scales could still move due to the stresses involved with swirly grain. I posted this before, but this set of burl scales was stabilized as a block by one of the big two (WSSI or K&G, not specifying so neither is called out because not their fault), cut into scales, flattened, and then... :confused::D
qIdMCF2l.jpg
 
this is a post of penetration time calculations assuming resin primarily penetrates along the direction of the wood grain, which is typically in the long direction of blocks/scales cut for handles. Assumption here is a 6-inch long block/scale being stabilized.

Apologies it took a while for me to get this re-posted ....

for viscosity, the BVV PC504 is labeled with a viscosity of 2 centipoise
the cactus juice is labeled with a viscosity of up to 6 centipoise (three times more viscous that the PC504)

BEST CASE:
using PC 504 to fill the 10micron and 1 micron pores
time to fill pores:
51 s (PC504, 10 micron pores, 1 atm pressure)
147s (~2.5 min) (PC504, 1 micron pores, 1 atm pressure)

WORSE CASE:
using Cactus Juice (6 centipoise viscosity):
time to fill pores:
252 min (~4 hrs) (cactus juice, 1 micron pores, 1 atm pressure)

So ... if this holds, I would hold the blocks under the liquid solution for maybe 4-5 hours before removing them and starting the heating to solidify the resin.

This is just a theoretical prediction - and I am sure reality will intrude somewhere to modify it :). specifically, I am not sure how to resolve this difference with Lanternnate's comment that wood turners will hold walnut under pressure for up to a week before heating the wood (unless they use much larger pieces of wood????). - but it would not hurt to try the longer time!

I have not done any calculations at higher pressures (like K&G can reach). From the above, hopefully it is clear that the higher pressures, in addition to allowing the resin to pass through the smaller, the resin velocity through the porespace is faster. so the higher pressure also buys K&G the opportunity for a faster cycle time on their process (and higher throughput).
 
So - with a little time for people reading this to digest what I have tried to put out there, I thought I would close this thread out, at least for now, with a few thoughts and conclusions of my own.

First, in order to do a reasonable job of home-stabilization, there are a number of things to be aware of and to monitor:
  • make sure the wood is dry (and know just how dry it is - it is better to dry to a higher degree in a kiln or drying box)
  • be aware of the type of wood you are stabilizing - and more specifically be aware of the pore size distribution in that wood (if the distribution is slanted more towards the smaller pores, then you are not going to get the degree of pore-filling you might be after
  • resin viscosity is not necessarily going to affect your degree of penetration of the wood - BUT with the more viscous resins you need to allow more "soak" time at pressure to allow the resin time to flow into the deepest pore spaces.
  • When you pull a vacuum - make sure your equipment allows you to pull to a low enough pressure - AND allow enough time under vacuum to both evacuate air, and to allow more moisture to de-adsorb from the pore surfaces
  • Allow sufficient "soak" time after relieving the pressure to allow the resin to flow into the pores as completely as it can
  • know the quality of your resin - avoid "pre-activated" resin, and strive to use domestically-produced resin
From the above, it should be clear that there are a LOT of ways in which stabilization can be messed up. Given that - you might want to consider whether you want to trust stabilized wood done by "just anybody" out there (from Etsey for example), and also whether you want to trust yourself to get the steps right. some will trust themselves, at which point you can probably do a reasonable job (especially with woods that tend towards the larger pore distributions - spalted woods being an extreme case of wood with a lot of very large pores).

Always be aware, though, that you will simply not be able to get the same degree of resin penetration that the professional houses can (with their 4000 psi final "push" of resin through the smaller pore throats). If your objective is a straightforward "heavier is better" - then I think there is no argument that having the stabilization done professionally is the better approach. Also keep in mind, as several have pointed out, that it is not necessarily less expensive to do the stabilization yourself.

On the other hand, however, there are two factors I can think of that might drive you towards stabilizing yourself. First is turnaround time. Doing the stabilization yourself will take, maybe, 2-4 days. Turnaround time to have wood sent out and done at the professional shops will likely take weeks to months. You will have to decide which is more important. The second is the point that started me thinking about this in the first place: How much resin penetration is "good enough"? If your objective is not sheer weight/heft of the wood, how much resin penetration is "good enough"? As several have pointed out, woodworkers stabilize their own wood, then put it onto things like, a lathe, and spin at high rates while pushing sharp objects into the material. If your objective is sheer mechanical stabilization, then, especially for those woods that really need it precisely because they are loosely held together, and thus by definition have mostly large pores (like spalted woods, or some burls) then you can probably do quite a suitable stabilization yourself - but again, the result will likely be lighter than if done professionally.

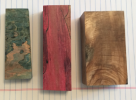
For example, I obtained a number of samples of spalted wood from WEO that he sent out for stabilization (he did not do the actual stabilization). some are not-yet-dry, some were professionally stabilized, and a couple were non-professionally stabilized (stabilization sources remain anonymous). One of them, dyed green, was obviously, by feel, less dense than the wood coming back from professional stabilization. Here it is:
upload_2019-8-19_13-52-52.png
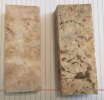
The outside, by probing with both fingernail and metal punch, is pretty hard everywhere. When cut in half for scales:
upload_2019-8-19_13-59-9.png
It is clear (again by probing with fingernail and punch) that in the highly sparled regions, the resin has for the most part penetrated and the material is hard, but in the not-so-highly sparled regions (the lighter colored areas) there is little or no resin (it is softer). But, these un-penetrated regions are well held together, and there is no sense these scales will just fall apart. It is good enough for put on as handle for a modified paring knife I am working on for myself and family - but no way I would put it on a knife I am planning to sell. (another piece of non-professionally stabilized wood is basically as dense as the professionally stabilized wood - and might very well be suitable for sale, or perhaps on a knife given as gift to friend or family. It depends.

What I have tried to do here in this thread by getting into the details is to de-mystify the stabilization process, hopefully to get past the differing opinions on professionally versus home stabilized wood. I believe those differing opinions have arisen from both different expectations and "needs" for the stabilized wood, combined with some truly bad experiences of "home stabilized" wood that was either done really badly (because of bad process and control of the process), or done on a wood that is just not suitable for home stabilization - but that does not mean that with the proper process, and appropriate choice of wood, that home stabilization is not an appropriate option (I believe it is).

Hopefully people have found this little exercise worthwhile....

For the record, I have some un-stabilized spalted wood that is now dry and ready for stabilization. I will be sending that out to a professional house for dying and stabilization. I would be interested in stabilizing that spalted wood myself - but right now dont want to invest the $$$'s in the equipment, and for its purpose I can afford the wait for the turnaround time......
 
Last edited:
I've genuinely enjoyed this thread, and hate to see it closed without a bit more digging. Here are some questions I'd like to see answered...

1) What percentage of weight gain can be expected in a professionally stabilized block vs a home stabilized block?

2) If a 100 gram block of wood is stabilized and achieves 100% penetration, what would be the expected weight gain?

I know there are infinite variables, but if it could be determined that xx% weight gain is superb stabilization, xx - 10% is perfectly acceptable, and xx - 40% is unacceptable, that would go a long way toward providing a guideline for folks who actually care about quality.

Again thank you for all the solid information!
 
1) What percentage of weight gain can be expected in a professionally stabilized block vs a home stabilized block?

2) If a 100 gram block of wood is stabilized and achieves 100% penetration, what would be the expected weight gain?
Oh boy ... I think the real (but not helpful) answer is that, as you said, it depends. In fact I just spoke with K&G about this this morning: they charge by the outgoing weight of stabilized wood because some woods (like spalted woods which have a lot of void space) take in much more resin (and hence have more % weight gain) than a denser wood like, say black walnut (which someone mentioned some wood workers stabilize) - and thus will have a smaller percentage weight gain, even with the absolute best resin penetration the pros can achieve.

With those samples I received from WEO I have enough variability between not-as-good & reasonable home stabilization and professional stabilization to take some density measurements and can post those numbers as rough % weight gain (small samples - not really statistically "sound" - but should be enough to give a ballpark idea of the ranges we are talking about. Give me some time and I can post those numbers.

I have a bunch of black walnut (unstabilized) - if someone perhaps has some stabilized black walnut and can lend it to me for a short while, I can try to do similar for that species....
 
What percentage of weight gain can be expected in a professionally stabilized block vs a home stabilized block?
Here is a first (quick and dirty) shot at trying to put some numbers to this. As I mentioned, I have some spalted maple from WEO. Here are the three stabilized samples he sent to me (thank you William!!):
upload_2019-8-20_15-18-6.png
The green and the red are "home" stabilized, the undyed one on the right (which I will call "clear") was professionally stabilized. By feel, the red one is quite close in density to the clear (professional) one, but the green one is noticeably less dense. to put numbers to that, the densities of the three samples are:
  • green: ~12.18 g/in^3 (apologies for the mixed units, and I am not being extremely careful about significant digits....)
  • red: ~17.55 g/in^3
  • clear ~ 19.43 g/ in^3
Of the un-stabilized samples, I pulled two, one more highly spalted (less dense), and another somewhat less spalted (more dense). Both were dried in my drying box, and are reading zero moisture (blocks sitting in ambient are reading an equilibrium 8% moisture):
upload_2019-8-20_15-23-51.png
These two blocks have an average density between the two of them of 7.82 g/in^3 (they are 9.03 and 6.61 g/in^3 respectfully).

Using this average weight of the unstabilized blocks as a "typical" baseline weight, this puts the percent weight gain of the stabilized blocks at:


  • green: 56% weight gain
  • red: 124% weight gain
  • clear: 148% weight gain (this is the professional one).
My takeaway from this is that, with this pretty porous wood, someone at home, if they are paying attention to what they are doing, can come pretty close to the professional impregnation level. It also shows that if you do not pay attention to process (the green one), you can end up coming nowhere close to the professional in terms of weight gain - BUT as I said in a previous post, the penetration in the spalted areas is really not too bad, and the block is stable enough (and looks cool enough) for me to feel comfortable putting it on a small paring knife-sized blade I am making for my own and families use.
 
Thank you for that, sir. It's a great place to start!
 
Back
Top