Review Using the RUIXIN PRO III knife sharpener

Joined
May 11, 2012
Messages
992
Disclaimer: I bought all my sharpening stuff including the Ruixin on my own, none of the items were sponsored. I am no knife nut, don't own many personal knives or multitools, and don't consider myself a knowledgeable fuzzy regarding knife or sharpening topics in any way. This is not a systematic product review but an experience report, share of my thoughts, and presentation of how i do things with it.

Summary: I like the (modded) Ruixin better than any other sub-100$ guided rod sharpening system (GRSS), it satisfies all my needs and expectations as a beginner in the world of knives and sharpening. Now that I am consistently able to re-produce a scary sharp edge on my kitchen chef knife —the easiest of all knives duh— with such little money investment, "20$", it seems unreasonable for me to invest either much more $$$ or much more skill'n sweat just to get my few stuff even sharper. If funds weren't an issue, i would exactly know what to buy to replace my Ruixin eco system with; we all have wishlists, don't we?:poop:

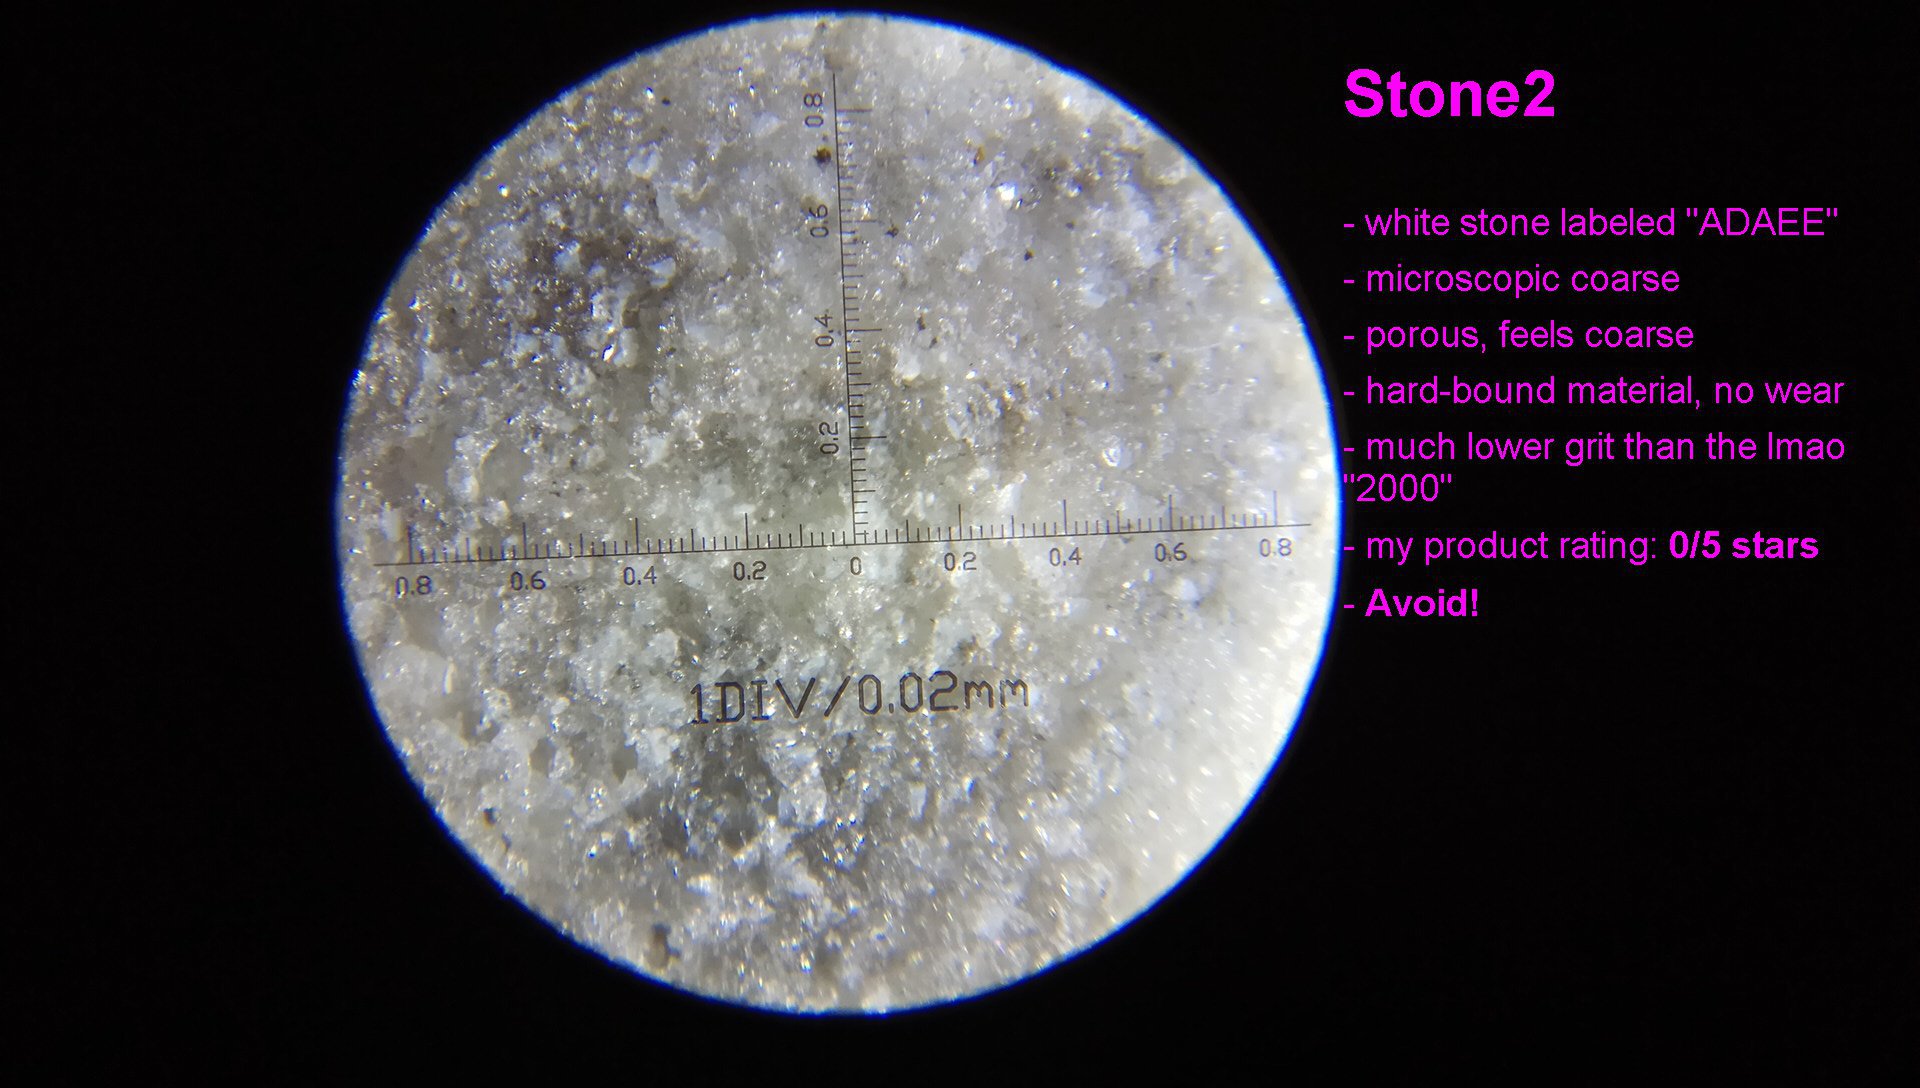
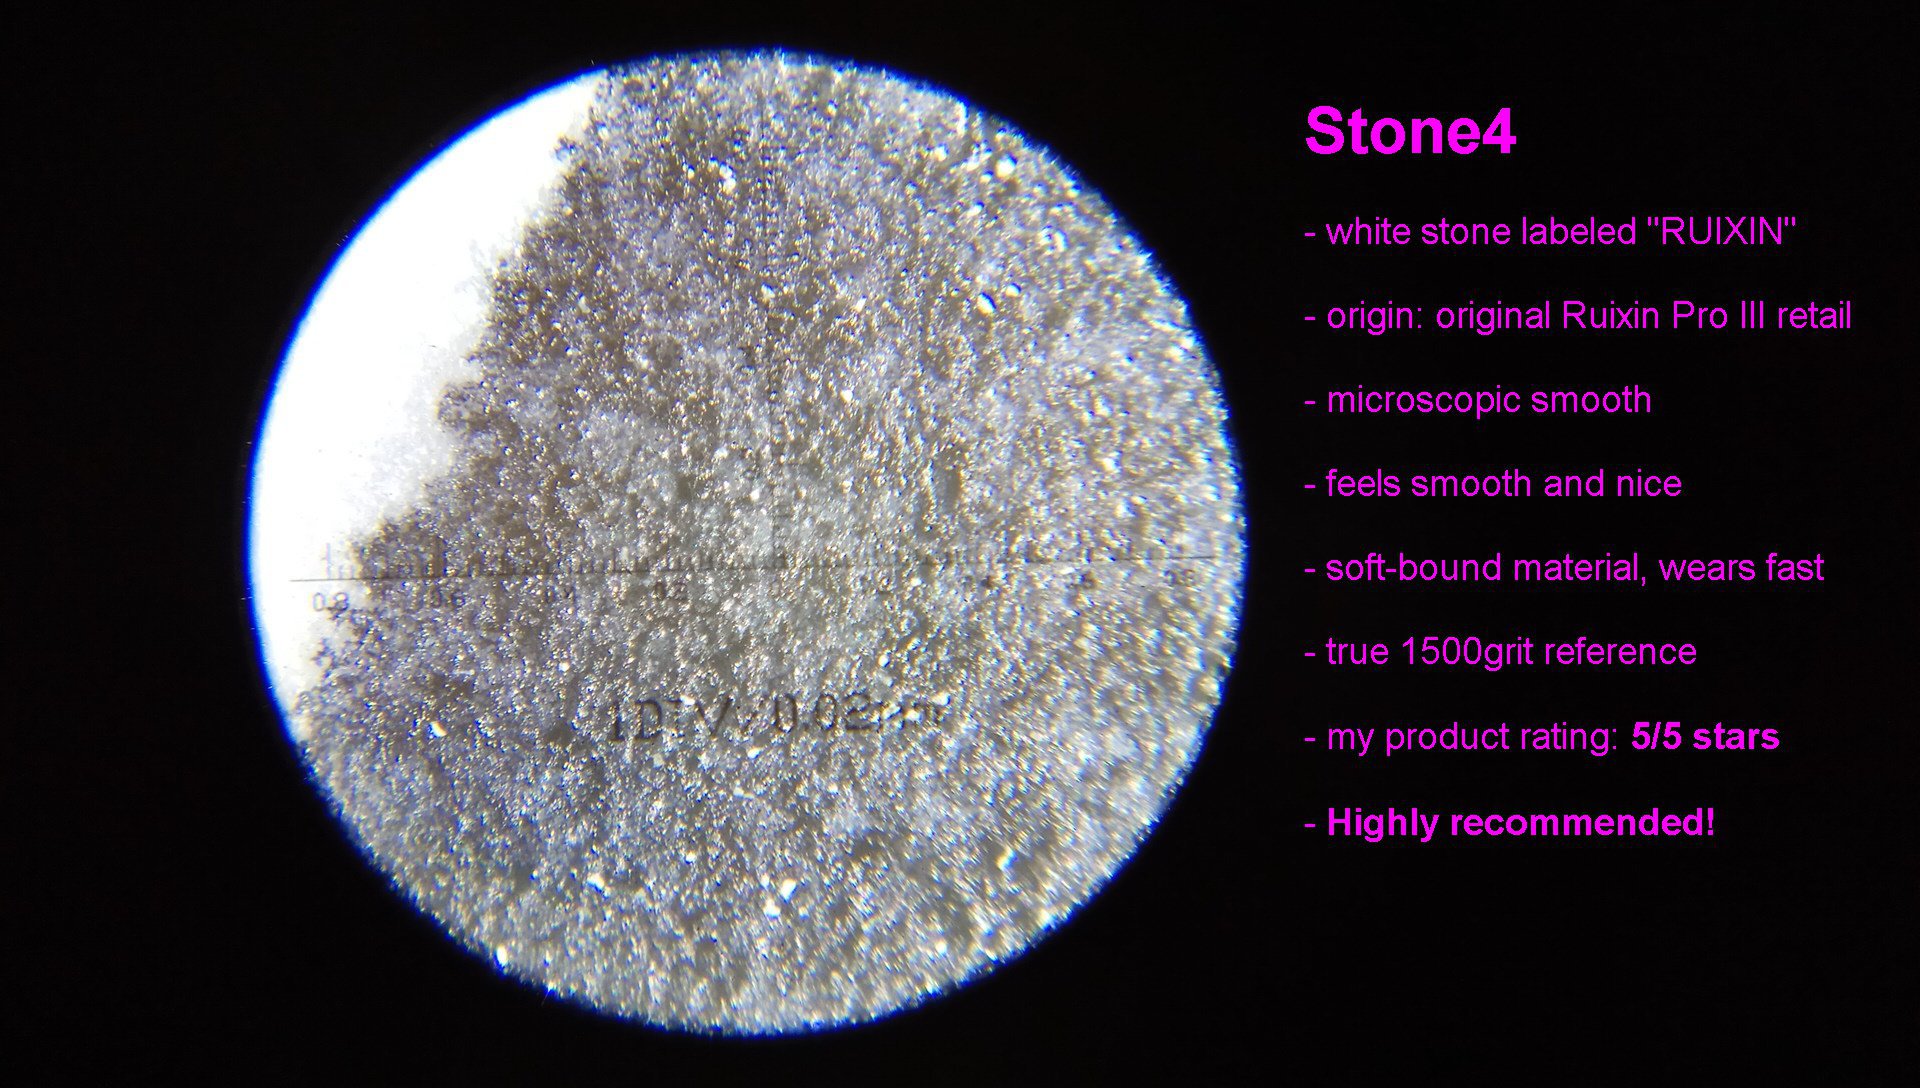
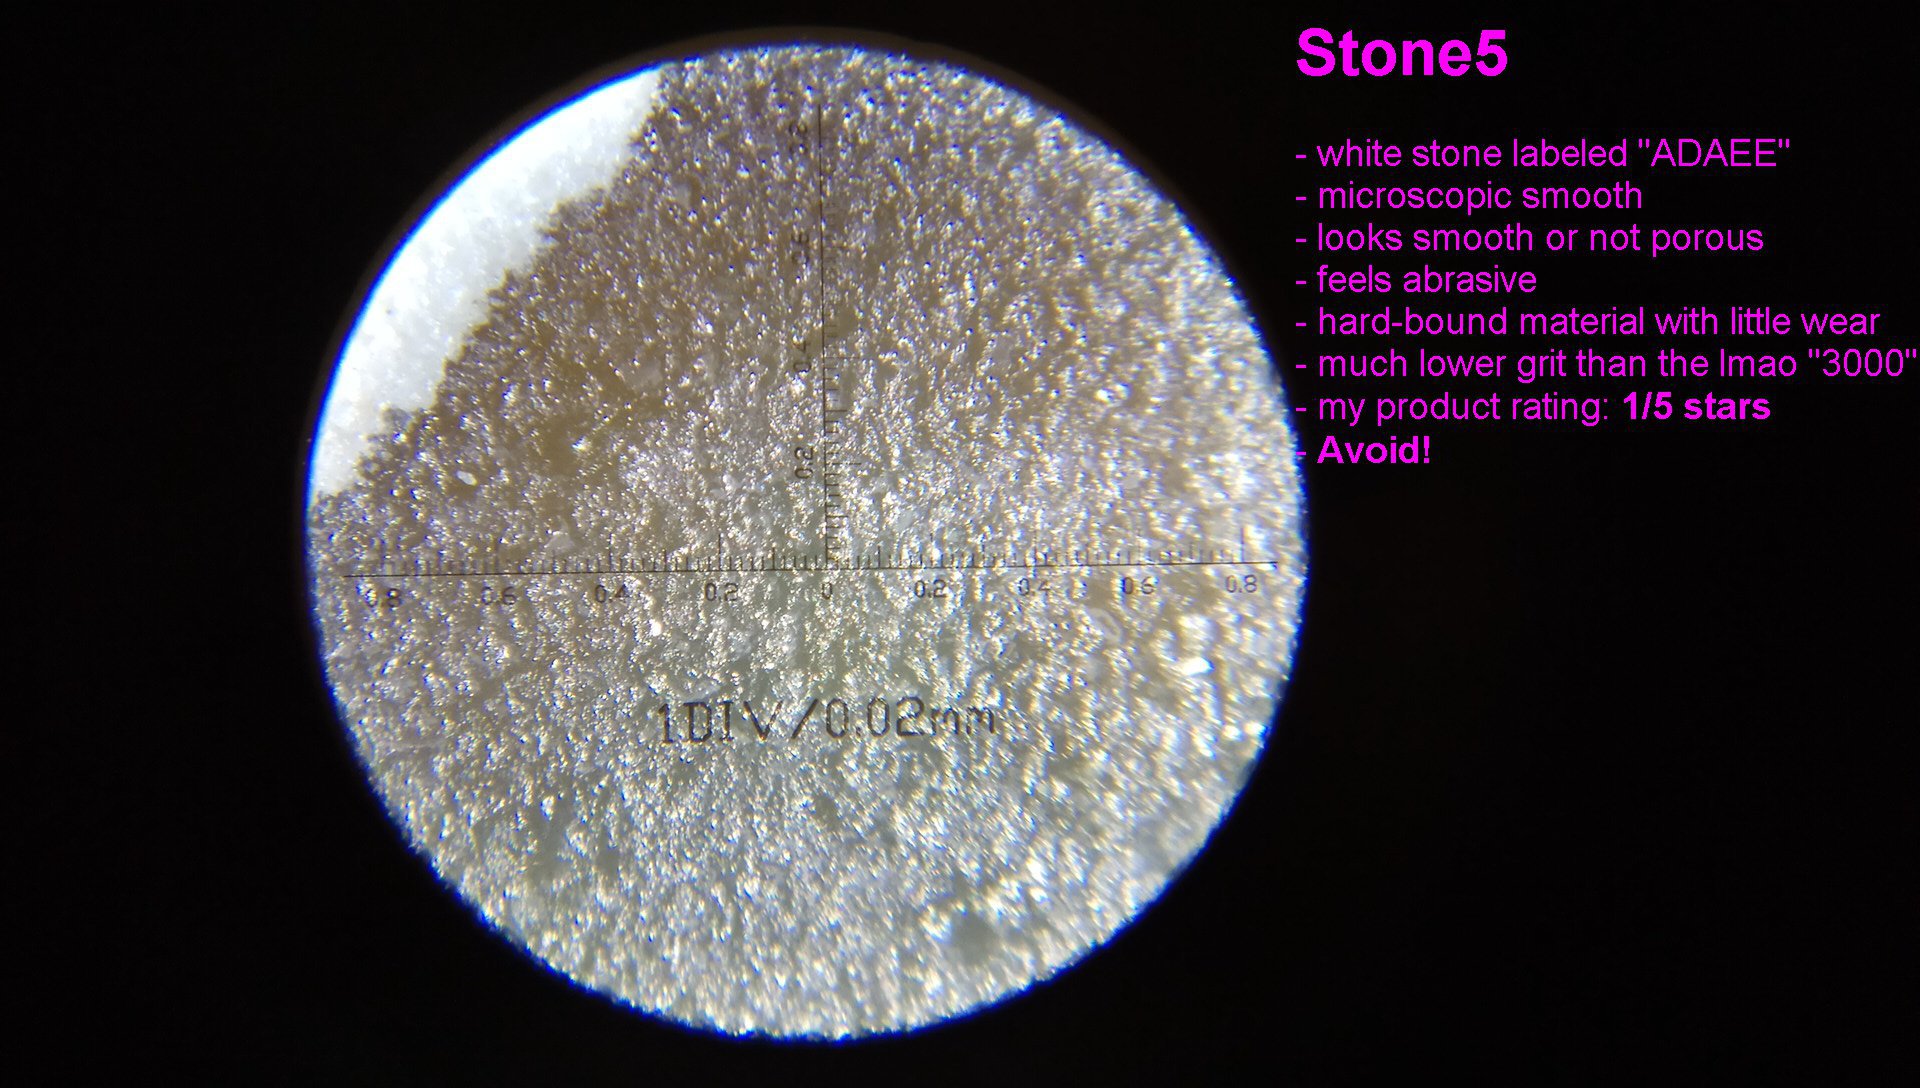
Random thoughts and blabla

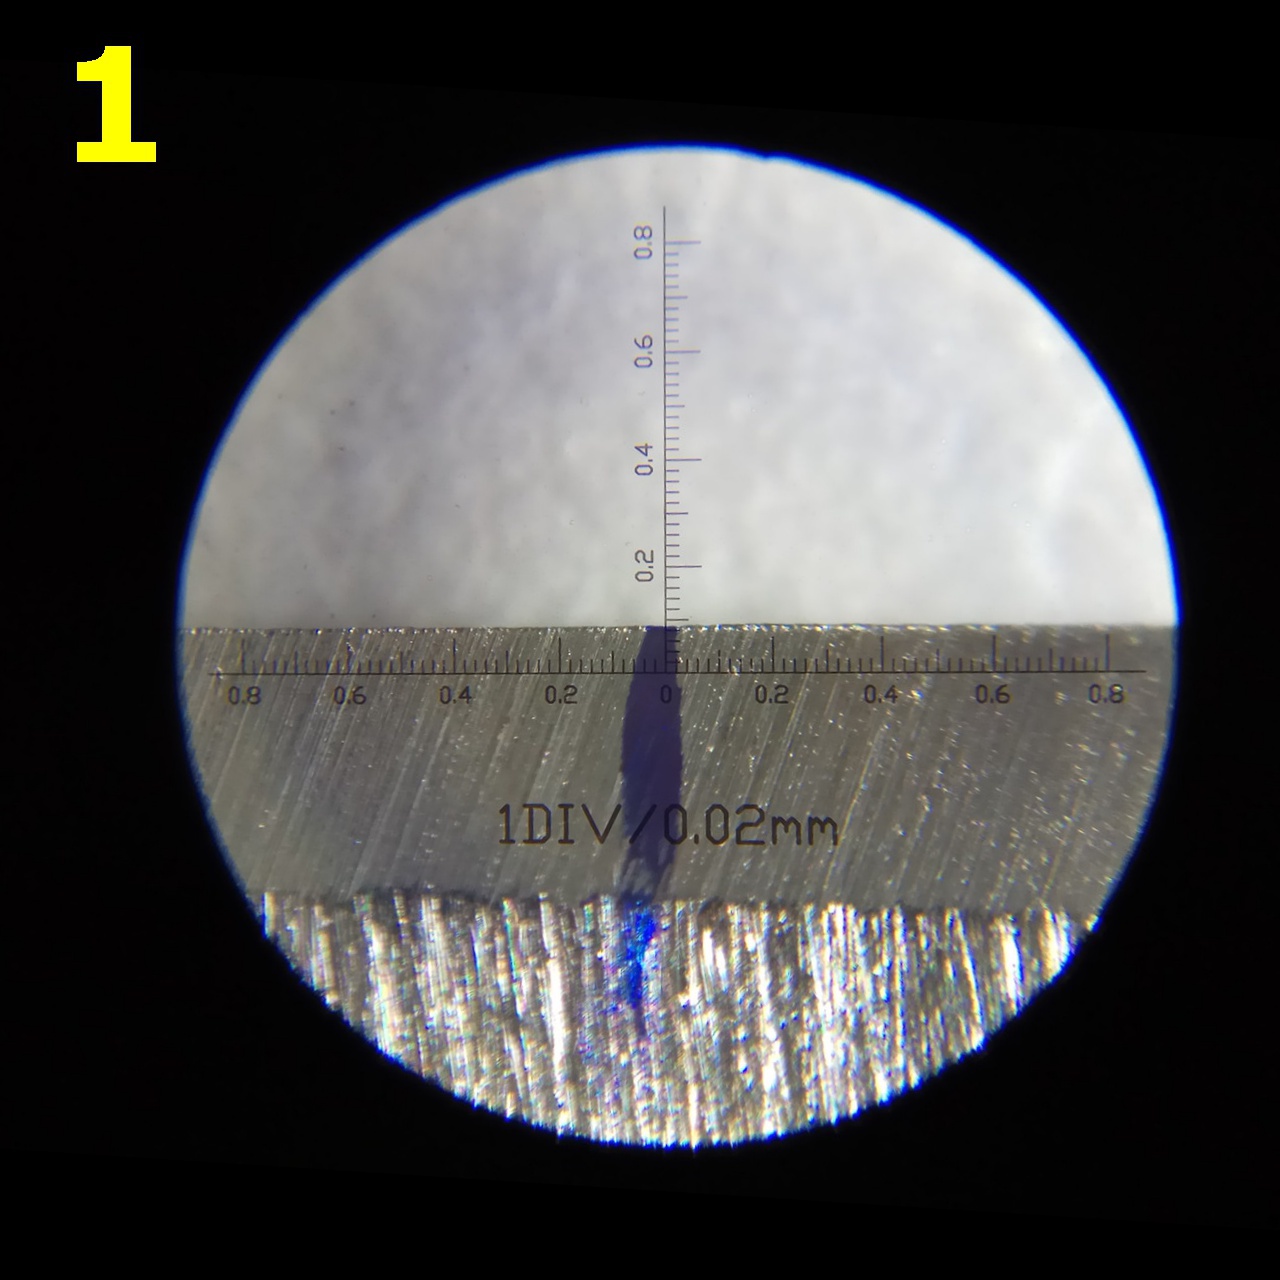
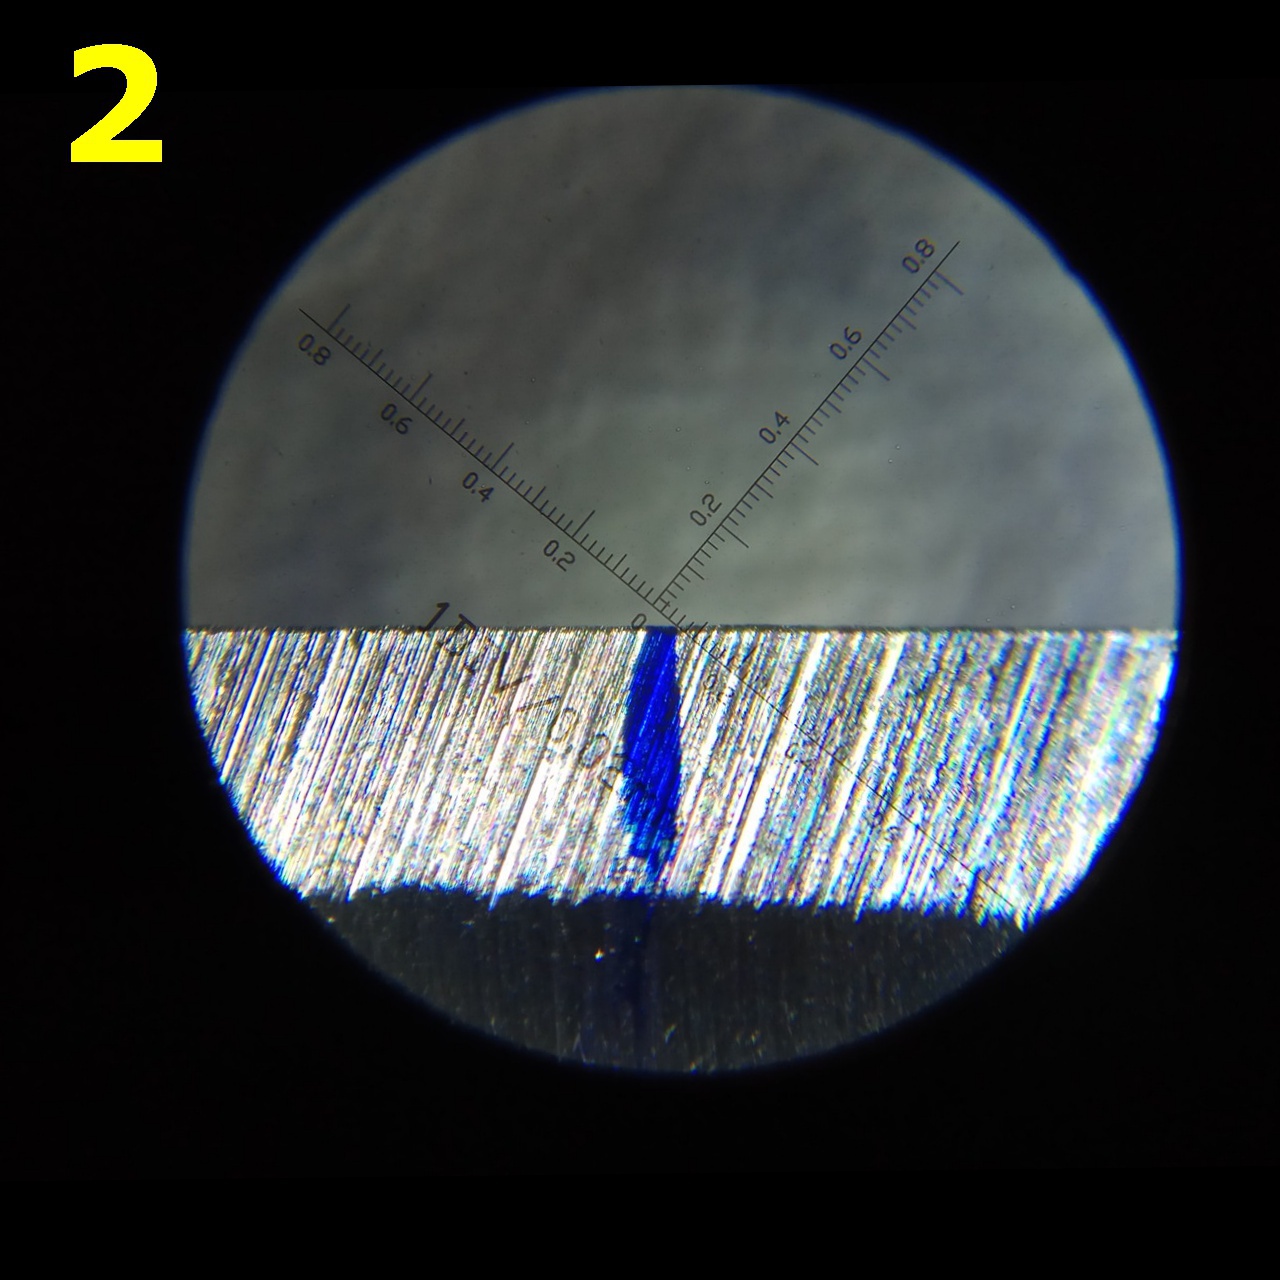
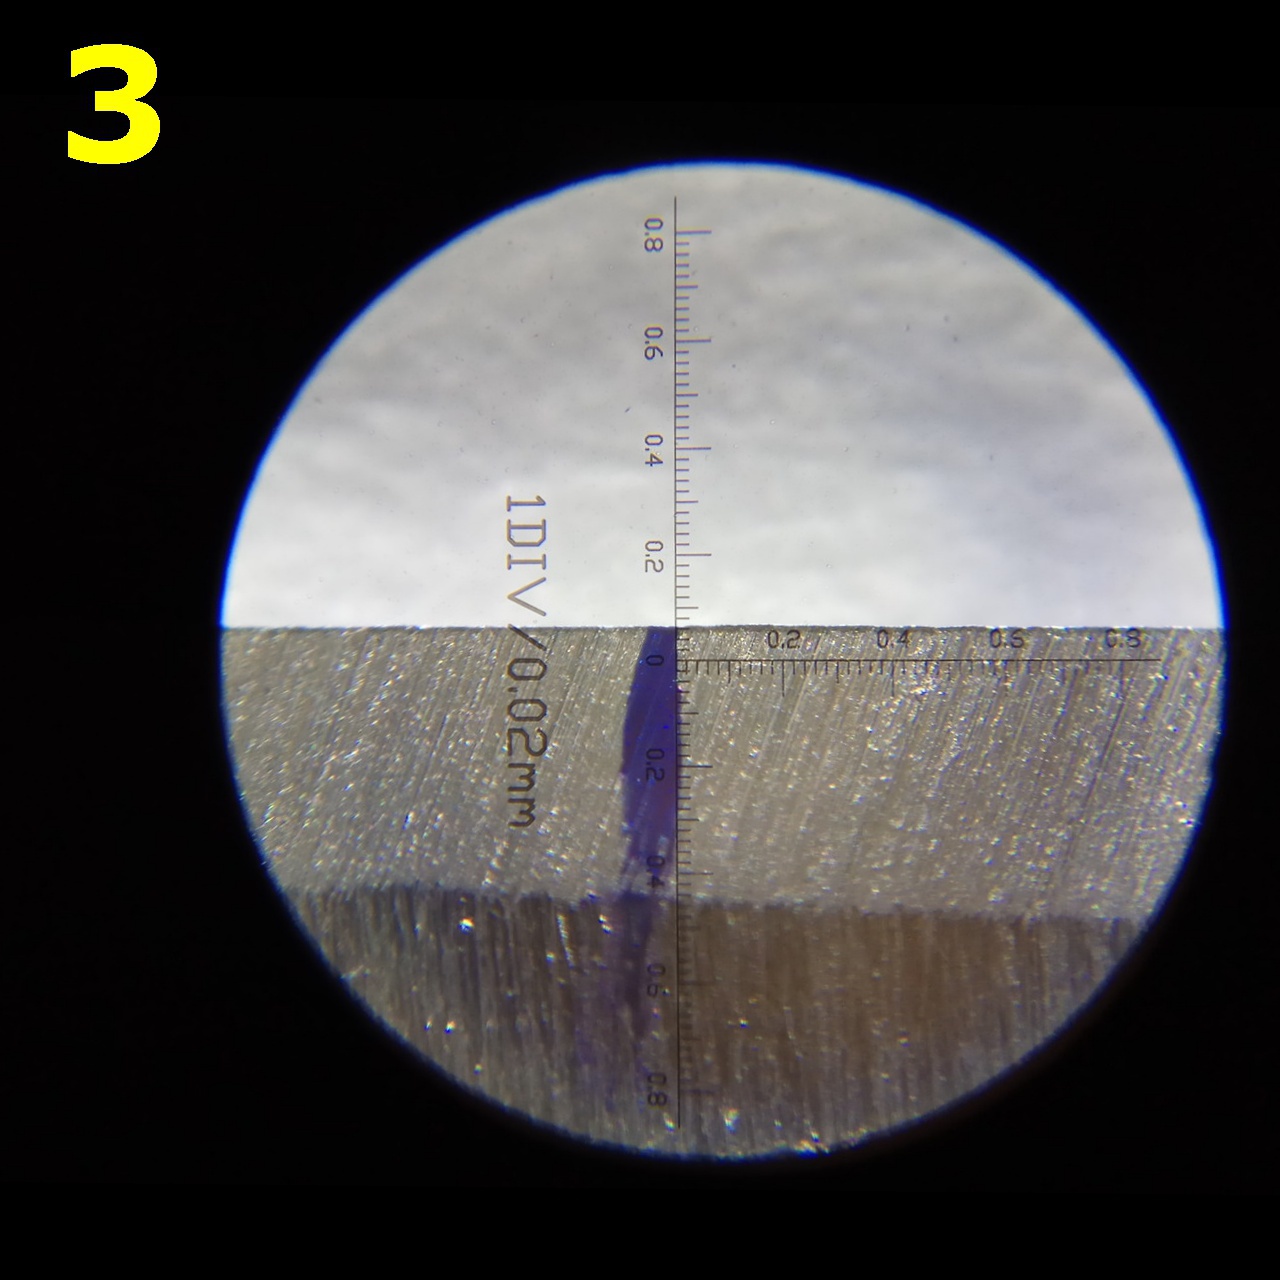
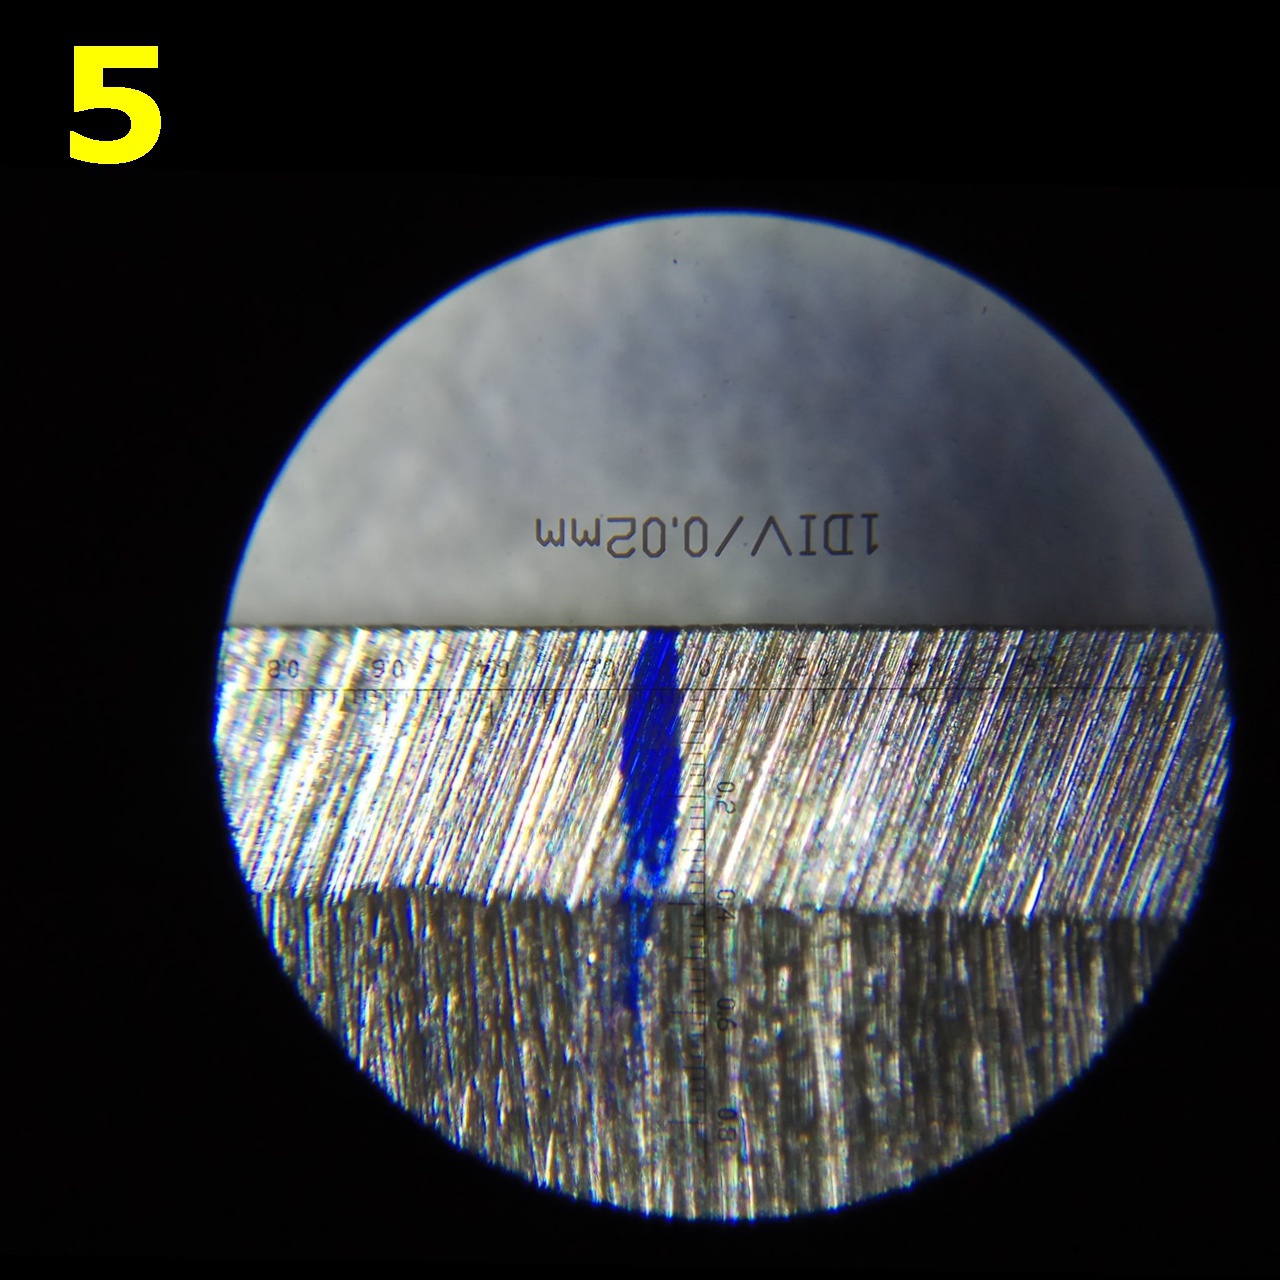
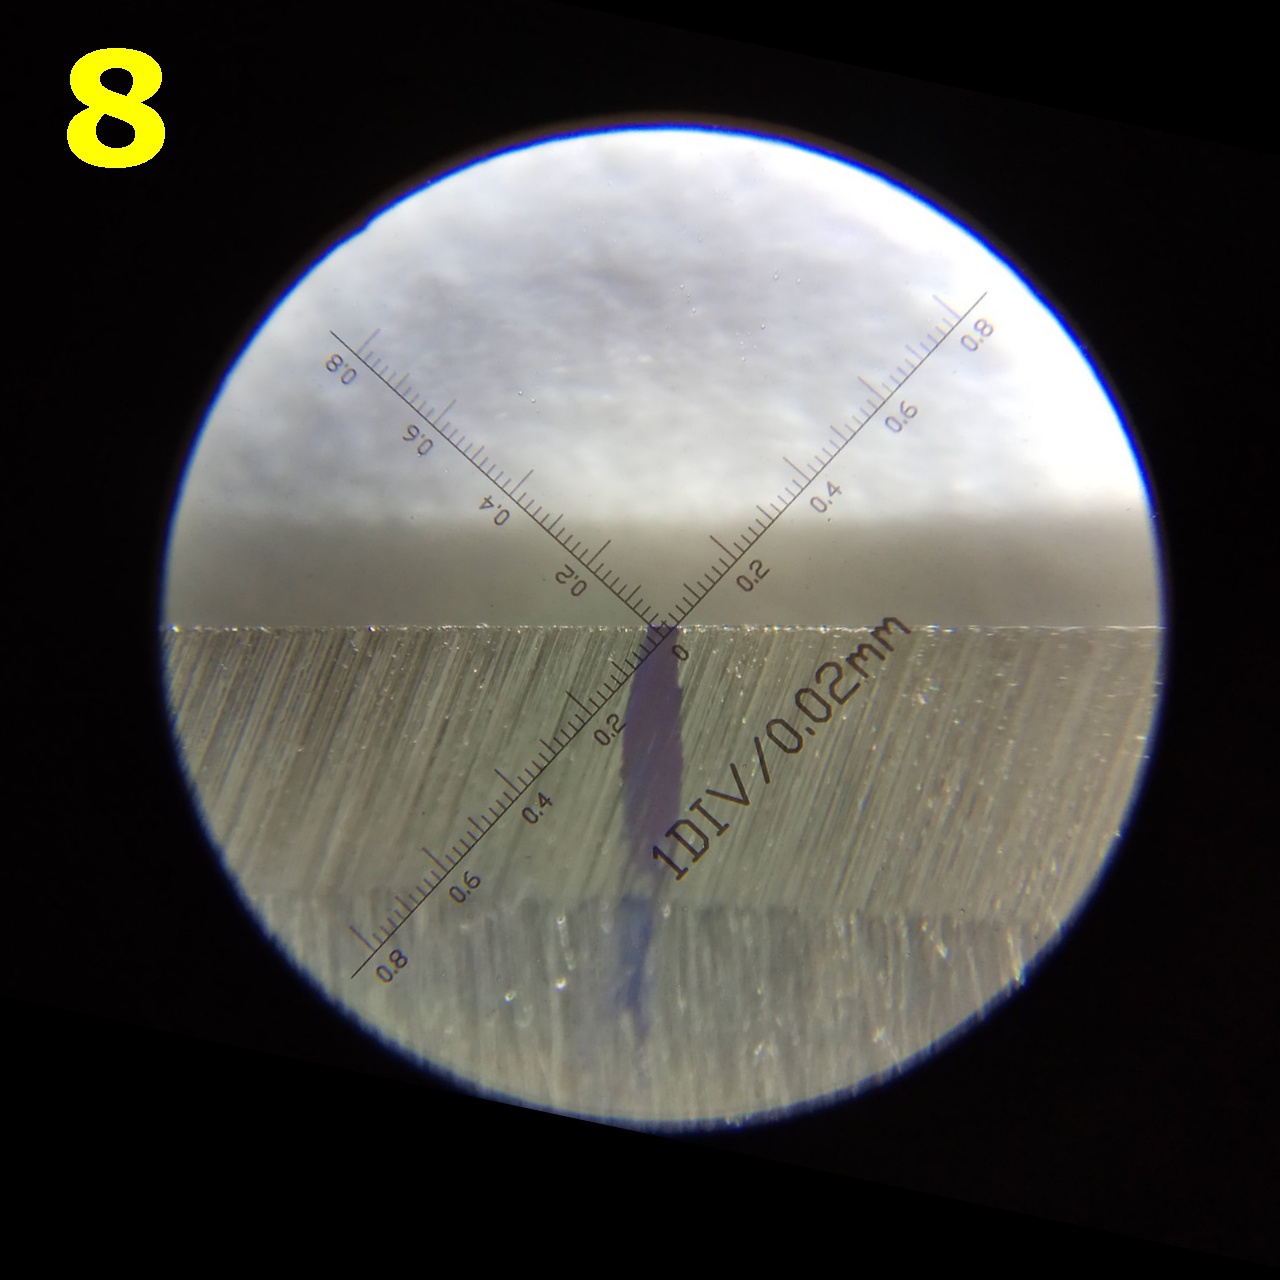
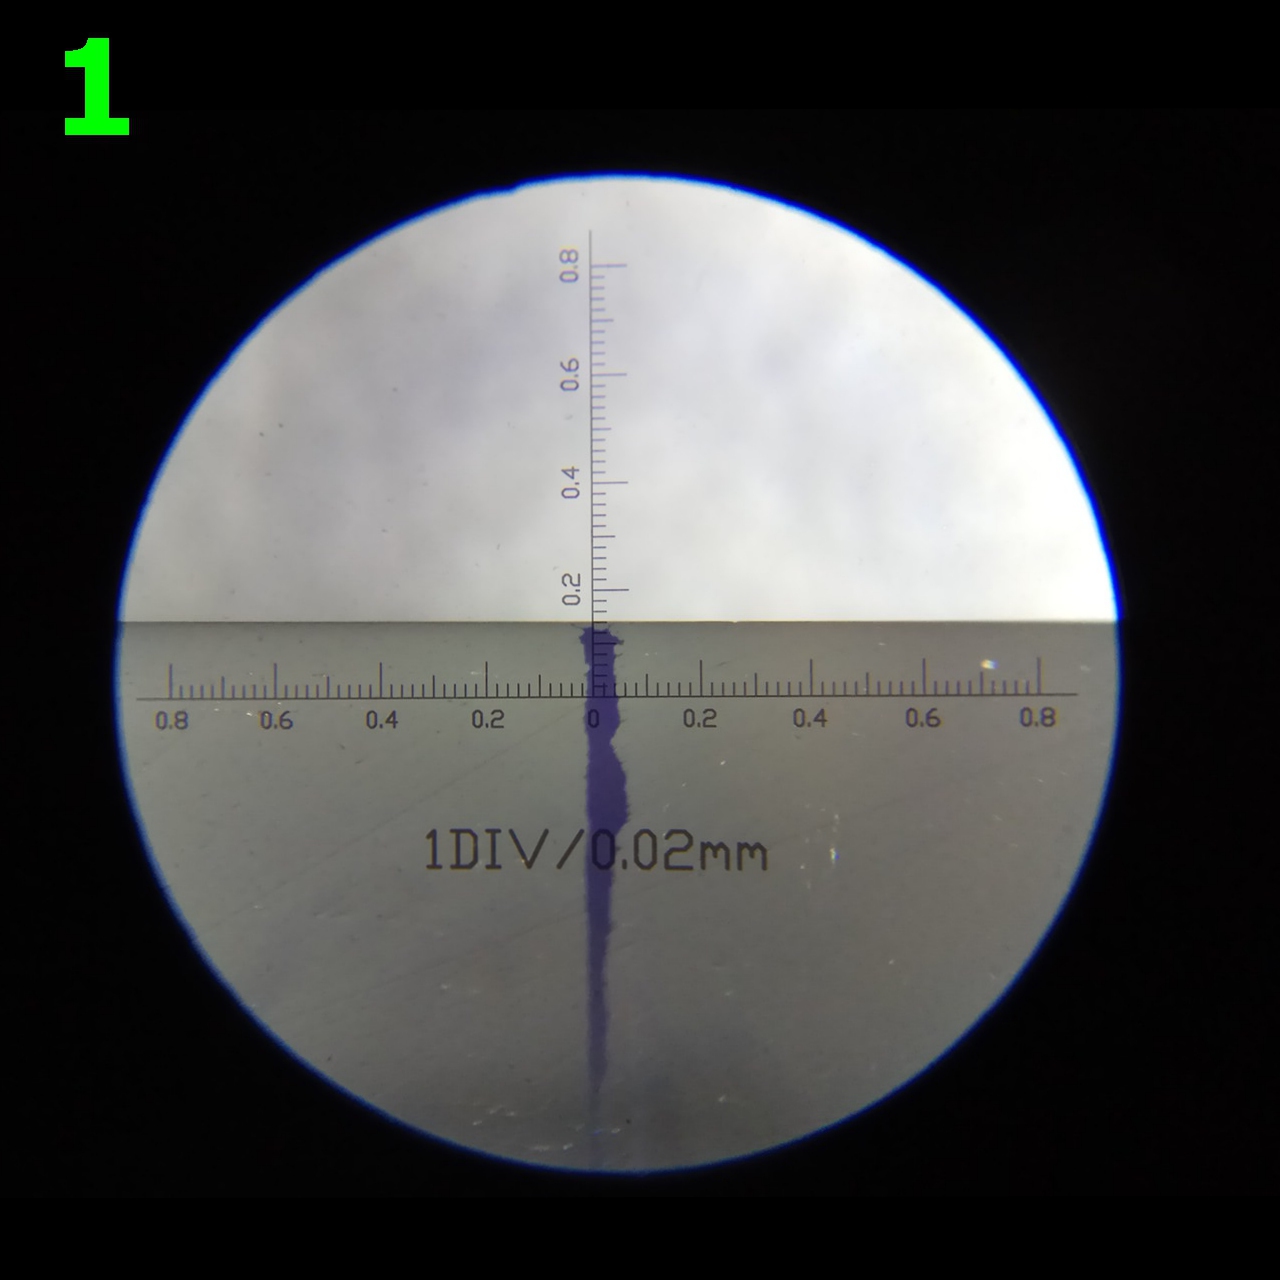
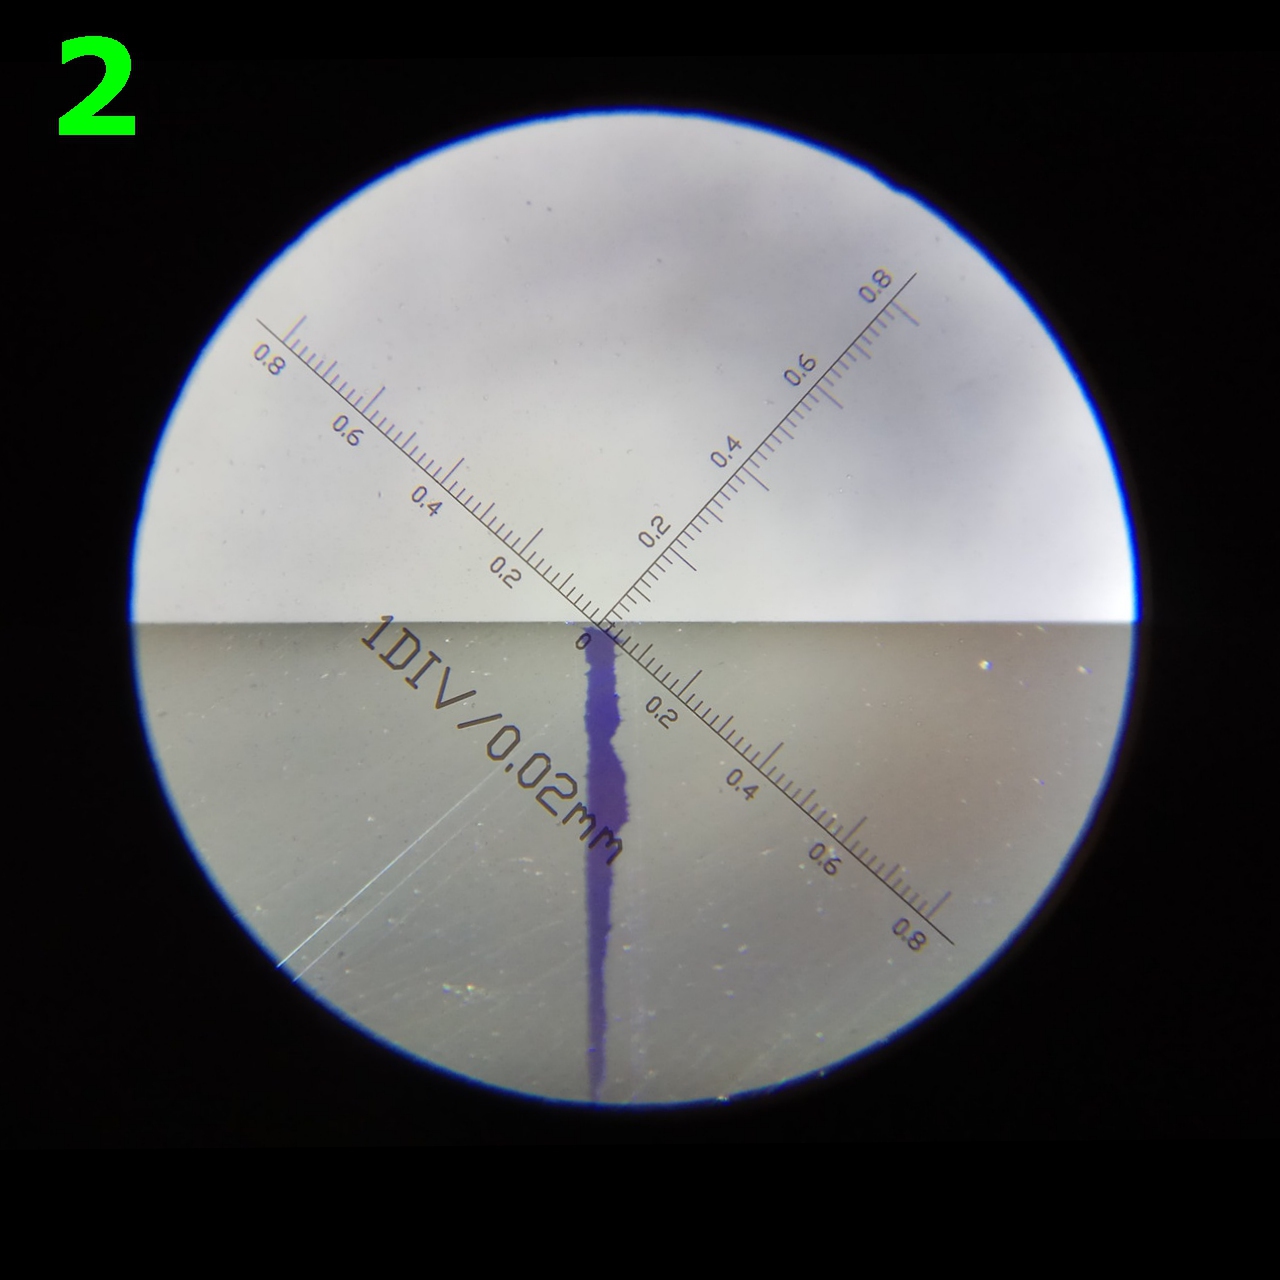
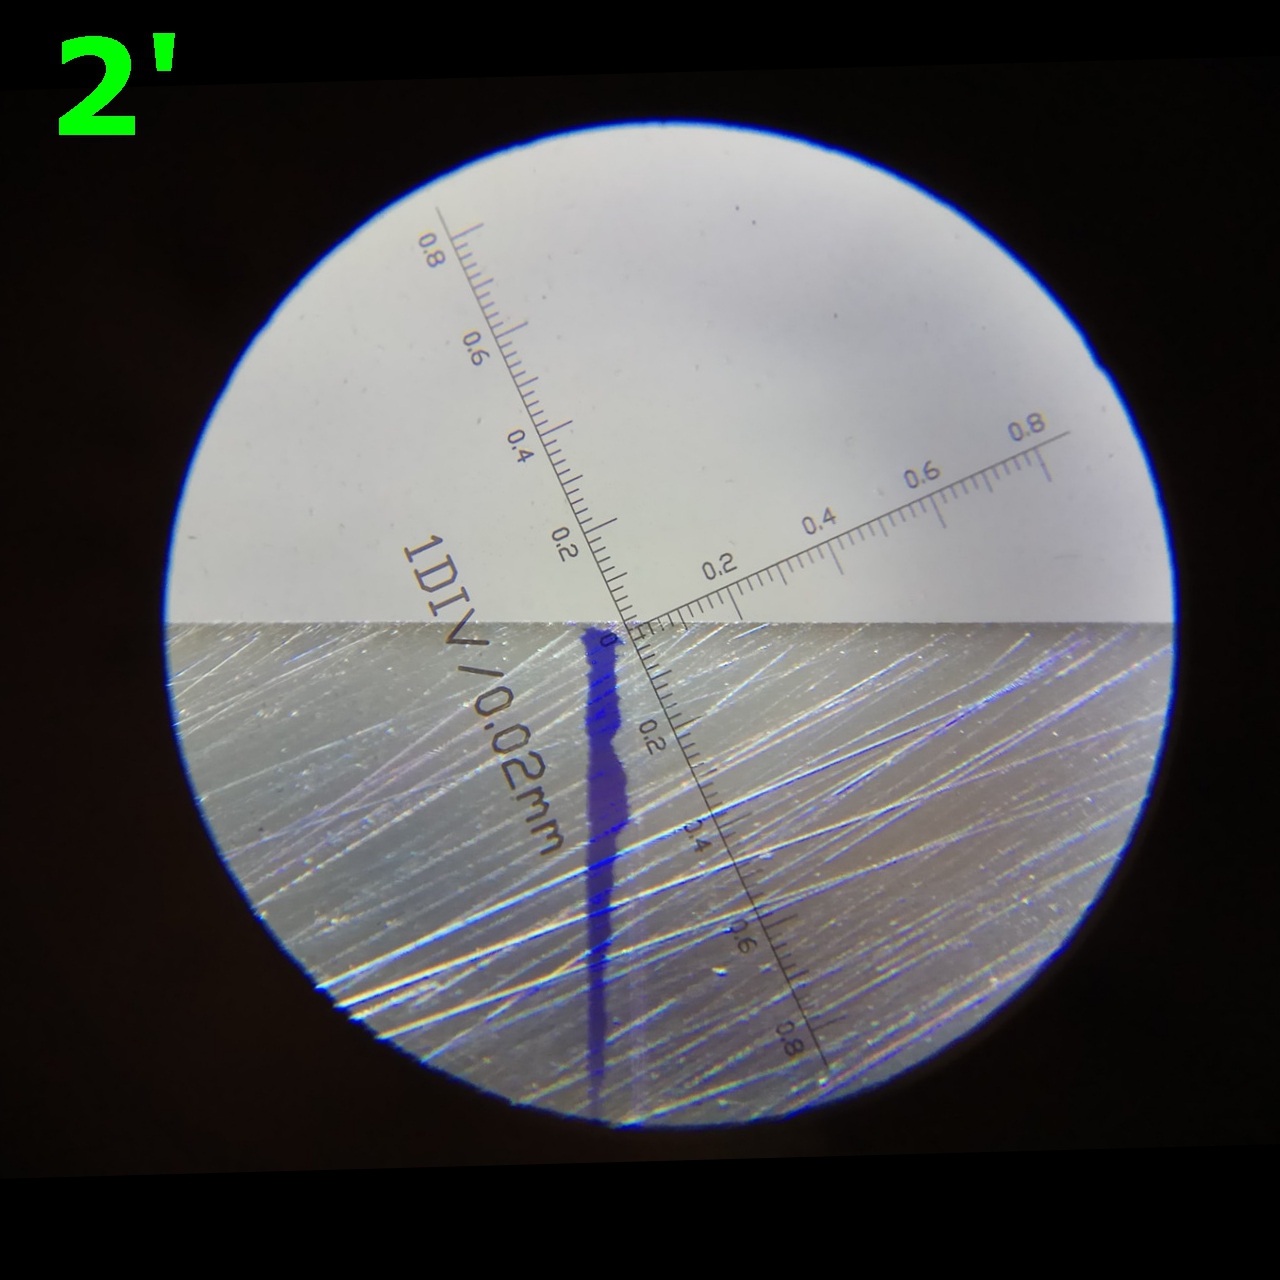
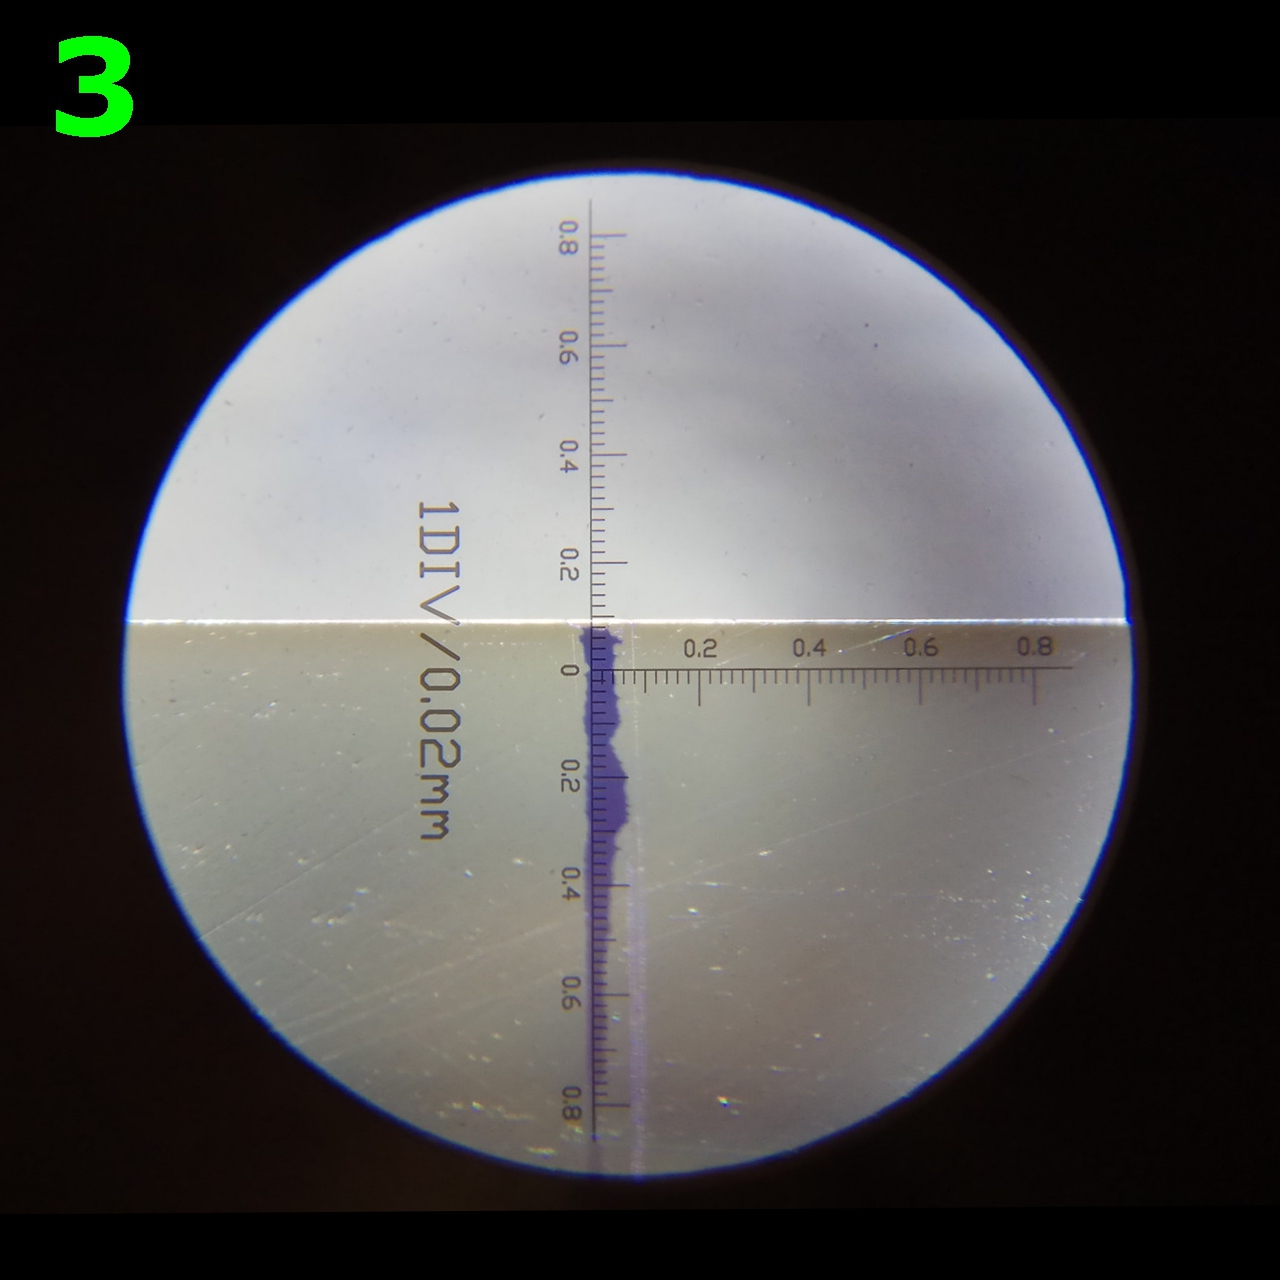
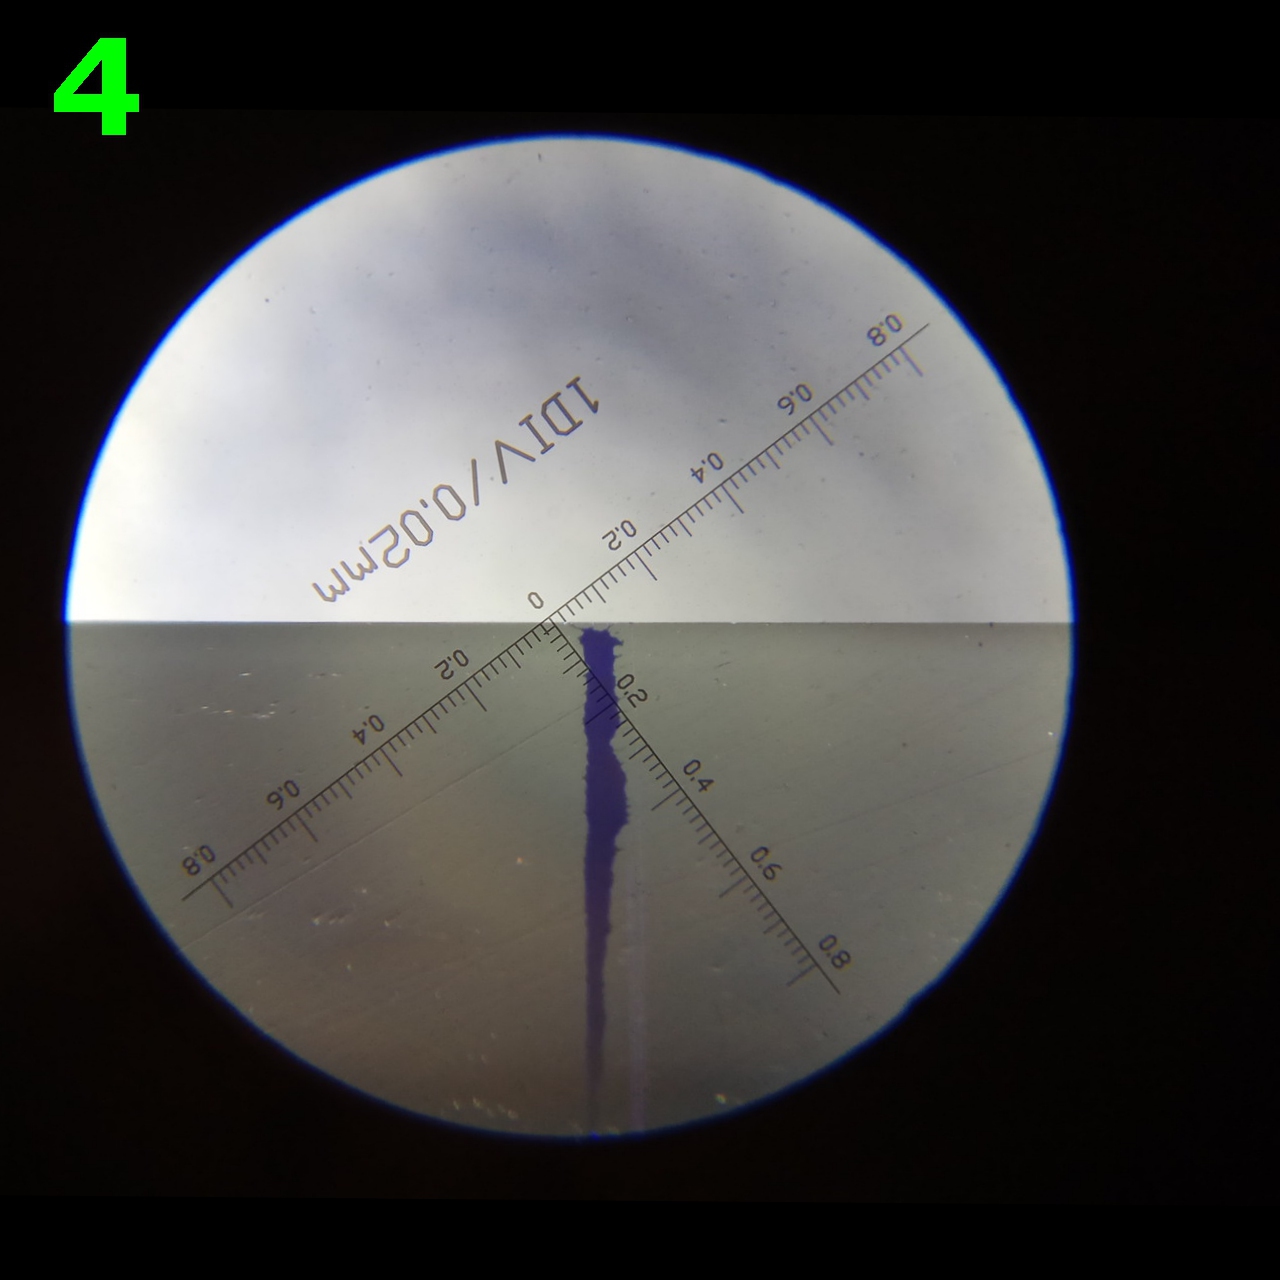
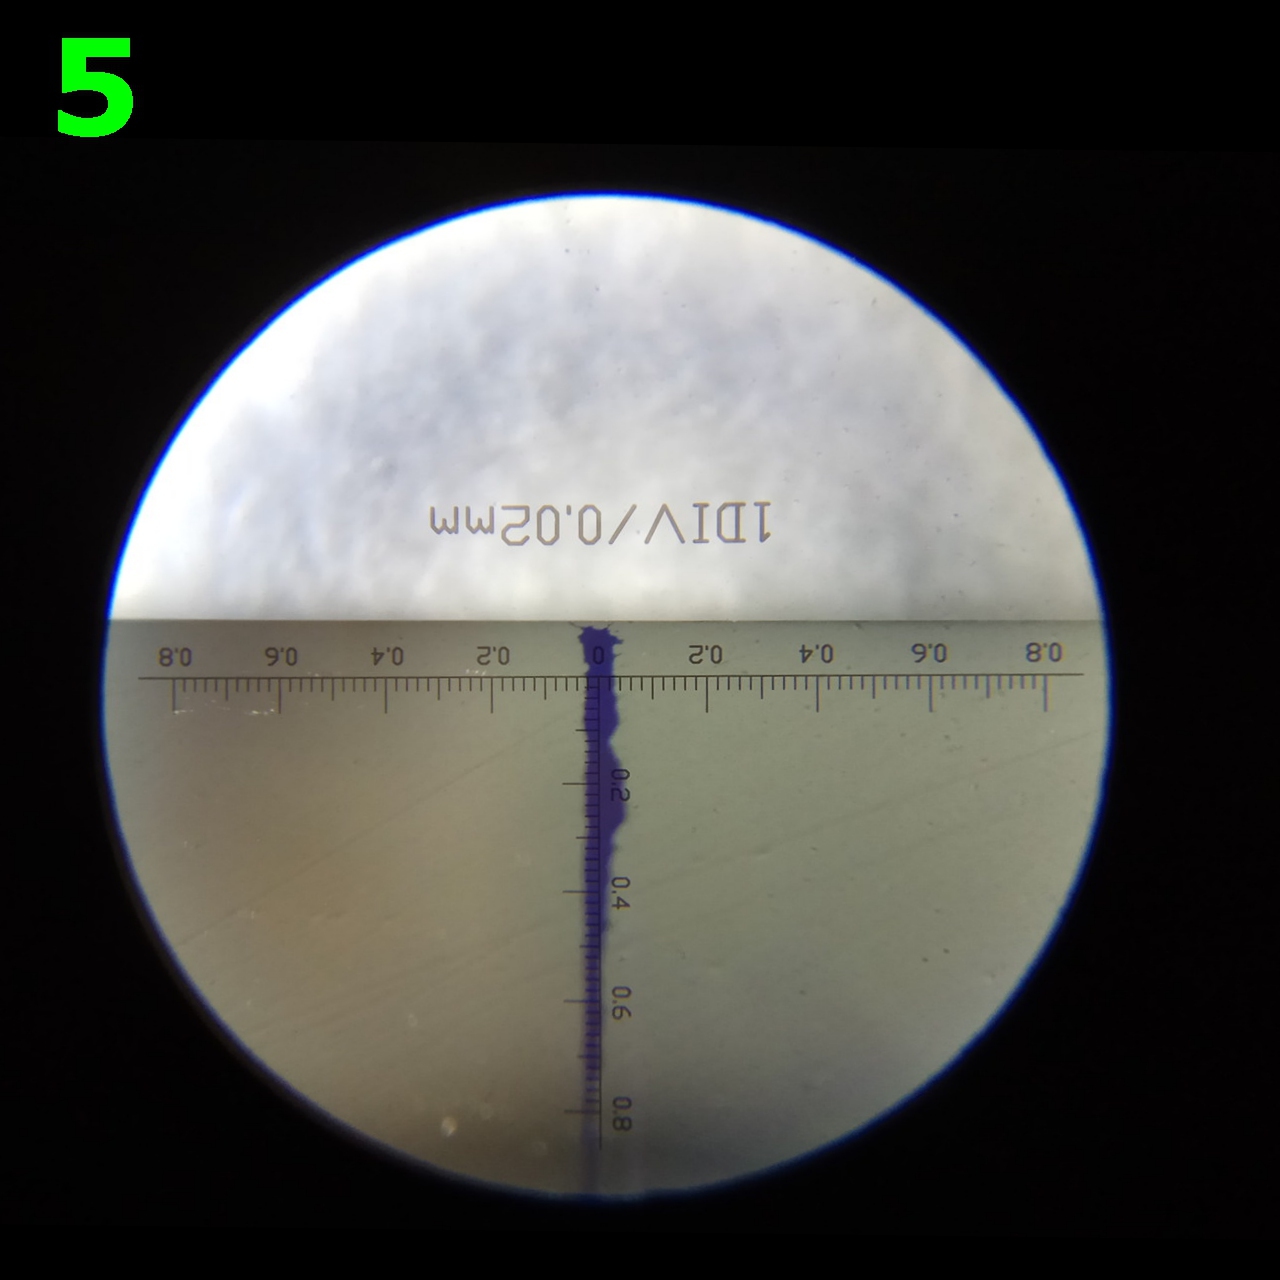
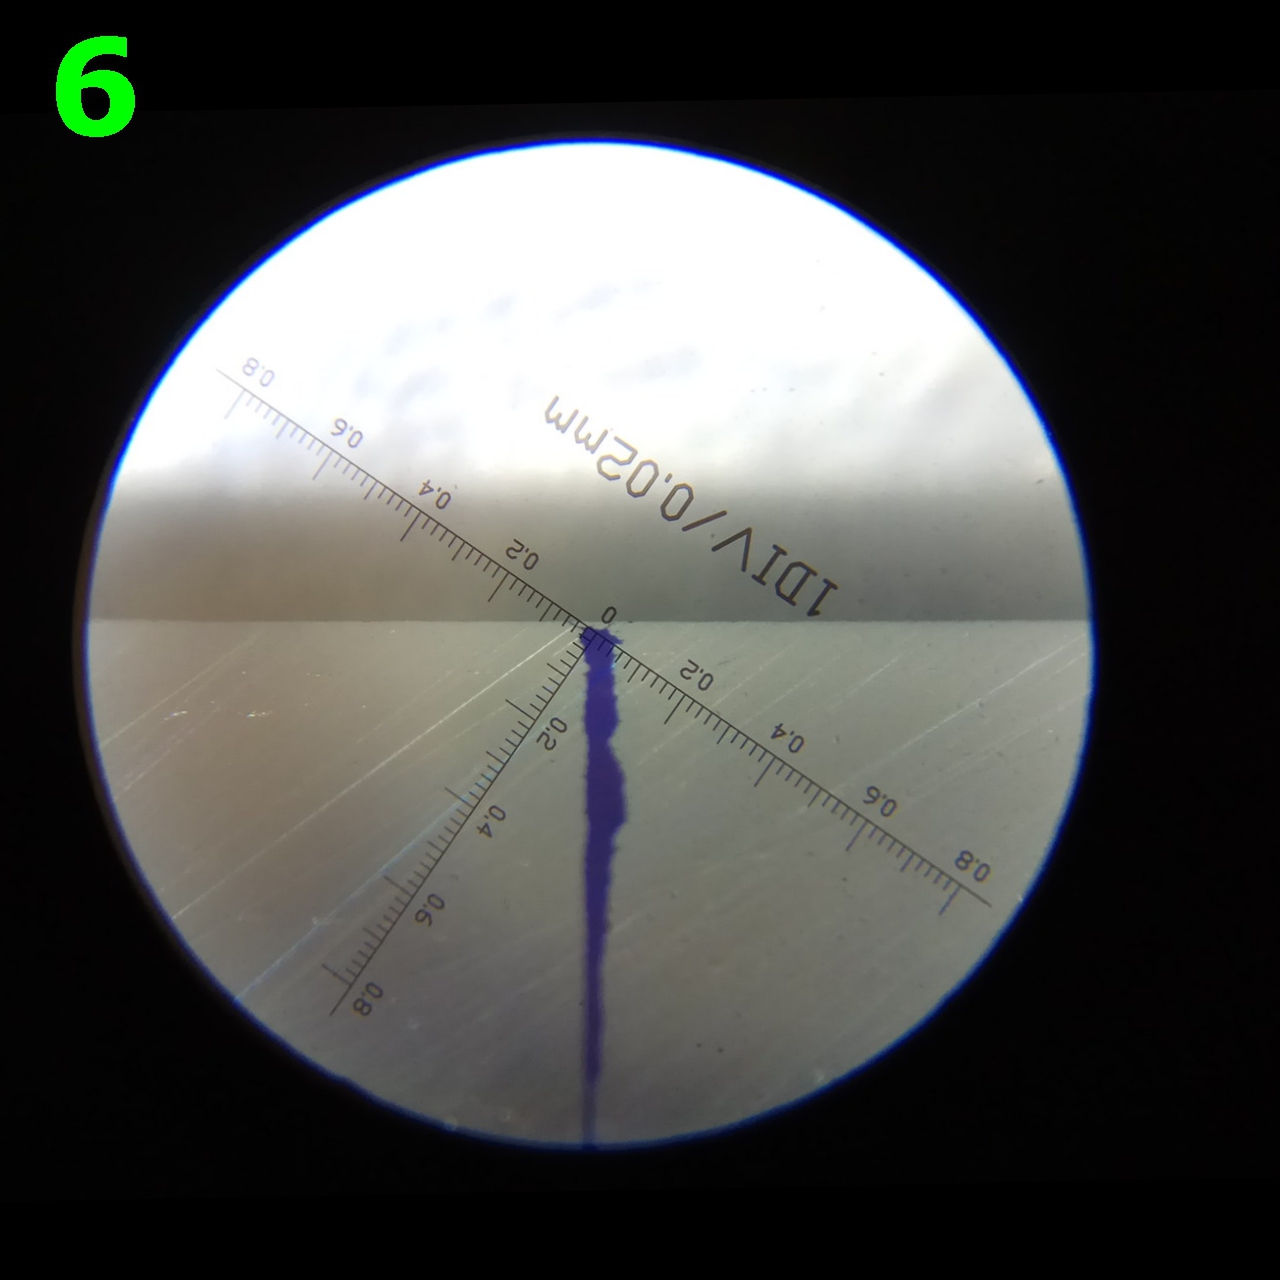
I always had an interest in guided rod budget sharpening because knowing (and doing) the sharpening of an edge is a highly useful and satisfying skill. Guided rods are more consistent and precise with the sharpening angles, very easy to operate, and why pay more as a beginner in the field? This thing costs 20US$ on ebay including 4 fantastic original whetstones and it taught me a lot, alongside the gain of massive experience, about sharpening in general. By now I really know what i am doing and why and what should be done next, the next step in the sharpening process and how to know if every step was completed successfully. In the end, imho, it comes down to seeing: If every dude saw in real-time and 100x magnified what his passing of the whetstone just did to the edge, he would instantly learn if the edge manipulation has been correct and doesn't need correction; he would take instant control, correct right away, if needed, and reach the desired sharpness without detours. It is imho exactly that, being blind and not seeing in real-time, which is the real reason which makes sharpening so difficult. My portable microscope helped me to see at least in stages; and that's where i learned about progress and failure.

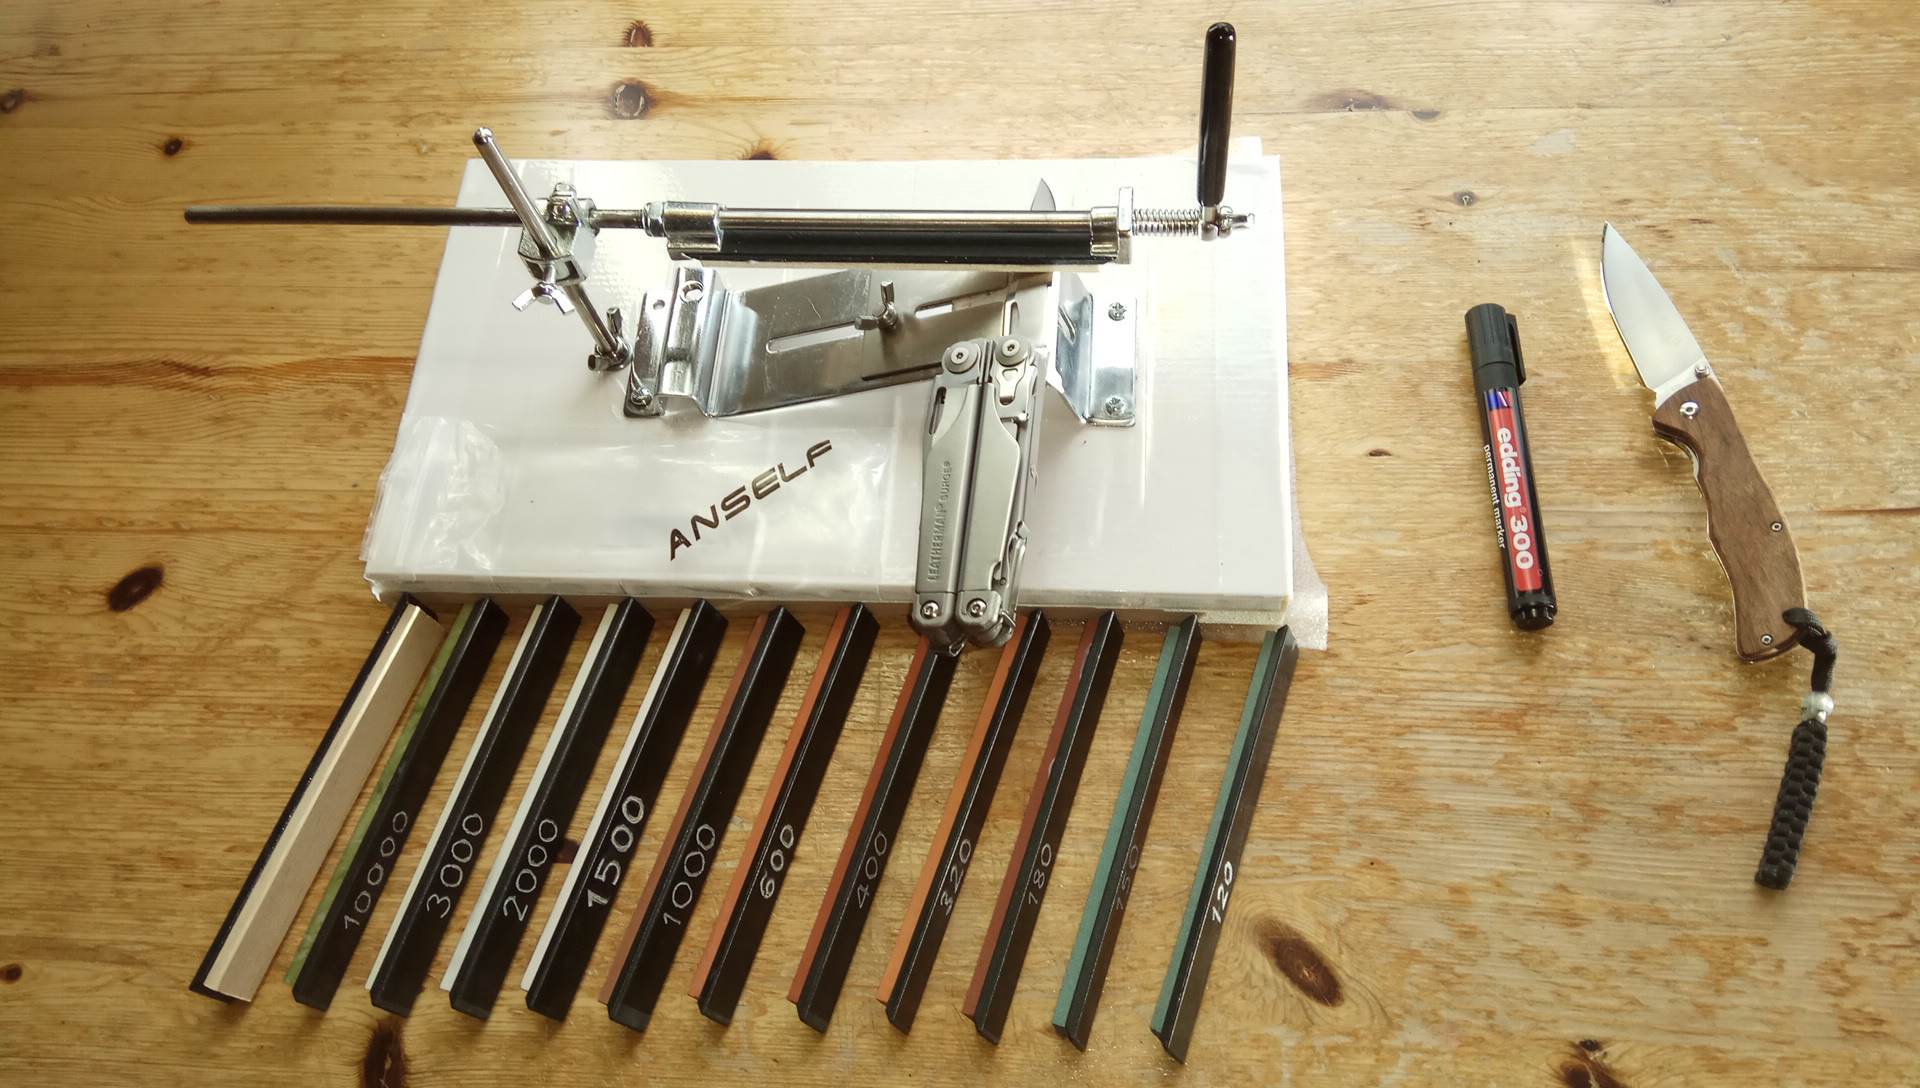
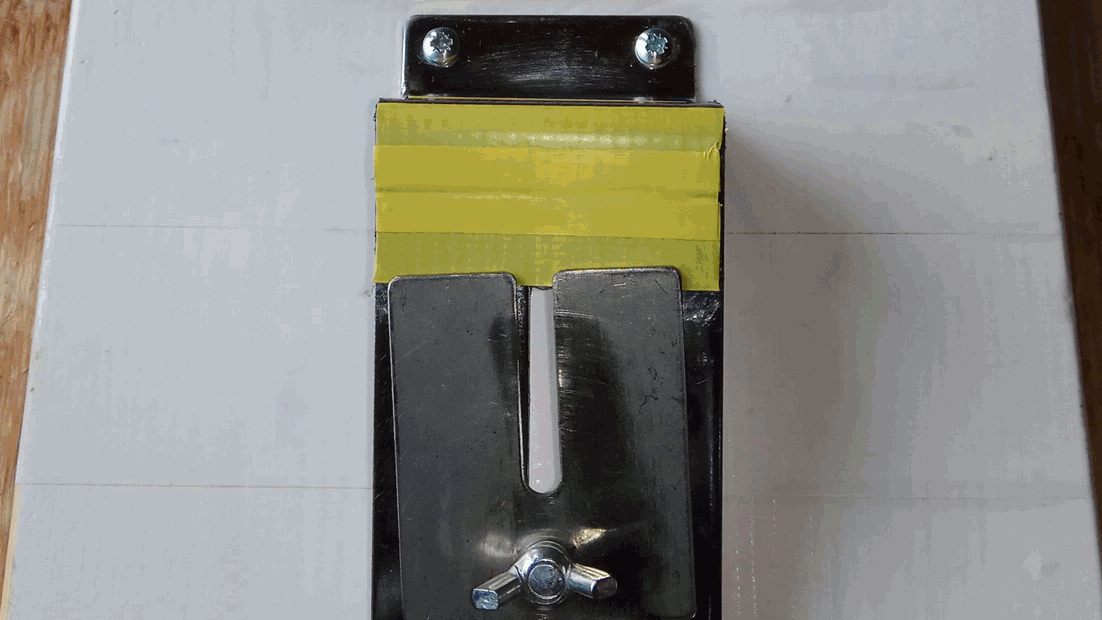
This post can't be about the principles of sharpening (apex, burr, grit progression, burr reduction, burr removal, stropping, polishing), so let's move on to the main product, the (now popular?) 'Ruixin'. I got that version (2015 model? also called 'Ruixin Pro V3' or 'Gen3' or 'III'?) in January 2017 and have been using it since, whenever i do a sharpening session, which is not very often or regularly tbh. What can i say, i've come to love this thing, and yadda yadda bla blah.

It's been 7 months or so since my last notable Ruixin session. In the meantime i didn't do any sharpening but procured accessories for this budget sharpening system and got acquainted with the concept, setup, build/make, and beginner's practice of stropping strops (various sizes, materials, and compounds!) to get myself prepared for the ultimate task: improving the factory edge sharpness of my collector's mint multitools by removing the least amount of steel possible and without scratching up the shiny blades!

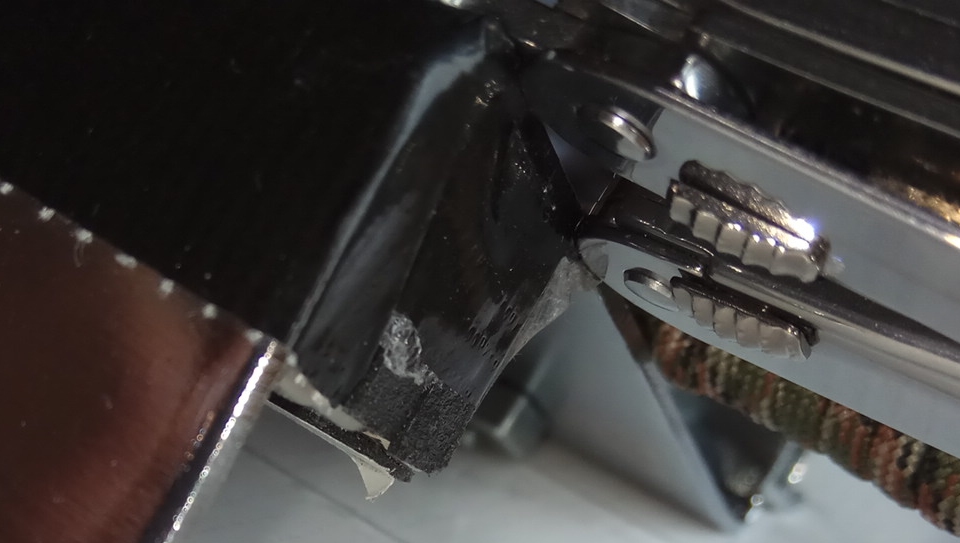
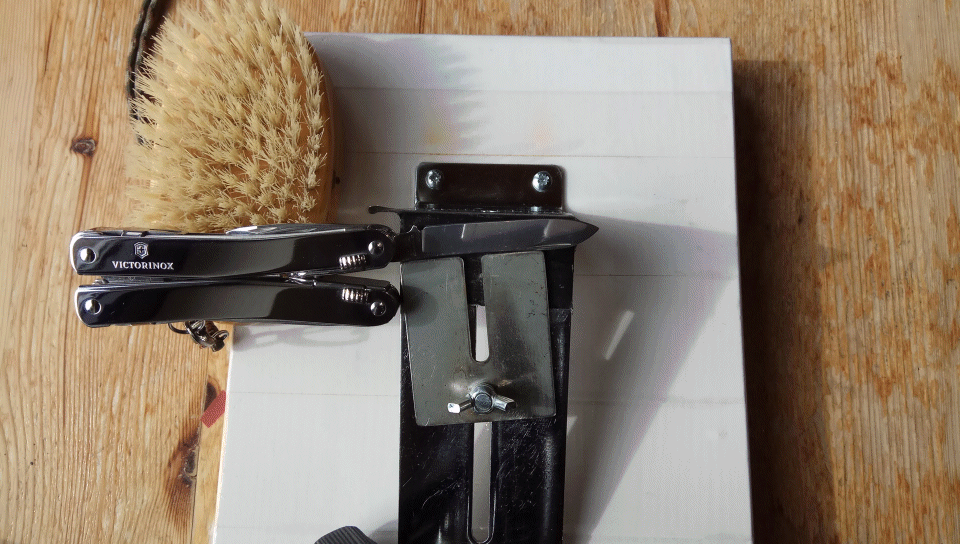
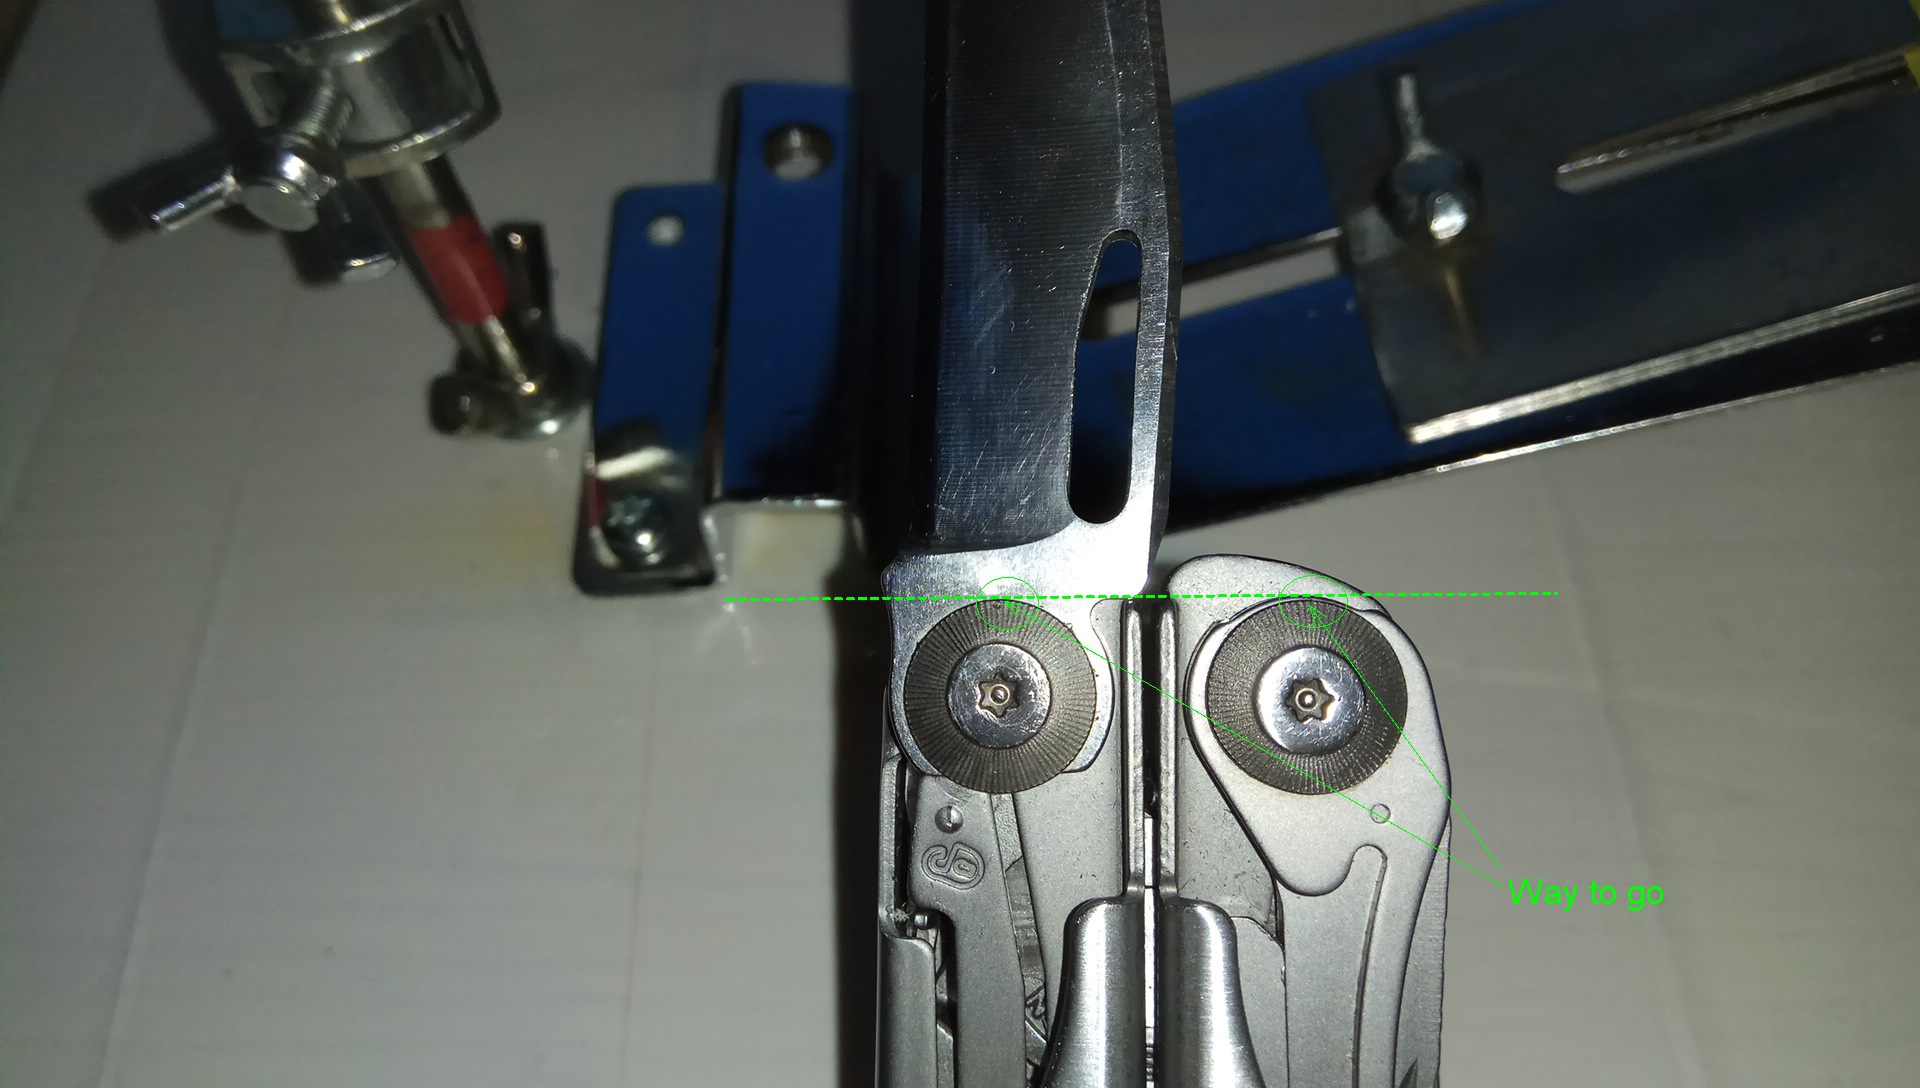
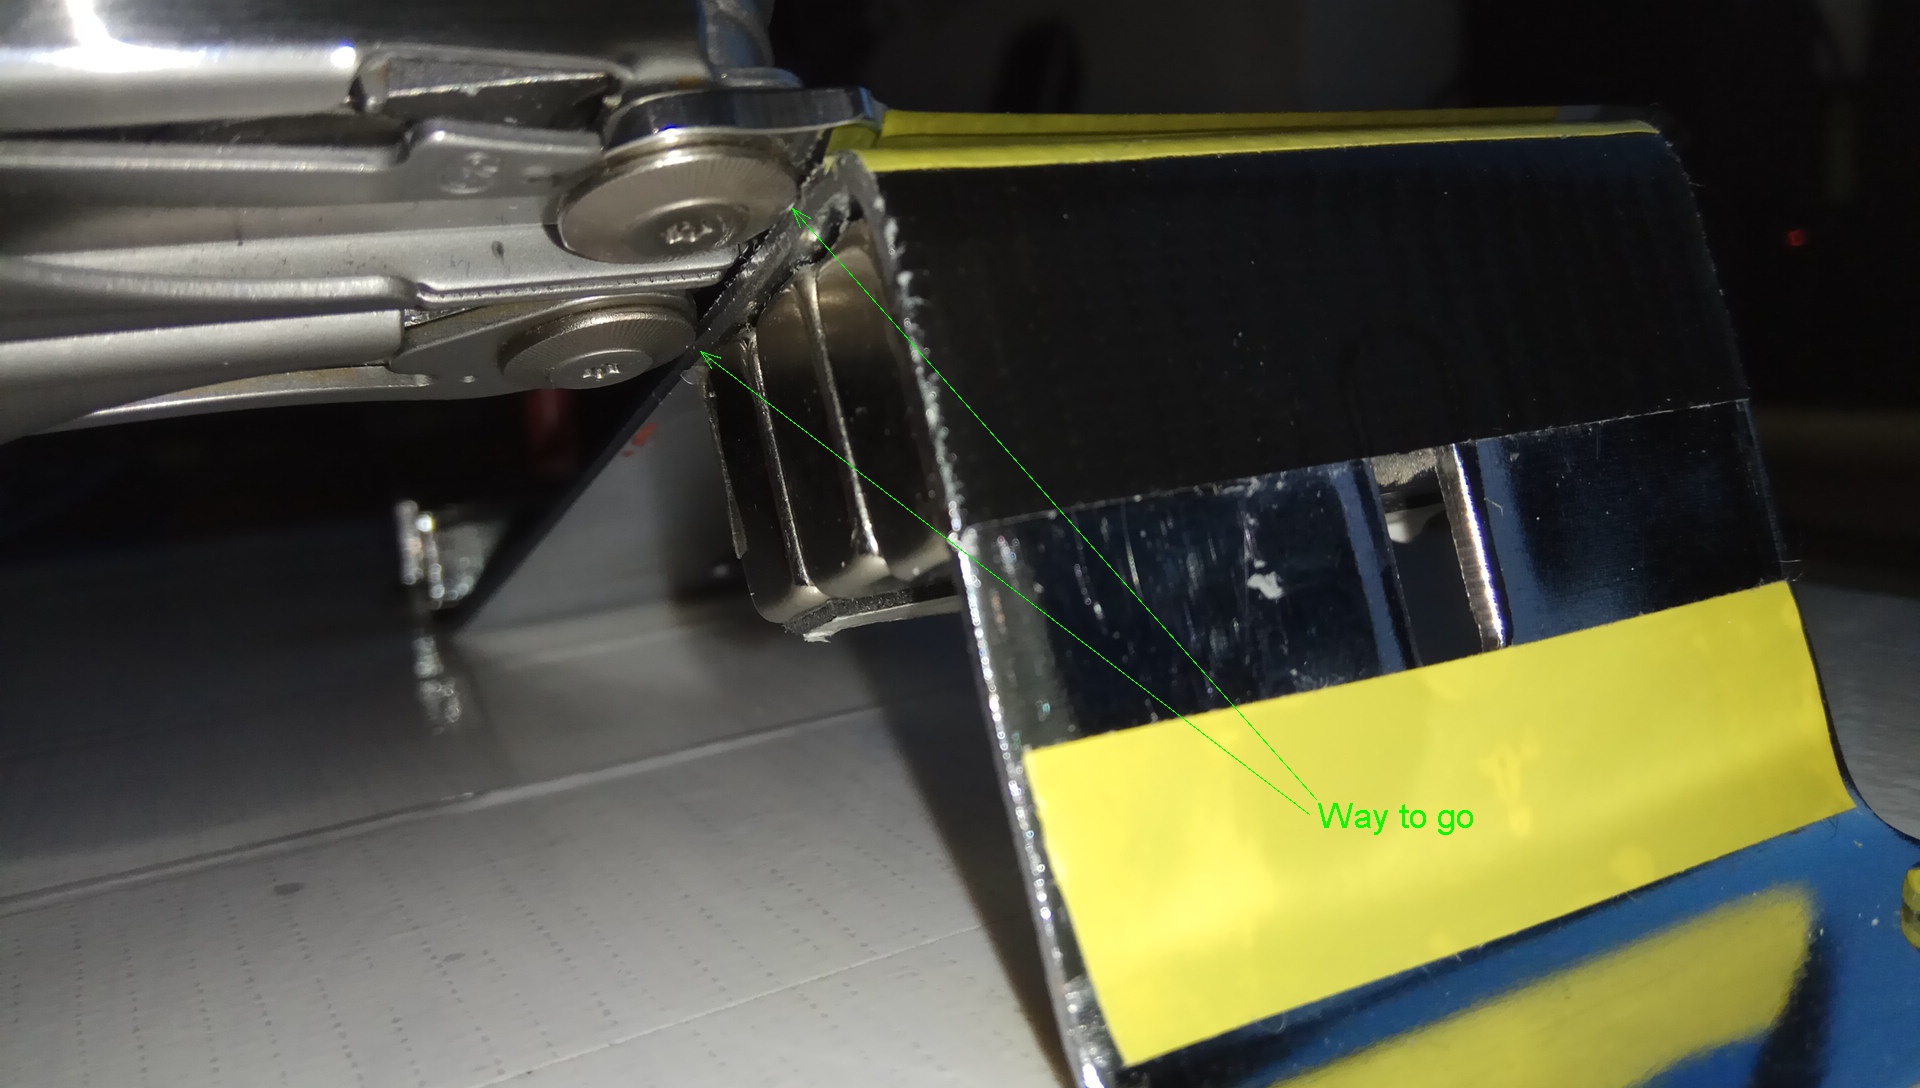
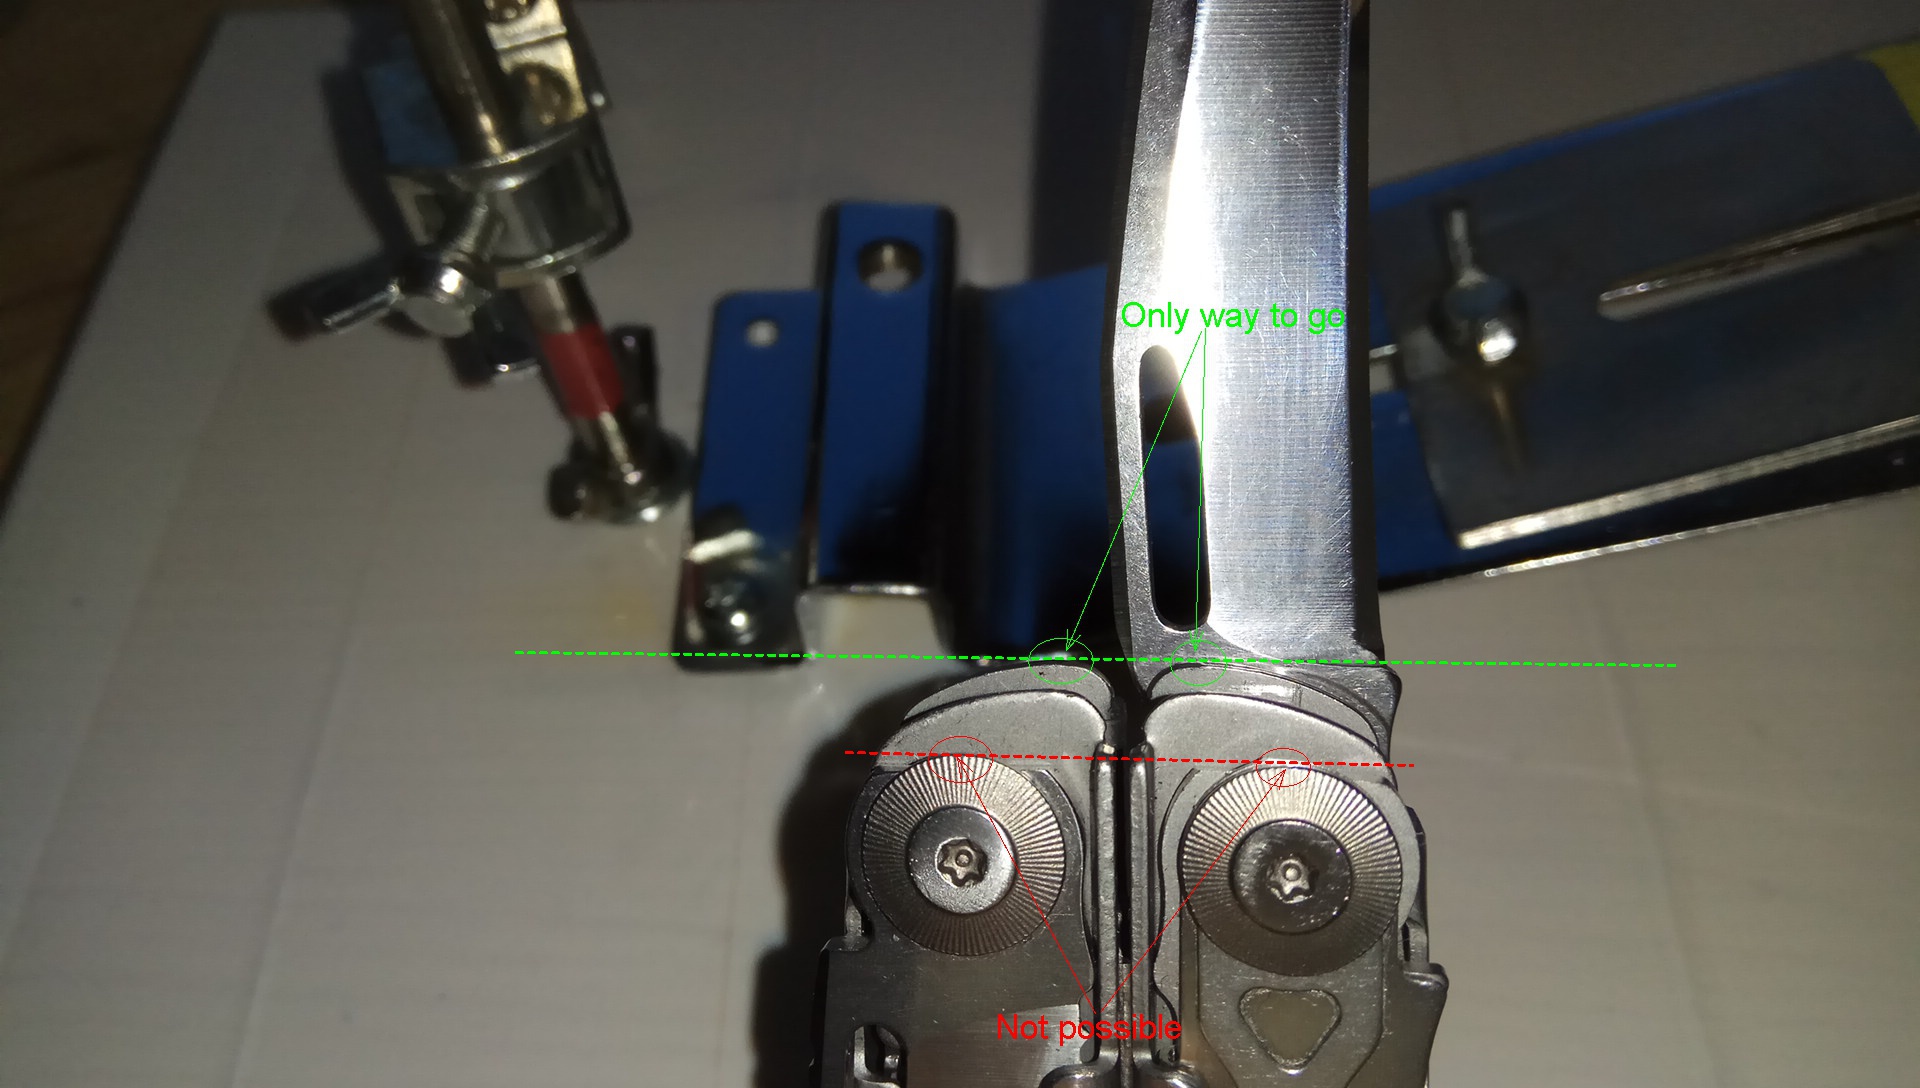
Finally, i found the time and motivation and followed through, as planned 7 months ago: in the past days I have successfully sharpened the non-serrated main blades of my LM Surge (polished edge with secondary bevel removed, slightly reprofiled blade shape naturally due to the Ruixin's inherent workings), Vinox SpiritX (arm-hair popping razor-sharp perfect geometrical edge with original angles, symmetric), and Vinox Camper (was a prize gift so i used it for learning and practicing the stropping concepto_O).

The work on the Surge was a pita and i am glad that i came through, somehow, with my inappropriate sharpening tools including the Ruixin. For starters, one would need sharpening rods (different grits, different materials), which i don't own and don't plan on buying, something like a Spyderco Sharpmaker.

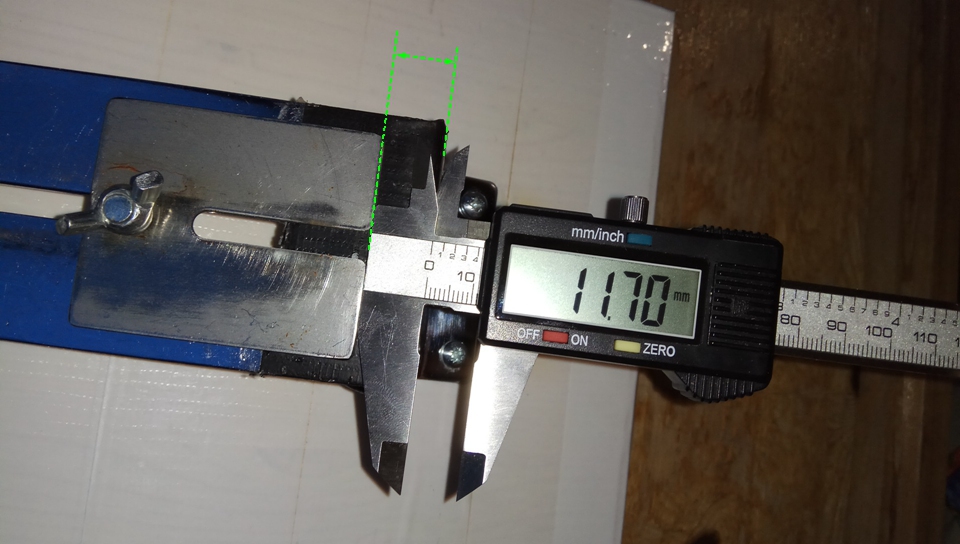
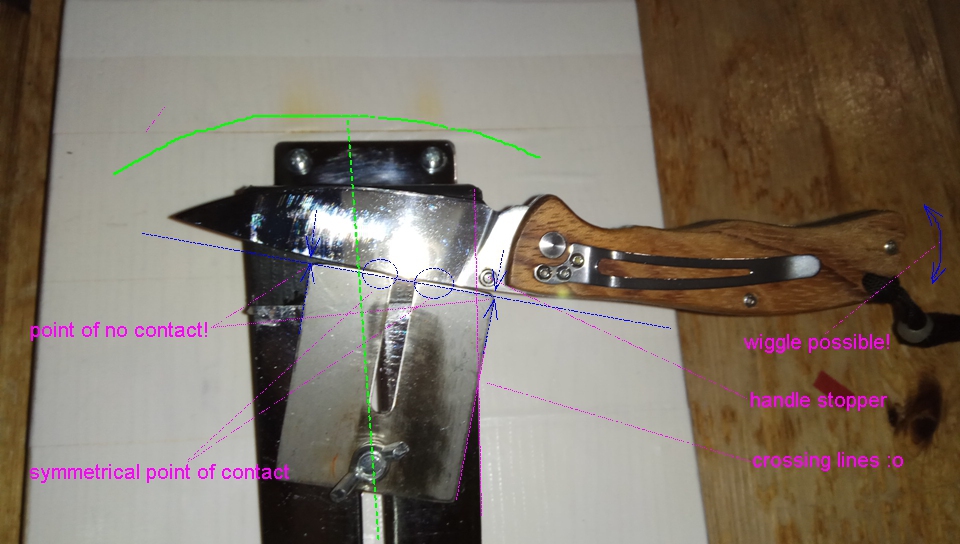
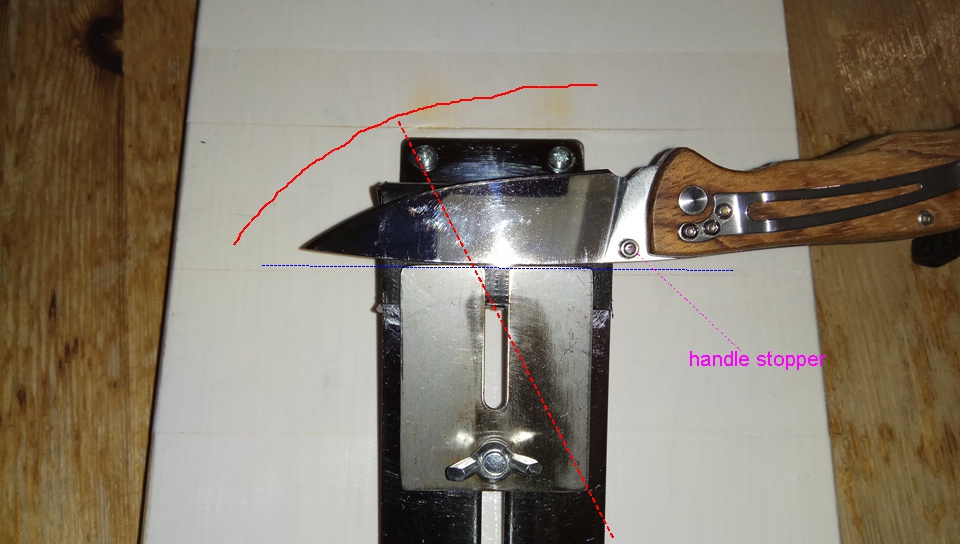
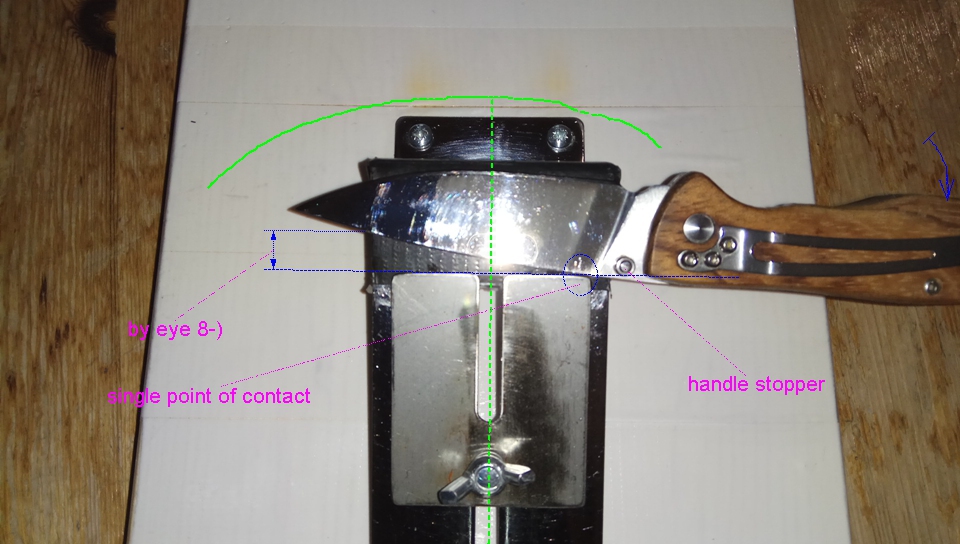
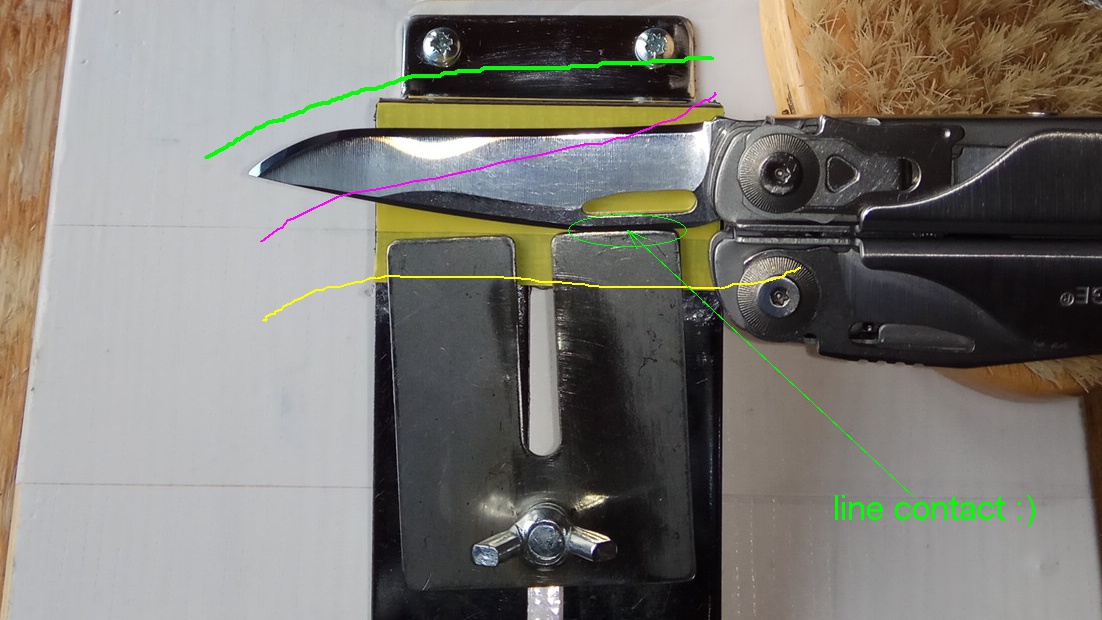
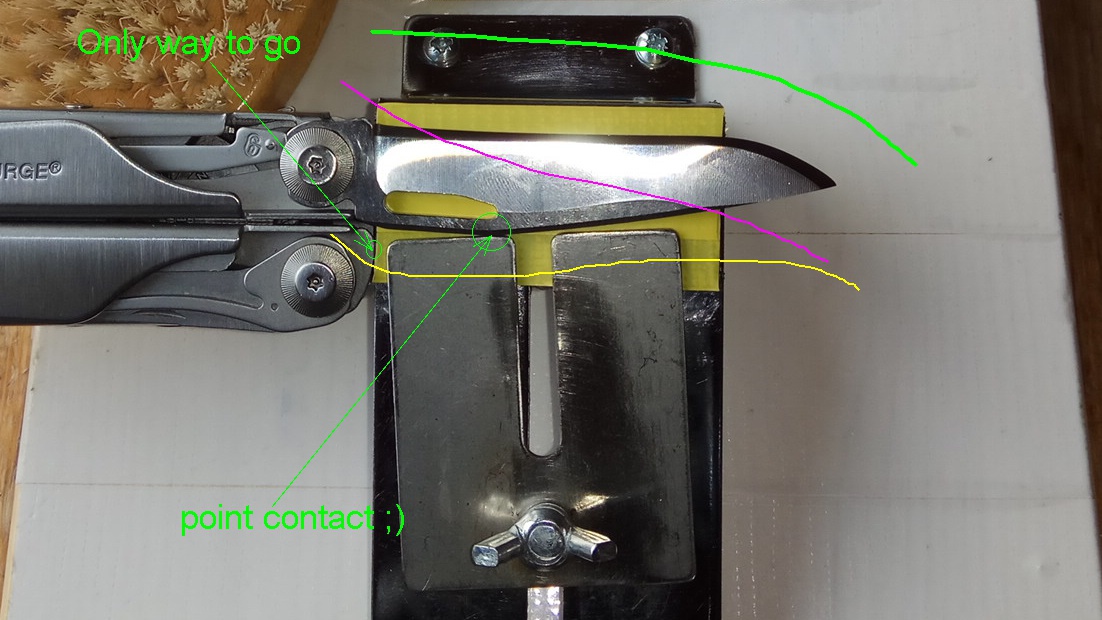
The work on the SpiritX, on the other hand, was much fun, deeply satisfying, easy/fast, without problems or challenges, and led to the sharpest result i ever produced, wow!:eek: And yes, crazy me, i started the SpiritX sharpening process with the Ruixin!! Why? Because the knife edge had grit machining marks on one side near the blade tip, and i preferred to not smooth them out by stropping. And because i wanted to check, if one could use 1 single Ruixin setting (angle, ..) for the SpiritX, knowing that for the Surge one needed omfg 2 different angles on the Ruixin, i.e. my modded Ruixin setup, to match the LM factory bevels.

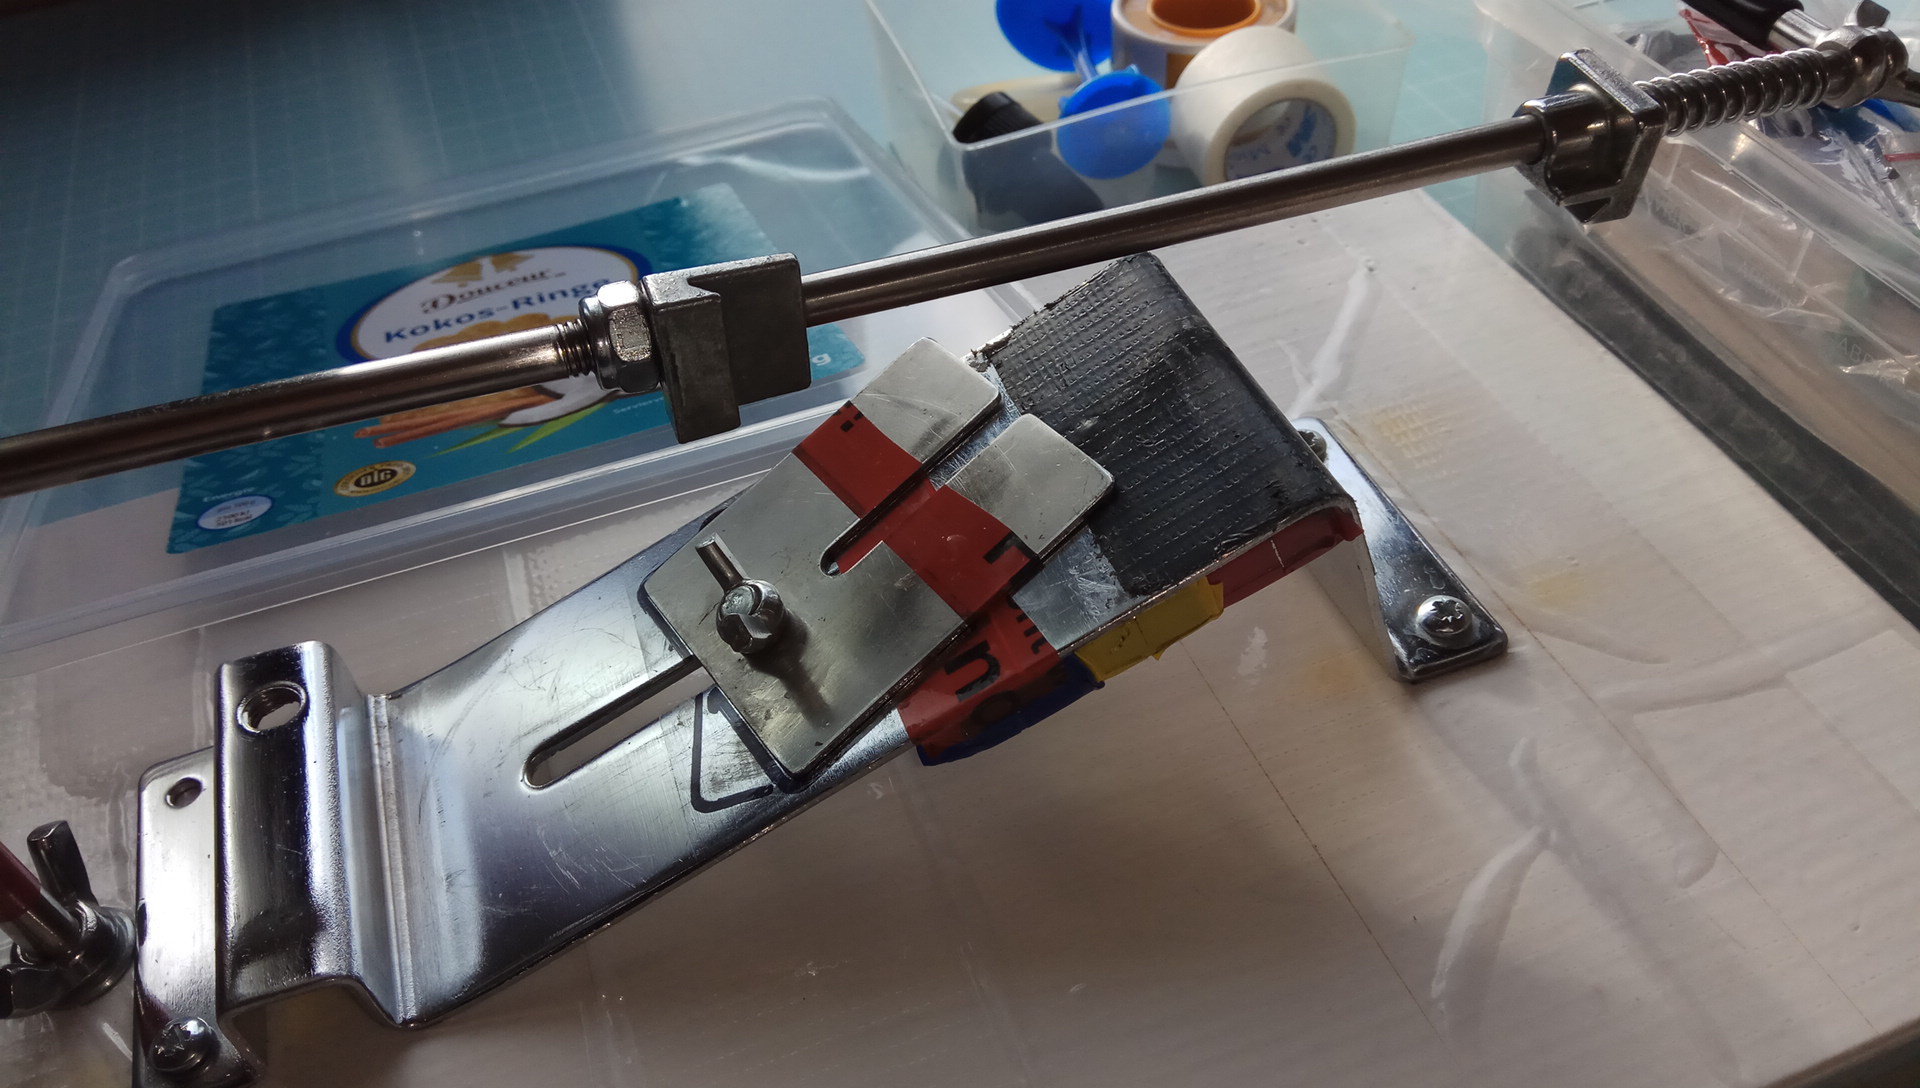
I do take notes on my smartphone about the Ruixin settings (height of the wing nut, distance of the stainless steel plate, where to place the knife and similar specific comments) of each and every knife which i sharpened on the Ruixin; these notes proved to be very handy for the next sharpening session of the same long kitchen knife, for example.

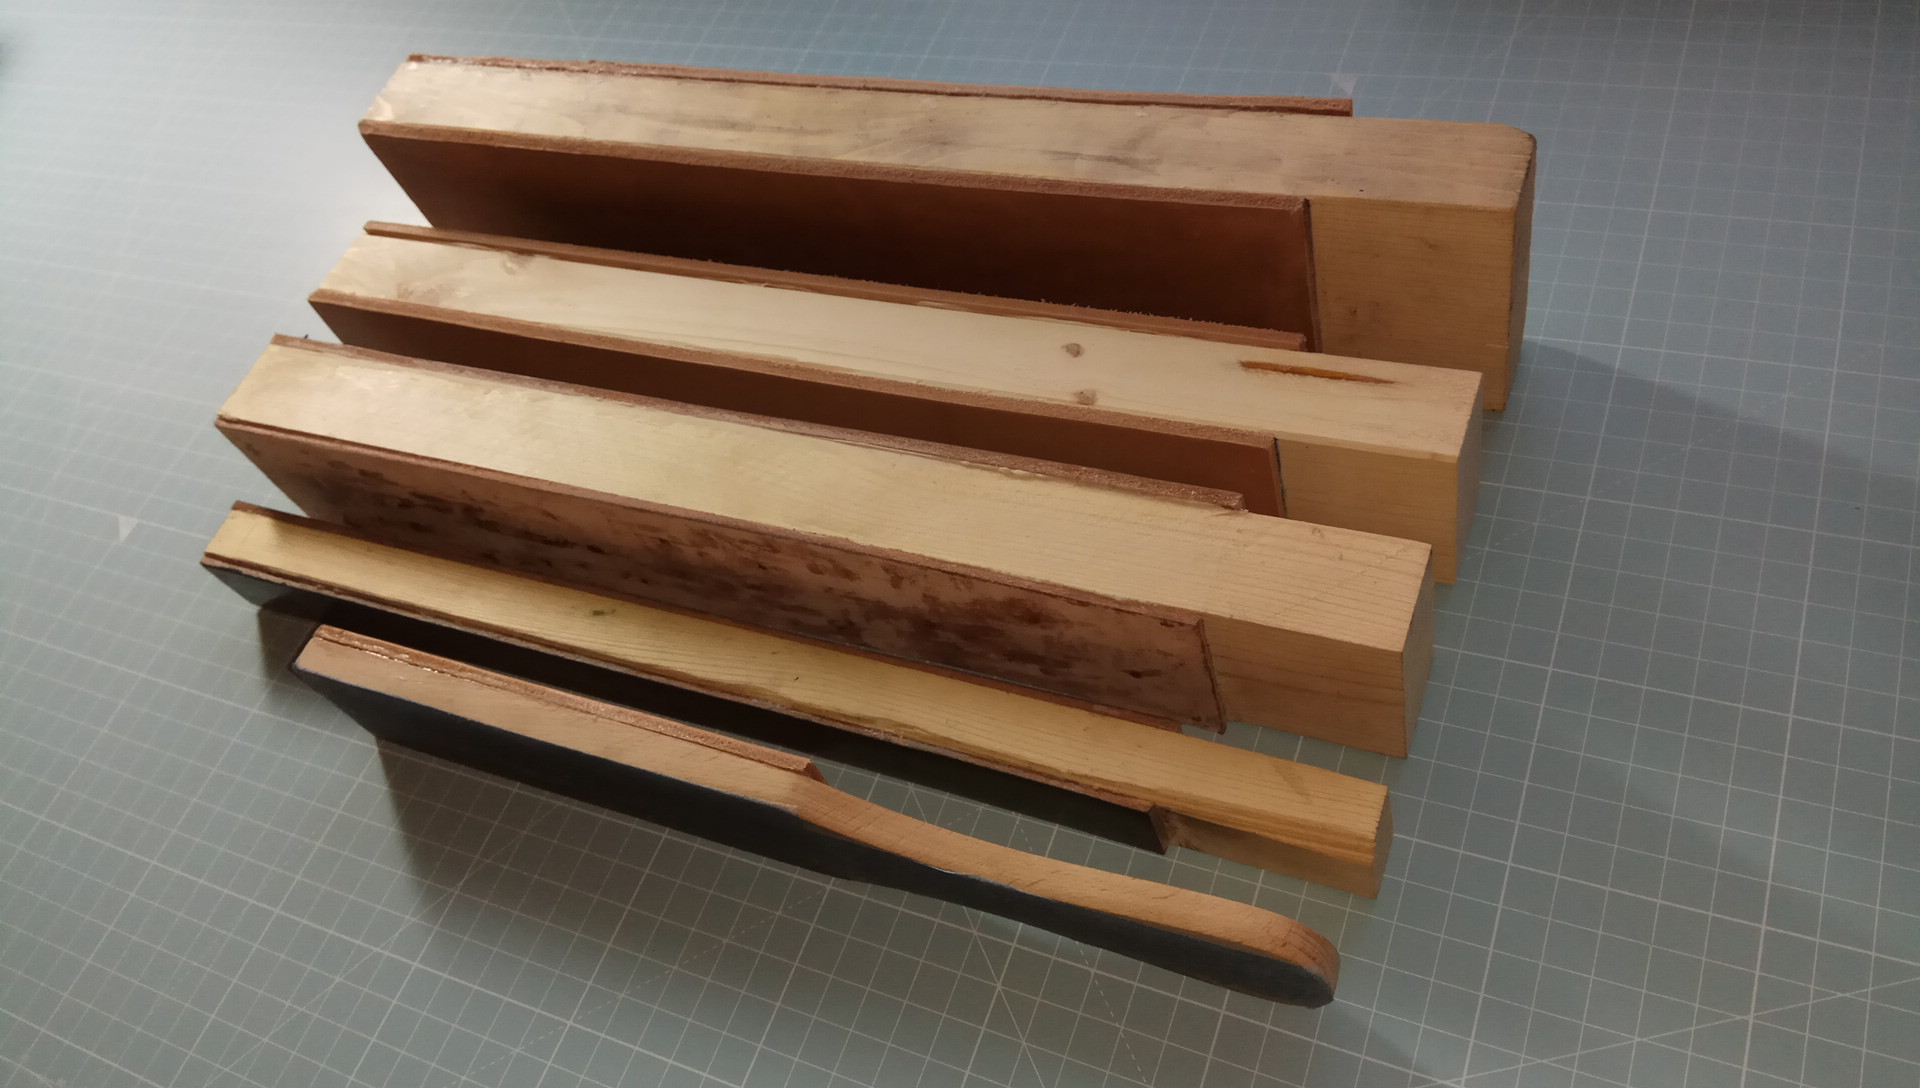
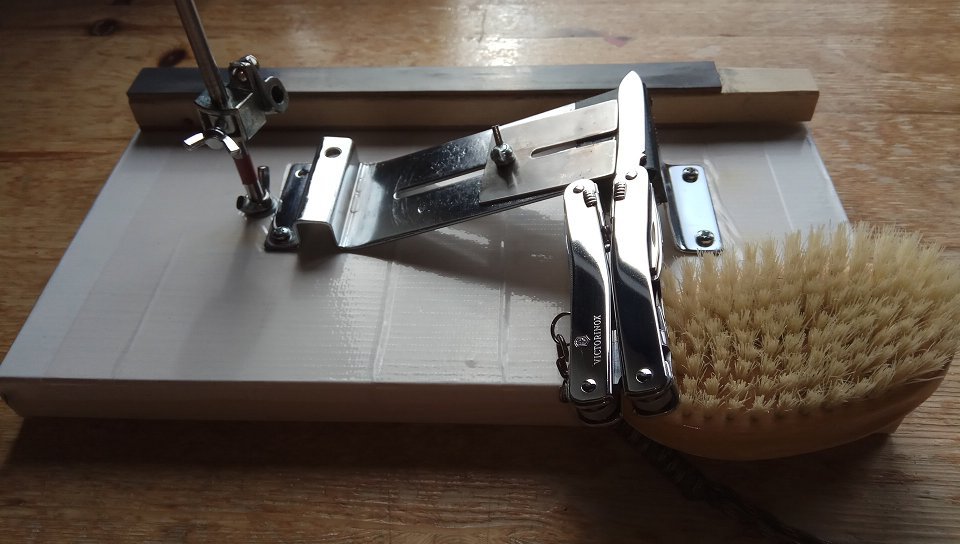
Sometimes i also use the Ruixin for stropping: i bought balsa wood and glued it on the plastic holders (they are available from Aliexpress for cheap, 4pcs for 3$ iirc), loaded it most easily with compound, and then off i went. Works really(!) great for just removing the burr without any major polishing of the apex. I will definitely recommend the use of ruixin DIY balsa strops, especially for beginners or budgeteers:
ruixin1leatherman51sxs.jpg


Again, last but not least and never mind Lansky, Edge Pro Apex, Ruixin Pro III, or similar, the most important step is the final step, the stropping on a nice size leather strop loaded with an effective stropping paste. I am guessing that mostly 'sharpening beginners' (like myself) are interested and use these low cost sharpeners but they probably ignore or don't know that stropping is more effective, more important and must not be neglected. Alternatively one can use the PTS method for stropping plus polishing the edge.

Btw i also own another Lansky knockoff, distributed by Exduct, horrible build quality. Back at the time it seemed like the best budget system due to the lack of other commercial offers and i spent many effing hours with it, trying to learn about progress and learning failure instead ouch. Never mind. I am so glad that i got the Ruixin. It is fantastic, so much better than Exduct (and Lansky i suppose).
 
Last edited:
The good, the bad, and the ugly

I got full blown motivation to buy it and do similar mods (improvements) after i had watched the following interesting video:

The Pro III (modded) has absolute key characteristics, advantages, which makes it in the end imho superior to many commercial Lansky-style sharpeners. Lansky was the first of this kind afaik, so kudos to them, all designers took inspiration from them and copied the principle. Looking at my modded Pro III, i appreciate the following points:
  • very stable base, no wiggling movement of the system whatsoever. this is VERY helpful/important/pleasant. also very easy/fast to clean, just wipe off, you could imagine. the base also doesn't slide during operation.
  • magnets at the metal frame 90degree-vertex hold the blade in position, quite firmly so.
  • typically, i.e. with small to medium length blades, i just leave the blade in that 1 position (as seen with most Lansky-type sharpeners) and don't move the knife back and forth (as seen with some Edge Pro knockoff instructional videos). Thumb and index finger of 1 hand (if needed!) hold the knife fixed in position, while the 2-3 fingers of the other hand move the sharpening rod.
  • so sometimes the 1 hand is not needed! then i am sitting back relaxed on my chair and operate the system with the other hand only, single-handedly.
  • flipping sides of the blade is super easy/fast, also VERY helpful/important/pleasant, since i don't clamp the blade down with the 2nd stainless steel plate: i simple don't make any use of that plate, because the magnets are strong enough to hold the blade in position. this makes it so convenient to flip the blade side.
  • the ruixin blade stopper ("1st stainless steel plate") has the advantage that it can (if needed!) swivel or be swiveled. you do wanna make use of this option with some knives, depending on the shape of the blade. then you would swivel the plate back and forth, whenever you flip the blade side. i should insert an animated GIF here to demonstrate what i mean.
  • all parts of the ruixin are made of some kind of metal. sturdy parts, sturdy construction. i was longing for a full metal construction, after tens of miserable hours with the Exduct which is frikking cheaply made.
  • thick stainless steel guiding rods, not the flimsy ones as seen on the Lansky or my Exduct. helps the precision of the rod guiding.
  • the spring-assisted clamping mechanism of the apex whetstones is really great, loving it!!
  • the full length of the whetstones gets used.
  • VERY important: this system can handle shorter blades, thinner blades, and narrower blades than systems which use a clamp on the back of the knife. typically some part of the clamp is 'in the way' of the rod guiding action when you try to sharpen narrow blades. as mentioned before, i was able to sharpen my SpiritX blade pretty much single-handedly with the Ruixin, because the magnets would hold the blade/multitool well in position. I don't think that you can sharpen such a narrow blade on a Lansky or a Wicked Edge or any other clamp sharpener. The Edge Pro Apex could sharpen narrow blades but it would be more of a challenge, i can imagine. (Anyway, short/thin/narrow blades should not be sharpened on such systems but simply through a leather strop. Imho.)
  • I've seen tons of youtube videos on Lansky-principle sharpening systems, and even though i haven't tested them all, i believe that my modded ruixin is the best and most likable purchase option (ebay 20$ shipped?) in the sub-100$ category. off the top of my head, sure i also went out to buy the wood base, some screws, 3 block magnets, additional apex knockoff whetstones including an expensive 10000grit one, apex knockoff blanks, balsa wood, leather, cheap diamond polishing paste, expensive stropping paste, several glues, a black marker, duct tape, portable microscope, AAA mini flashlight, and leather oil.:rolleyes: But the total expenses were still under 50$.
  • using a portable microscope is VERY instructive. highly recommended! not only for beginners.
  • for sharpening 'rather long straight' knives i would separate 2 blade sections with a piece of tape and then sharpen lower section, then upper section, then flip the blade side, sharpen again the lower section, then the upper section, and so on. in any case i would not constantly move the knife back and forth.
  • needless to say, Lansky-type sharpeners are, imho, best suited for beginners, or lazy nuts ("single-handedly"..), and for medium sized blades: medium with respect to width(!) and length. my modded ruixin can handle narrow, short, and thin blades, such as SAK or multitool blades, too, which is a real plus.

2 things which bug me:
  1. the ruixin frame has a chrome-like shiny coating, and that coating is easily damaged/scratched, and once it is, the main material (metal) starts rusting right away. cheap sheet metal material, not a big deal.
  2. the right angle of the ruixin frame is rounded in the vertex, basically eliminating the vertex through the existence of an annoying radius. having a rounded edge, where your knife is to lie, **cks and causes problems with small/narrow blades. bending a metal sheet to a 90degree angle will always entail a radius ("bending radius"), so i am just saying that a much smaller bending radius (or no radius as with the Edge Pro Apex) would have been much better. cheap production process.

All in all i am a happy camper here. I would assume that i'd like my Ruixin better than the original Edge Pro Apex because of the Ruixin's sturdier construction and the metal material. For sure i am so satisfied that i am not even interested in test driving the Edge Pro Apex. And from now on i will re-sharpen my Camper, Surge, and SpiritX exclusively through my leather pad strops anyway, so the question whether i'd like the Ruixin or the Edge Pro Apex better is futile.

I love the Ruixin .. but owning and using leather strops is more relevant!

Btw i don't believe that the original Lansky (or any other clamp-based system) is really suitable for narrow SAK blades or edc-sized MT's like the SpiritX. No doubt that the Spyderco Sharpmaker is .. but it's expensive (main product, additional rods, replacement rods after breakage) and I would be really worried to break or to drop or roll away'n drop such a ceramic rod. Never mind, i am sure it's a highly effective system for just sharpening (but not for re-profiling). The Ruixin comes with a clamp, too, but thanks to the magnets i don't need to fumble with the clamping 2nd stainless steel plate. With the Lansky, 1 hand must(!) hold the clamp. With the Ruixin, 1 hand can (if needed!) support the knife handle, with minimal force; in the below pics this minimal force is illustrated by a brush lol.

One imo annoying problem with Lansky-type of clamps is that it is difficult/impossible to memorize the exact position (X-coordinate, Y-coordinate) of the clamping tip on the back of the knife AND the orientation (rotational degree) of the blade with respect to the clamping tip. This (X/Y/degree) data set would be needed, when you came back to the Lansky after having used the knife for months and didn't want to lose patience by guessing about where/how you had clamped the knife in the Lansky clamp; and even if you had noted down such a data set, it would take some efforts to setup the knife clamping exactly according to this data triplet. Probably a pita, or not very precise in practice!

The Ruixin simplifies things and offers higher precision in this regard:
typically, i.e. for short to medium-length blades, the magnets function as stopper for the knife handle. Then you'd set the distance of the stainless steel (SS) blade stopper, and preferably in the middle/straight position. For top precision, one could swivel the blade stopper, in order to support ("stop") the blade in an optimal way, but with regular-shaped EDC knives you can just leave the blade stopper's orientation in the middle/straight position, no problem.
 
However, the point of the following pics is to demonstrate the blade stopper swiveling. :D

Setting up the SpiritX on the Ruixin is done super easy/fast: you only need to set the blade stopper's distance, 11.70mm (including the thickness of the black duct tape):
pic0crslg.jpg


That's it, you're done, nothing else to take care of! Why? Because the handle is stopped naturally by the Ruixin, perfectly flush // aligned. On one side by the rim of the Ruixin frame:
pic8ahs8q.jpg


On the other side by the magnets. The length of the magnets equal the width of the Ruixin frame:
pic7oxs9b.jpg


With this 'natural stop', the SpiritX blade is not perfectly parallel to the Ruixin edge but the situation is acceptable because of the circular range of the guiding rod:
pic6beskt.jpg


Here a pic showing the blade stopper swiveled back to "stop" the blade from sliding down the slope:
pic4vis9c.jpg


And a close-up. If this was a regular EDC knife, the blade stopper would also prevent any rotational degree of the blade; in any case the blade stopper would help to orient the blade correctly at once! Since there is no clamp, no clamping mechanism, there is nothing 'in the way' of the guiding rod, no obstacle. You could sharpen very acute angles and even on such narrow blades:
pic50ys2h.jpg


Because of the circular range of the guiding rods my presented 'lazy method' (i.e. 1 fixed position per knife side) is most suitable for sharpening short to medium-length convex blades. Longer blades or blades with long straight sections would require sharpening in segments; this is valid for all Lansky-type sharpeners btw! Luckily the straight section of the SpiritX blade is short and the natural stopped position is just fine, so the lazy method applies:
anim2u3sny.gif


Swiveling the blade stopper is often not really needed; instead, starting from the middle/straight position of the SS blade stopper, one could simply turn the knife 1 or 2 degrees to expose the knife edge in parallel to the Ruixin edge. This could be called a 'lazy method' too, because you'd be too lazy to swivel the SS blade stopper every time when flipping the knife side. I find this animated GIF mesmerizing hehe:
anim18zsiv.gif


Concave blades or concave blade sections cannot be sharpened with flat whetstones; the LM Surge and filleting knives have S-shape blades. So here is another example where i made use of swiveling the SS blade stopper in order to get a single fixed sharpening position per knife side. The lazy method. Note that, because of the length of this filleting knife, i couldn't use the handle as handle stopper. There is no handle stopper with long knives! Instead, i measured and noted down the distance of the tape marking. Coincidentally the width of the tape, 50.0mm, matches the width of the SS blade stopper. Very helpful for aligning the blade along the SS blade stopper:
pic1m3sh5.jpg


In my next post i should talk about the Apex knockoff whetstones which i use: RUIXIN (cheap great!), ANSELF (not necessary!), ADAEE (cheap cr*p!).

Back then when i was shopping for a multitool, i chose the Spirit, Model X, expressly because of the ease of sharpening the main blade. I didn't know anything about sharpening but i knew that sharpening the Model X blade would be much easier and straight-forward than sharpening the butter knife. Nowadays it's the same .. when or if i go shopping for a new knife .. If i couldn't imagine sharpening it on my modded Ruixin, i wouldn't buy the knife! S-shaped knives are a no-go for me, for this reason.

Again, the above series of pics was not about How To Sharpen the Victorinox Spirit X , but to demo the swivel functionality of the Ruixin SS blade stopper. The SpiritX treatment on the Ruixin was a 1 step process (1500grit RUIXIN stone only!) and took very few minutes. Then 1min ruixin balsa strop. Then leather strop iirc.

At last 3 more pics explaining visually how a typical regular shaped EDC knife could be setup in a single position on the Ruixin. Note that in all 3 setups the knife, which has a full flat grind, is completely held by the magnets; one could sharpen it single-handedly, in theory. In practice there is tiny wiggle space between the back of the knife and the SS blade stopper, because the back of the knife is curved, not straight. With this in mind, it's best to hold the handle with 2 fingers, while you're sharpening with the other hand. Also, the thumb stud always functions as premature handle stopper, which is welcome.

In the 1st setup, the knife edge (its curvature) is perfectly oriented with respect to the Ruixin guiding rod or the center of the circular range. To achieve this perfect orientation we had to 1) swivel the SS blade stopper and 2) swivel it even beyond the side of the Ruixin, see the crossing lines! This is no real problem, but it would take efforts to swivel the blade stopper back and forth and get its angle (rotational degree) always right:
pi1f9spq.jpg


The knife edge is convex at all times. Perfect for Ruixin use then? Yes, but only if you orient the edge as good as it gets with respect to the center of the circular range ("concentricity"). In the 2nd setup, we were too lazy to swivel the SS blade stopper. As you could tell, the knife edge (its curvature) looks off-center, not concentric. This, too, is no real problem, because the blade is not long, while the Ruixin guiding rods are long. You could sharpen this EDC-sized knife in this very position but i would not recommend it. The position is not optimal, i hope you can see and agree:
pi2vdsuv.jpg


Personally, i use the 3rd setup. In this setup, i am too lazy, too, to swivel the SS blade stopper. However i do turn the knife a few degrees, until the knife edge (its curvature) looks nicely oriented, concentric. I could mark this position with a piece of red tape on the Ruixin frame but if you have good eyes, you could try to remember the necessary distance (along the Ruixin side) by eye. With this setup, for sure you will need 1 hand (2 fingers) to hold the handle/the knife in this swiveled position. Do you prefer to swivel'n fix the SS blade stopper (see the 1st setup) or, instead, swivel'n hold the knife (this setup)? I prefer the latter because flipping the knife side is much faster this way. And as you know, we need to flip the knife side very often, for example at 1500grit stone, when reducing the burr with the same grit stone in a gradual manner:
pi3w8s6n.jpg
 
Human one-sidedness

Apart from tens of hours of practice required for mastering freehand sharpening, being a right-hander makes it difficult to sharpen both knife sides 99.9% equally well. Similar to playing tennis or table tennis, naturally one side (or movement/stroke) comes out easier or better, usually the player's forehand; only pro players have an equally great forehand topspin stroke and backhand topspin stroke. In fact, in table tennis it is commonly accepted knowledge that the backhand topspin stroke is the most difficult (basic) stroke in the sport. Most amateur players have a poor backhand stroke, let alone a backhand topspin stroke.

I am a righty but use my left hand for operating the guided rod on knife side A, and use my right hand for operating the guided rod on knife side B. Body-symmetrical operation, very satisfying feeling! No force, no efforts or concentration needed. My left hand/arm is very weak anyway. It is actually one of the most relaxed physical activities i do in my bedroom;). Also relaxing. No sweat. Including the operation of the ruixin balsa wood strops. But then comes the treatment on the leather pad strops: often i would need to stand up for this activity, be focused that my stropping strokes are within the perfect range, and can't let my thoughts wander. There's always some amount of mental concentration needed! Freehand sharpening and freehand stropping are clearly physical activities, body, arms, wrists, mind form a harmonious interplay; your heart rate increases a bit, and some big guys may even start sweating, especially depending on the knife size and the strop size:p.

In contrast, operating the Ruixin - i always sit on a chair for it! - is as physical an activity as operating a PC mouse on the same desktop :angel: and similarly a "single-handed" operation (unless you insist on calling my thumb and index finger supporting some fractional weight of the handle not a single-handed operation anymore). The Edge Pro Apex operation is a bit more physical, most youtubers seem to stand in front of a countertop and you certainly make full use of both hands, plus the concentration needed to slide the knife blade back and forth, per knife side. The Edge Pro Apex has a non-swivel SS blade stopper but no magnets, so my super-relaxed lazy method wouldn't be possible.

Apart from the perfect geometry sharpening result, polished or not, i do enjoy how fun it is, because the process is so easy and exactly re-setting up the knife ( 1. Ruixin parameter height of the guiding rod wingnut, 2. Ruixin parameter distance of the SS blade stopper, and for long knifes the 3. Ruixin parameter distance of the tape marking on the blade ) so fast. And yes i can keep and reproduce the exact factory bevel (angles) .. something which is not possible with the fixed angles of Spyderco Sharpmaker.

Even though the sharpening principle is the same, the Lansky principle, the point is really made by the actual end product: i absolutely disliked re-setting up the knife in my Exduct and operating that sad product. No fun, no joy, and limited results. From what i can see, the Exduct is a 1:1 clone of the Lansky, just with inferior build quality.

I regret having bought the Exduct in May 2012 (SKU:SP931D , total US$31.74 shipped) but am honestly happy now with my modded Ruixin. I'd consider it a crime for Exduct company to still offer that @#$%&! Lansky clone, shame on that Chinese vendor.:mad:

If i owned the Edge Pro Apex, i wouldn't be interested in the Ruixin because both are very similar systems. However, if i didn't own the Edge Pro Apex but 'only' a clamp-based system like Lansky/Exduct/Gatco/Vipersharp/Wickededge/etc and liked certain aspects of it, then I'd definitely look into the budget-friendly Ruixin. Interestingly the Ruixin seems extremely popular in the Ukraine&Russia (most Ruixin youtube reviews are in Russian language).
 
Are GRSS an overkill for sharpening SAKs and MT blades?

I tend to agree that guided rod sharpening systems (Lansky, EdgePro, Ruixin, WickedEdge, Exduct, etc) could be called overkill for sharpening narrow and or thin blades such as SAKs and MT blades. but even before calling names, in many/most cases it is the physical/constructional limitations of the system which simply does not allow proper sharpening treatment and operation of the "small blade" (Def. "small blade" = a blade which is either thin or narrow or both) on the system. For sure it would be overkill to sharpen the short blade of a Vinox Minichamp on any guided rod system. However in the case of Vinox Spirit X, as shown earlier, or Leatherman Surge, as shown below, the Ruixin is not an overkill but a very apt tool for sharpening and also for guided stropping.

On the EdgePro Apex/Apex Clone, the user typically moves the (medium-sized) blade back and forth on the narrow plastic 'table top'. On the Ruixin, i leave the (medium-sized) blade fixed on the narrow metal 'table top', the 3 block magnets would hold the blade and knife in place; and, typically, i operate the Ruixin one-handedly or use the other hand for minor support, as indicated here with the Surge and my brush. Fixed positions are easy to reproduce and more precise in the operations (angles, movements, sharpening), that's why i wouldn't want to move the blade back and forth on the system's table top.

For fixing the Surge blade position relative to the table top, it is very fortunate that metal elements/parts of the Surge tool help us in 2 ways: the elements serve as blade stopper (in the X-direction) and they serve to set and fix the orientation of the blade!

In the following pic, you can see the green tangent. This tangent line is where the Surge gets stopped at the Ruixin frame, but it also sets the exact orientation of the blade automatically, because the tangent is supported by 2 metal parts, i.e. mathematically 1 straight line defined by 2 points:
img20171017185049x7s73.jpg


On the pics, it says "Way to go", but if you think about it, it is the only way to go and therefore a very lucky constellation in all regards:
img20171017184221lcs2r.jpg


So what does the orientation of the blade look like, once the Surge gets stopped at the Ruixin frame? Well, in theory, it is impossible to sharpen a recurve, i.e. a concave edge, with a perfectly flat whetstone (see the yellow oriented imaginary edge line). That's why the resulting automatic orientation —slightly tilted counter-clockwise (see the purple oriented edge line)— is imho perfect enough, given the soft recurved(!) blade shape; the purple oriented edge line approximates the natural circular range of the guiding rod much better (compare with the green circular line). Now the Ruixin stainless steel plate can be moved up to support the blade position and stop the Surge from sliding down in the Y-direction; the user must align the SS plate in such a way that it establishes line contact with the spine of the Surge blade:
img20171017175501weshd.jpg


When we switch the blade side, we are learning about a potential asymmetry/problem: other elements/parts of the Surge would now serve as blade stopper (in the X-direction):
img201710171849439ps0y.jpg


Once the Surge gets stopped by the Ruixin frame, less of the blade edge gets 'on top of the table top', by a few millimeters. It is simply "Not possible" to use the previous elements as blade stopper again:
img20171017184545w3sp0.jpg


The difference of these few millimeters were the reason why months ago i had come to the (wrong) conclusion that the Surge edge had an asymmetrical grind (profile) from the factory, so i had to work with 2 different sharpening angles on the Ruixin to match the factory bevel exactly on either side. But by now i seem to have found 1 single median angle which produces a symmetrical-looking bevel on the Surge, lucky me! Maybe even luckier, the position of the previously fixed SS plate does not need to be changed at all: the Surge blade gets stopped (in the Y-direction) at the correct height, making point contact, and the orientation of the edge is again sloping correctly, naturally, slightly tilting clockwise. Note that the purple line is an exaggerated representation of the slightly tilted yellow line, just to make my point:
img201710171756389nsdb.jpg


The following animated GIF illustrates how to setup the exact position of the SS plate, and it also proves that the SS plate does stay in 1 fixed position during the entire sharpening (and stropping) session on the Ruixin.
anim200csclsij.gif


Note: i would not disassemble the MT to remove a singular blade for sharpening. nobody does that. a factory can handle singular blade sharpening, the common user cannot. also, i will admit that the most efficient and recommended method of sharpening Surge is by way of the Spyderco Sharpmaker, still. however, i don't own one and a full set would cost me €€€ ouch :oops: no thanks. with my Ruixin i reach an absolutely precise geometrical edge (microscope) with the full bevel polished to any micron without convexing it. the PTS method it is maybe the key to success why i prefer and can recommend sharpening and stropping Spirit X and Surge on the Ruixin.

This week i am expecting an Aliexpress shipment with replacement stones, i used up the 120grit and the 1500grit stones because of mal-usage (my bad:D). The set of 4 stones, hopefully original Ruixin quality, costs 6usd shipped incl tracking number. I will report if the set of stones are identical stuff.
1.5usd for 1 whetstone!:thumbsup:
 
For my original Ruixin system i bought compatible aftermarket whetstones because the original stones were wearing down, getting consumed, at different rates, and i wanted to have equal quality replacement stones. The original 2 orange stones, lovely dense and smooth ones!, didn't show any wear/consumption; and it is trivial to replace the fast-wearing 180grit blue stone. No, the challenging part was finding a 100% equivalent substitute for the 1500grit white stone (Stone4), which is btw a wonderfully performing whetstone other than its unfortunate fast consumption.

In the end i found out that no aftermarket white stone matches the supernice quality of my original stone! And after seeing Stone3, which originated from a friend's rebranded Ruixin Pro III copy (clone?), i must come to the sad conclusion that the actual material quality of original retail included Ruixin stones may vary between production batches. My Ruixin set came with 4 supernice stones, his rebranded Ruixin set came with 2 cr*ppy orange stones and 1 inferior hardly acceptable white stone. On the aftermarket, AX vendors may advertise "original Ruixin quality" stones but that's the whole point of this post: You will end up with inferior quality white stones, no matter what, you risk you lose!

The only safe solution or guaranteed recommendation for replacing a worn-down wonderful original Stone4 is buying the ruby stone instead (Stone6).

These are the 6 white stones numbered from left to right. As one could tell from the same white colors, Stone2 and Stone5 are both ADAEE-manufactured stones; and i am suspecting that Stone1 was made by ADAEE factory too (for simplicity lemme call such suspicious stones "FAKERUIXIN stones" :poop:) since it shares many similarities with Stone2+5 (=official ADAEE stones) and completely differs from Stone3+4 (=official RUIXIN stones):
img20171229141509xsu4n.jpg


All pics are in 1080p and use the same magnification. The word "microscopic" refers to what you see in these pics. As mentioned earlier, i am suspecting that Stone1 is a FAKERUIXIN stone. And for sure, it is a cr*ppily performing white stone. If you ever order a Ruixin-labeled/Ruixin-branded white replacement stone from AX, chances are very high that you'll receive an item equal to this one:
img201712291226283uu7v.jpg


Now look at Stone2. Do you see much of a difference to Stone1, no? That's what I am trying to say, i wouldn't wonder if Stone1 was made in the same factory as the ADAEE branded stones. Stone2's performance is just horrible, it literally tears the bevel, producing wild burr shavings all over the place and creating a monstrous toothy edge. Lmao this was to be a 2000grit stone? No way:
img20171229130651dguaz.jpg


Stone3 is from my friend's set. The branding and everything looks authentic but it is disappointing that his white stone doesn't exactly match the wonderfulness of my white stone. The Ruixin stone factory seems to have problems with producing identical quality stones :rolleyes::
img201712291343308ku5q.jpg


Stone4
is the original Ruixin stone from my knife sharpener set. The material is dense, non-porous, "soft" or fast-wearing, and performs perfectly as finishing stone. Without such a nice quality stone the Ruixin system becomes pointless and worthless, it is imho the key stone of the system. Maybe you could tell from the pic, Stone4 does look finer than Stone3:
img20171229134948xyuq7.jpg


Yes i could tell that the ADAEE 3000 (Stone5) has smaller pores than the ADAEE 2000 (Stone2), and apparently it wears faster, maybe because the material is less hard-bound. But overall it is still as horrible and far from the "3000" grit rating:
img20171229135838lfurr.jpg


I do like some of the red ADAEE-branded stones because those are hard-bound, non-porous, and very smooth; in contrast, my post has been clear, all white ADAEE-made stones are :poop: :confused:

Thanks god there's a Ruixin compatible stone which solves the situation. It is the ruby stone (Stone6). From all i know, there is only 1 kind of ruby stone on the aftermarket, and probably all ruby stones are made in the same single factory. Some vendors rate it as 5000grit but the most common rating, also confirmed by end consumers, is 3000grit. I paid like 2.4US$ shipped, which is a steal considering how this stone solves all your troubles with finding a guaranteed substitute for the fast-wearing Stone4. Of course, one cannot replace a true 1500grit with a true 3000grit stone it is a bit big of a jump but erh never mind :p:
img20171229140247vgu8m.jpg

Image annotation correction: "soft-bound Material, wears fast" is wrong; in fact the opposite is true!! See all later posts of mine where I mention the RUBY3000 again. It's become my favorite Edge Pro format stone!

You're wondering what the white stuff on the surface is? Well, that's pulverized stone. Powder. I cleaned the surface with rubbing motions of my finger, so more of the ruby gets exposed:
img2017122914112036ug0.jpg


Summary: Stone1+2+5 are :poop:, Stone3 is acceptable, Stone4 remains unmatched. Stone6 is a valuable addition to the original set and guaranteed higher grit than the 1500 reference of Stone4. From here on, one would continue with the PTS method and not look back; paper tape stropping supersedes grinding at 3000 or any higher grits. From what i can tell, Stone6 produces the finest grind, whereas Stone2 the coarsest. In a full comparison, the gradation order would be imo as follows, for my reference:
FINEST: Stone6 < Stone4 < Stone3 < Stone1 < Stone5 < Stone2: COARSEST
or translated into names,
FINEST: RUBY3000 < RUIXINOLD1500 < RUIXINNEW1500 < FAKERUIXIN1500 < ADAEE3000 < ADAEE2000 : COARSEST

Comment: In a typical sharpening session one would not make any use of ADAEE3000, ADAEE2000, or FAKERUIXIN1500's. Coming from lower grit stones, one would jump to ADAEE1000 (which is a very smooth red stone, nice!), then use any RUIXIN???1500 available and finally proceed with the PTS method, or jump from ADAEE1000 to RUBY3000 instead and then also proceed with PTS. The white ADAEE-made stones are really coarse omfg! If you have bought them, no need to bin them; you could still use them for other grinding jobs (scissors, cheap knives, practicing) in order to spare the fast-wearing white RUIXIN1500 stone which is hard to source on the aftermarket in the quality of Stone4 or Stone3, unless you buy another new Ruixin Pro III retail set lol. The white ADAEE-made material is hard-bound and doesn't wear; that's the only advantage of the ADAEE-made stones!

Alex made a video about the ADAEE stones with similar negative findings:

I do like 1 or 2 of the red ADAEE stones but it doesn't mean that you'd get the same nice quality in your amazon or AX order. Both ADAEE and RUIXIN factories don't seem to produce consistent constant production quality between the production batches. Could be hit or miss. You pay what you get for, China production standards. As mentioned earlier, only the ruby stone is a guaranteed hit.

( fyi the microscopic pics were taken under great efforts with my phone camera plus a 10$ portable microscope )
 
Last edited:
Nice thread! On my homemade jig, to expand the point of contact of the knife stopper I build a concave piece:
hxQ3XAy.jpg

The black arrow is the point of contact and black and white one is where is the base.
This help me prevent tilt the knife when sharpening the tip:
tdUFx6C.jpg
 
Hehe I fully understand the point of your post, thanks! So, you too, do you leave the blade in 1 single position (per knife side) and don't move the blade?
Do you hold the knife still with 1 hand, or is the knife held in place, fixed by magnets?
 
Yes, single position and have magnets over the base. I can’t hold the knife while sharpening, I don’t know why, even with magnets, but I still didn’t try this new stopper without magnets, soooo... but this way the angle change is so little that for me doesn’t make difference.

Happy new year!
 
Hi
Thanks for the review
For my original Ruixin system i bought compatible aftermarket whetstones ...
These are the 6 white stones numbered from left to right. As one could tell from the same white colors, Stone2 and Stone5 are both ADAEE-manufactured stones; and i am suspecting that Stone1 was made by ADAEE factory too (for simplicity lemme call such suspicious stones "FAKERUIXIN stones" :poop:) since it shares many similarities with Stone2+5 (=official ADAEE stones) and completely differs from Stone3+4 (=official RUIXIN stones):

FINEST: RUBY3000 < RUIXINOLD1500 < RUIXINNEW1500 < FAKERUIXIN1500 < ADAEE3000 < ADAEE2000 : COARSEST

Alex made a video about the ADAEE stones with similar negative findings:

I do like 1 or 2 of the red ADAEE stones but it doesn't mean that you'd get the same nice quality in your amazon or AX order. Both ADAEE and RUIXIN factories don't seem to produce consistent constant production quality between the production batches. Could be hit or miss. You pay what you get for, China production standards. As mentioned earlier, only the ruby stone is a guaranteed hit.
It seems you're reporting the condition of the stones as received,
Have you tried lapping any of the stones and does that change anything?

( fyi the microscopic pics were taken under great efforts with my phone camera plus a 10$ portable microscope )
Is that your video?
Do the scale/crosshairs come with microscope?
Are you also just holding the contraption with your hands or have you rigged up a stand of some sort?
 
Hello bucketstove, thanks for your interest.

Neither video linked/shared in my post is mine. That's geman guy Leo presenting his microscope, and Alex reviewing his set of ADAEE stones. I am not Leo or Alex :rolleyes: ( i do own a youtube channel but it is not worth mentioning, you'd see white gloves handling flashlights and chargers rofl)

To clear things up, i've been using all of these stones for tens of hours. That's why the ADAEE label stamp is hardly visible any longer. I should have taken photos of knife blades treated with each one of these stones to make my point —you are right what matters is the resulting metal finish not the grinding stone finish—, but it is too taxing to take such manual photos with my cheap portable microscope and of a 3-D object such as an edge or bevel. There are several technical/mechanical/manual challenges and issues when handling a portable microscope, let alone a phone cam on top! Taking microscopic photos of the flat grinding stone surface (a 2-D object) was much more doable, even though still rather challenging. Unfortunately i must hold the contraption with my bare hands, because there is no other acceptable way of handling everything together at the same time (microscope, focusing mechanism, 2-D object, phone). People with fixed-stand microscopes and holders and clamps and whatnot will have no trouble taking phone cam photos of their knife edges, no matter what shape the blade has.

But what is interesting: Just by looking and touching the (finished) stone surface, one can tell whether the stone has the potential to produce a smoother metal finish or not, as commented by Alex in his video. All white ADAEE stones feel rough to the touch, their stone finish looks coarse under the microscope, and —no surprise!— they produce a horribly jagged edge and ruin the fine result of the RUIXINOLD1500 stone. I compared the results under the microscope, so I am telling ya. If you know how to, you should avoid all white ADAEE stones and all FAKERUIXIN1500 stones.

If you search for < portable microscope > on GB, BG, AX, DX, etc, you'll find that generic microscope for under 10US$ shipped. The build quality is horribly cheap but the product functions well and taught me a lot about sharpening progress, burr removal, stropping mistakes, polish differences, and so on. With this invaluable tool, I've become much more aware and focused about what i do, when doing a sharpening session. It provides full understanding of what is really happening between sharpening steps. You know, at first, i thought that Leo was overdoing/overkilling it with his microscope. But then i noticed through BG customer reviews that many folks from all over the world buy this product for exactly the same purpose: the meticulous sharpening of knives! Now i make use of the microscope between critical steps all the time, especially when i want to reach the best possible sharpening result with no detours or errors along the way. It is also highly instructive to examine ex-factory edges of your new folding knives, Stanley knives (utility blades), kitchen knives. I find exfac edges by Ganzo and Spyderco absolutely stunning; their bevels are hair shaving to razor sharp, even though their edge sides have a non-shiny finish, looking like a 400grit grind!

The scale/crosshairs come with the microscope, depending on the model version. I must say though that the scale is off, very easy to see if you examine the millimeter scale of a ruler with it lol.

Btw months ago i had blown the LED of the microscope, so i modded the product. Now the lighting is supplied by a popular US-brand AAA flashlight. :cool:
 
Last edited:
I've created some microscopic photos to make 2 points:
1. the integrated scale is off, we can tell by counting the DIV's for 1.00mm of my ruler.
2. for a particular oriented grinding pattern on the knife edge, what you actually see as reflection of the knife edge also depends both on the lighting angle of your light source and on your viewing angle. for 1 chosen viewing angle, the user still needs to rotate the direction of the lighting source in order to get the desired revelatory edge reflection.

Now let's have a look at the photos. The RL distance between the 2 blue lines is exactly 1.00mm:
img2018010319071425od1.jpg


The following 8 pics show the magnification of the same spot on my BERNDES knife edge. Since a knife edge is a 3-D object, i've tried to direct the sharp camera focus on the bevel line but sometimes the cam auto-focus wouldn't set the focus correctly or else. Blurry sections in the pics are either my fault, the cam's fault, or both. It was really challenging to take these photos, some turned out better than others, tant pis. It is easier to see all sections sharp without the cam. But these cam pics give you some idea of what you would see when you look through the microscope directly with your bare eyes, without a cam.

starting position be pos1:
rot1alqvo.jpg


after rotating the microscope, i.e. the direction of the lighting source, by 45°, we get to pos2. what a dramatic change in picture:
rot2y6ouh.jpg


after another 45°, we get to pos3:
rot302r7x.jpg


pos4 looks similar to pos3, no major change in picture:
rot4cwof7.jpg


pos5 shows another dramatic change. the pic is similar to pos2:
rot5phokl.jpg


pos6 is yet another dramatic change in picture. it is a revelatory position for our purposes:
rot6eao5r.jpg


pos7 remains similar to pos6, which is helpful:
rot76fog1.jpg


pos8 is again similar to pos1. not very revelatory positions for our purposes:
rot80errz.jpg


Finally, let's see the continuous 45° rotations in an animated GIF. Note that all pics of this post are in 1280p, so please feel free to open them separately in a blank browser tab to see more details:
rot200csqwoqp.gif


For our purposes, sharpening, pos6/7 are the most helpful because that lighting position reveals the imperfections in the bevel line best. This unused(!) BERNDES exfac knife edge/bevel looks imho pretty poor, i can do much better with the help of the RUIXIN sharpener. It is interesting though that this poor-looking unused exfac edge can slice through phonebook paper and kitchen paper towel (kitchen roll test) with ease, I am surprised!

Hope you liked this post!

When I am done re-sharpening this knife on the RUIXIN incl. PTS treatment to mirror polish, i'll try to redo this series of 8 photos then!! For comparison and reference purposes.
 
Last edited:
Hello Piero, thanks for your friendly comment, appreciated! ( The OP is not a product review but simply showing how i put the Ruixin to use )
I got the plastic Edge Pro Apex compatible bases/holders —called "Apex-compatibles (adj.)" from here on thx!— from Aliexpress, using < plastic apex > as search term there. I had paid 3.00US$ for 1 set of 4pcs shipped incl full tracking number. To be clear, the plastic doesn't feel well-built andl is very cheap and flexible material, definitely not hard stiff plastic, so 3 bucks is imho really overpaid. Let's note that the black plastic bases of original ADAEE and RUIXIN whetstones seem to be of probably better quality. Since i really needed those spare bases for my set of balsa PTS, i don't regret the purchase; however i will not openly recommend buying these cheap China plastic:poop: parts. But of course they work as intended: as holders/bases for your 5mm whetstones/balsa strops/leather strops, or 5mm PTS. And since they are flexible, it is impossible to crack/break them.

What are you planning to do with these Apex-compatible bases? You're not going to re-create holders for the PTS method or are you? :p
 
Last edited:
Hello Kreisler, thanks for your fast answer!
Apex base was the key word I needed!

I didn't know the PTS method. but just found some informations about it, and will read it.

My idea was to buy the Ruixin pro III, the Apex base, and to glue some fine sandpaper, from 2000 to 7000 grit, to make a very fine edge.

I usually sharpen my knives, with a whetstone in the hand to have a fine convex edge and I have good results, I made a vid here: https://www.bladeforums.com/threads/can-a-ten-dollar-kitchen-knife-be-very-sharp.1482693/

But I want to try to sharpen a knife with a very acurate angle to see if I can improve the sharpness, on vey fine levels. I think the ruixin pro III is a good way to. For example, I want to achieve the hanging hair test, with a knife. I achieve it with a straight razor, but with a knife and 30 $ of sharpening materials it would be really awesome!

I am french, so sorry for my poor english ,-)
 
The result looks extremely good! Since you are so proficient with your hand-held manual method, you probably would not need a Ruixin for refining your result. Imho one cannot/shouldn't mix a manual method with a Ruixin; if you want to use the Ruixin for stropping, then the knife should have been sharpened on Ruixin too! That's because each Ruixin unit setup/configuration is unique and, due to the circular motion range of the guided rod, will leave a characteristic grinding angle on the edge; to match this angle 100% accurately, both the sharpening and the guided-rod stropping must be performed on the Ruixin, the identical Ruixin unit.

Good options:
Option1. Sharpening on the Ruixin. Then manual stropping on a strop.
Option2. Sharpening on the Ruixin. Then guided-rod stropping on the Ruixin, e.g. with the PTS method.
Option3. Manual sharpening on block whetstones. Then manual stropping on a strop.

Bad options:
Option4. Manual sharpening on block whetstones. Then guided-rod stropping on the Ruixin.

Btw, I am betting that your 7000grit sandpaper does not leave as fine a result as my CN diamond paste 0.5micron.
 
Actually I was thinking about the second option, to see if a very acurate method can permit me to improve the sharpness of the edge (that is different than the cutting power, which is very good on a convex edge!).
I will use sandpaper after the 1500 grit stone and before the stropping.
What does CN mean? Is it the name of the brand of your diamond paste? I have some hard steels (d2, s35vn, ...) so I think diamond paste will be better than the other compounds.
 
Signed up just to thank you Kreisler for the informative thread.
You have inspired me to buy a Ruixin Pro and modify it after struggling with free hand sharpening to maintain the correct angles.
Spent way more on good DMT plates and whetstones than i have spent setting up the Ruixin and i am getting some owesome results from my very first effort.
Looking forward to trying your PTS method when diamond paste and spare holders arrive.

Cheers Geoff
 
Last edited:
Hi Geoff, thanks a lot, your post (and also Federer winning his 20th GS :D) made my day and inspired me to take pics of my full array of sharpening utilities, all budget stuff! So this post is for you, enjoy :thumbsup:

One cannot generalize that ADAEE stones for our Ruixin sharpener are all bad, neither are all RUIXIN (chin. 睿炘, pronounced ~"ruh-eeh-shinn", check Google Translate app) stones of identical good quality. The stone quality seems to vary between production batches, thanks China! :poop: :oops: If i say "bad", i mean "rough", i.e. not as fine as the nominal grit rating suggests. As mentioned before, all white ADAEE stones (A1500, A2000, A3000) are rough, so i use them as grinders before moving on to the nice smooth (original) Ruixin R320 stone. As one can see, i've got 4 ready-to-go PTS holders and 2 spare balsa pieces (and also 4 spare leather pieces). Even though the balsa material serves as tape holder only, it is a consumable, gradually getting deformed/non-flat and softer, moistened by diffusing oils from the compound on the paper tape. The stones for the Ruixin sharpener are consumables too, that's why i ended up with so many stones:rolleyes:. The photo doesn't show all of my sharpening utilities, for example i didn't include my exclusive French industrial-grade polishing compounds (4 formulas) which i also use for PTS; it's super fast cutting solid compound but in the end not as fine as 0.5micron CN paste, so never mind:
img20180128142014zeqtk.jpg


A week ago i saw these Xmas 600g cookies on sale and bought them for the transparent plastic box/container, knowing that all my Ruixin/Adaee/etc stuff would fit in there neatly:
img201801281445092ures.jpg


Can you see what i did there? I used a black marker pen to mark the position of the swivel stainless steel plate, then protected these markings with thin clear adhesive tape, and in addition used red tape stripes to reconfirm the 2 opposite swivel positions. The black duct tape is to prevent scratches (on the knife blade, on the Ruixin). Actually it wouldn't be such a bad idea to tape the entire Ruixin lol :p to protect its finish against scratches/oxidation/rust. These particular swivel position markings are for my modded PM2 blade, left blade side, right blade side. Also look at the new arrangement of the 3 neodymium block magnets, depending on the knife model:
img20180128144912vloo8.jpg


Maybe birchwood or basswood, instead of balsawood, make less of a consumable as PTS holder but I cannot guarantee that they would perform equally well; i tested paper tape stropping with the Micropore tape attached on super hard holders, such as the green Natural stone (N10000, guided-rod PTS) or the commercial paddle wood (freehand PTS), and wasn't as satisfied with the performance and results:
img201801281700253mrg8.jpg


Likewise, attaching paper tape on top of a leather strop is a poor idea. Apparently the PTS method works best in conjunction with a guided-rod sharpening system (EdgePro, EdgePro Apex, Ruixin, a.o.) and not so well freehanded:
img20180128170510rvr8f.jpg


I never liked my China-made Exduct-distributed guided-rod sharpening set, it is too cheaply built, thanks again:poop: :oops:. Its plastic clamp/clamping mechanism s*cks in every respect and at that time i didn't know anything about stropping or didn't believe in it. Back then, even though i spent endless hours with it, it didn't teach me anything about sharpening principles and progress. What a waste of money, energy, and time! I still use the Exduct stones for minor freehand grinding tasks, whenever i don't want to waste my Ruixin stones on them:
img201801281457345mrbs.jpg


I also have tens of hours of experience with the portable mini sharpeners. They worked and i loved them but i didn't know what love really means o_O:
img20180127170358fzrui.jpg


I would love owning DMT plates and whetstones. One can never have enough sharpening utilities ;)
 
Last edited:
When I am done re-sharpening this knife on the RUIXIN incl. PTS treatment to mirror polish, i'll try to redo this series of 8 photos then!!
HERE WeGo. I took 3 microscope photos after each Ruixin step but you may not be interested in seeing all those photos, are you? So today i am presenting the final result without more ado for direct comparison and reference purposes. The exfac BERNDES edge was very sharp already, but after the Ruixin treatment (stones, then PTS) it got scary sharp thanks to the precision stropping of the PTS method. The resulting deep mirror polish make most of the below pics look seemingly trivial, even though they absolutely aren't. You can compare the BEFORE and AFTER 1 by 1, pos1 vs pos1, pos2 vs pos2, etc.

First thing you'll notice is that i reprofiled the edge to an acuter angle, which widened the edge width. pos1 shows a perfect looking bevel line, a very straight line, flawless:
d01nqpf0.jpg


pos2 looks nothing like pos2. All grind marks have been polished away and the bevel line still looks flawless. Note that the cam focus is always on the bevel line, please excuse other pic sections for being blurry:
d02a0rrsh.jpg


Rotating the microscope (=rotating the lighting) by a few degrees more brings up a total different picture of the edge, wow:
d02bxhpnb.jpg


pos3 is now the most revealing lighting position! Under the microscope the bevel line is lightening up, light gets reflected into the eyes of the viewer. The acuter the bevel line (a "1-D object", in theory), the less light gets reflected and the darker would the bevel line look through the ocular. Any convex microbevel or any apex micro-convexity would look super bright under the microscope; namely that's what one sees with exfac edges since they are machine-belt-stropped, which leaves their bevel lines with a polished micro-convexity. In this compromising revelatory position we hope to see as little light reflection as possible (which is true in RL through the ocular, yet the photo isn't showing what my naked eyes are seeing):
d037kryu.jpg


pos4 may look boring but it looks totally different from pos4, which makes all these AFTER-photos interesting to look at:
d04wjqzu.jpg


Ditto for pos5:
d05yiq8e.jpg


Due to the mirror polish, even pos6 hardly reveals any remaining (polished) grind marks from the Ruixin stones:
d06avrh1.jpg


But note that pos6 and pos7 do not show light reflections at the bevel line anymore! Between the ruixin steps, that's what i always check for, hoping to see no more of them by the end of the full ruixin treatment or by the end of a finishing ruixin step. The PTS method allows me to eventually eliminate all(!) reflecting light bits at pos6/7 (but not at pos3):
d074hqo0.jpg


pos8 again looks pretty perfect. Do note that the bevel line looks darker at this position. Changing the lighting direction highlights different parts (or different aspects) of the edge differently; when using a microscope, one should be fully aware of this strong phenomenon and examine the object from all lighting directions (360°). As you have learned from these photo series, once the edge gets more and more polished, there will be only 1 or 2 very exact positions left, where light gets reflected into the viewer's eye, thereby revealing otherwise invisible imperfections:
d08alo9z.jpg


In summary, a single pic such as pos1, impressive as it looks at first sight ("wow so clean an edge!"), does not tell you the full truth about the edge quality, perfection, sharpness; so please don't get fooled on the www/youtube when others share microscope pictures of their polished edges. pos6/7 do tell me that i reached my personal goal with the PTS method, that's where I stop my stropping efforts with full satisfaction. pos3 makes us realize that any achieved bevel line is, at even higher microscopic magnification!, still a 2-D object (or micro-convex). And pos2' shows me clearly that the polished edge still has some deeper grind marks left which cannot be polished away.

To conclude this post, finally the animated version (in reduced picture quality; GIF reduces the quality of original JPEG's, GIF's are less detailed, you may still find it helpful), enjoy:
berndesdonej1q5f.gif
 
Last edited:
Back
Top