You are using an out of date browser. It may not display this or other websites correctly.
You should upgrade or use an alternative browser.
You should upgrade or use an alternative browser.
How To Slipjoint tutorials and advice
- Thread starter Stang Bladeworks
- Start date
- Joined
- Feb 19, 2018
- Messages
- 660
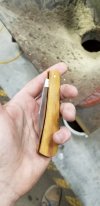
Looks greatI tried my hand at a slip joint and this is what I came up with.
RWL 34 Stainless, titanium liners, rams horn and stainless pins


- Joined
- Aug 2, 2010
- Messages
- 1,611
Excellent thread Derek! I as well appreciate you taking the time to make it. I've been itching to try my have at a slip joint for some time but wasn't too sure which if any special tools were needed to actually do it well. I don't have a surface grinder/attachment, but I do have a 9" VFD disc grinder and a digi micrometer, so fortunately I can get things where they need to be without needing to do it all by hand haha.
It's also nice to know it can be done without a rise/fall indicator, which I was definitely curious about. I've been needing a new drill press for years. It gets me by with fixed blades and by using a center drill, but it's one I got years ago from Harbor Freight, on which the shaft shifts to the left when it bottoms out. The center drill is usually able to keep the bit drilling in its spot, but it certainly is annoying having to worry about it. But anyway, thanks again for sharing all of this. These are the type of threads that help make BF great.
~Paul
My Youtube Channel
... (Mostly older videos of some past work, as it's been a number of years since my last upload)
It's also nice to know it can be done without a rise/fall indicator, which I was definitely curious about. I've been needing a new drill press for years. It gets me by with fixed blades and by using a center drill, but it's one I got years ago from Harbor Freight, on which the shaft shifts to the left when it bottoms out. The center drill is usually able to keep the bit drilling in its spot, but it certainly is annoying having to worry about it. But anyway, thanks again for sharing all of this. These are the type of threads that help make BF great.

~Paul
My Youtube Channel
... (Mostly older videos of some past work, as it's been a number of years since my last upload)
- Joined
- Feb 19, 2018
- Messages
- 660
PLEASE FEEL FREE TO POST WORK IN PROGRESS PICS
Last edited:
- Joined
- Feb 19, 2018
- Messages
- 660
TUTORIAL POST #8
Setting the half stop
NOTE: PLEASE IGNORE THE RADIUS ON OUTSIDE CORNERS OF THE TANG IN THE HALF STOP POSITION. THEY ARE TOO LARGE IN THE PHOTOS. I WILL POST UP BETTER PHOTOS WHEN I TAKE THEM. THE REST OF THIS TUTORIAL POST IS GOOD. I PLAN TO CHANGE A COUPLE THINGS ABOUT MY PROCESS FROM THIS POINT IN THE BUILD ON. WHEN I HAVE GOT THE NEW PROCESS DOWN I WILL CONTINUE THE TUTORIAL. EVERYTHING UP UNTIL THIS POINT IS GOOD. THESE PHOTOS WERE TAKEN AFTER THE CLOSE WAS ALREADY SET. YOUR CLOSED POSITION WILL NOT LOOK LIKE THE PICTURES AT THIS TIME. YOU WILL STILL HAVE THE EXCESS MATERIAL FROM THE PROFILING STAGE. I HOPE THIS MAKES SENSE. IF ANYONE IS CONFUSED LET ME KNOW. OTHERWISE GOOD LUCK.
At this point there are two remaining positions to set, half stop and closed. Of the two half stop is the easiest. The goal of this position is only that the backspring is flush when in this position. This is accomplished by carefully removing material from the back of the tang. This step is made easier with a rise and fall indicator but it is not needed.
If you intend to use an RFI you will need to take a measurement in the open position as a baseline.
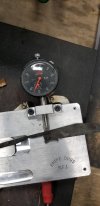
In the above image the baseline measurement is about 55.5 thousandths. You will now move the blade to the halfstop position and take the same measurement. if you have left excess material as detailed in the previous steps this measurement will be larger.
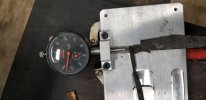
Notice the pre-adjustment measurement in 76 thousandths. The goal is to remove 20.5 thou so you end up with 55.5 thousandths (the same measurement as the open position).
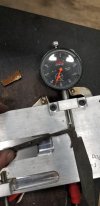
The post adjustment measurement is 55.5 thou. This is accomplished by removing material from the back of the blade where it contacts the spring in the half stop position. I then use my small wheel attachment to cut a small radius on the half stop so there are only 2 points of contact on the spring. this helps reduce the possibility of having any play in the half stop position. It can also be done with a Dremel. At this point don't worry about radiusing the corners of the half stop position. The corners in these pictures have been over radiused.
If you do not have an RFI simply assemble the knife and place it in the half stop. use a set of calipers to measure how proud the backspring is relative to the handles. scribe this line on your blade (on the half stop area) and grind 5 thou shy of the line. reassemble and visually check for flushness. remove the blade and grind a little more. reassemble and repeat until flush. Remember to only remove a little at a time. if you overshoot you will have a sunken spring at half stop.
I like to do this process with a 240g belt. I would avoid using a lower grit belt, it would be very easy to overshoot your mark.
Setting the half stop
NOTE: PLEASE IGNORE THE RADIUS ON OUTSIDE CORNERS OF THE TANG IN THE HALF STOP POSITION. THEY ARE TOO LARGE IN THE PHOTOS. I WILL POST UP BETTER PHOTOS WHEN I TAKE THEM. THE REST OF THIS TUTORIAL POST IS GOOD. I PLAN TO CHANGE A COUPLE THINGS ABOUT MY PROCESS FROM THIS POINT IN THE BUILD ON. WHEN I HAVE GOT THE NEW PROCESS DOWN I WILL CONTINUE THE TUTORIAL. EVERYTHING UP UNTIL THIS POINT IS GOOD. THESE PHOTOS WERE TAKEN AFTER THE CLOSE WAS ALREADY SET. YOUR CLOSED POSITION WILL NOT LOOK LIKE THE PICTURES AT THIS TIME. YOU WILL STILL HAVE THE EXCESS MATERIAL FROM THE PROFILING STAGE. I HOPE THIS MAKES SENSE. IF ANYONE IS CONFUSED LET ME KNOW. OTHERWISE GOOD LUCK.
At this point there are two remaining positions to set, half stop and closed. Of the two half stop is the easiest. The goal of this position is only that the backspring is flush when in this position. This is accomplished by carefully removing material from the back of the tang. This step is made easier with a rise and fall indicator but it is not needed.
If you intend to use an RFI you will need to take a measurement in the open position as a baseline.

In the above image the baseline measurement is about 55.5 thousandths. You will now move the blade to the halfstop position and take the same measurement. if you have left excess material as detailed in the previous steps this measurement will be larger.

Notice the pre-adjustment measurement in 76 thousandths. The goal is to remove 20.5 thou so you end up with 55.5 thousandths (the same measurement as the open position).

The post adjustment measurement is 55.5 thou. This is accomplished by removing material from the back of the blade where it contacts the spring in the half stop position. I then use my small wheel attachment to cut a small radius on the half stop so there are only 2 points of contact on the spring. this helps reduce the possibility of having any play in the half stop position. It can also be done with a Dremel. At this point don't worry about radiusing the corners of the half stop position. The corners in these pictures have been over radiused.
If you do not have an RFI simply assemble the knife and place it in the half stop. use a set of calipers to measure how proud the backspring is relative to the handles. scribe this line on your blade (on the half stop area) and grind 5 thou shy of the line. reassemble and visually check for flushness. remove the blade and grind a little more. reassemble and repeat until flush. Remember to only remove a little at a time. if you overshoot you will have a sunken spring at half stop.
I like to do this process with a 240g belt. I would avoid using a lower grit belt, it would be very easy to overshoot your mark.
Last edited:
- Joined
- Feb 19, 2018
- Messages
- 660
TUTORIAL POST #9
Setting the closed position.
This, in my opinion is the most complicated of the three positions to set. your goal here is to get your blade closed to a point where the tip is hidden below the handle scales and the backspring is flush.
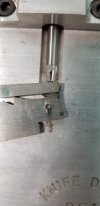
I have found that creating one large radius on this surface is the best method to achieve a solid closed position. There are lots of opportunities for mistakes here. the first mistake you might make is to extend your radius too far towards the half stop position. You need to make sure that your point of contact nearest the half stop does not extend into area you have relieved from the face of the spring. hopefully this picture makes that more clear. In the picture this point just hits edge of the spring. If any more of the spring was relieved this point would overshoot the end of the spring. If you identify this before you start removing material from the kick side you can correct it by making a small mark where the spring lines up with the half stop and only grinding your radius to this point. If you try this you will have a tiny flat spot at the end of your radius. This is not a big deal and should not affect functionality.
All adjustment here is made by removing material from the kick portion of the blade as pictured above. NOTE: you can use a RFI to get close but the final fit will need to be done by assembly and testing. I have found that even when simulating spring tension the tip will usually sit slightly higher when assembled in the closed position.
Essentially you are adjusting 2 contact points. Each point affects one area the most but each one affects the other a bit. To get this dialed in it requires a bit of back and forth. The two contact points for this tutorial will be the TIP SIDE (this is the contact point nearest the tip of the blade) and the REAR SIDE (this is the contact point nearest the half stop position). Hopefully this makes sense.
Removing material from the tip side will lower the tip further into the handle when closed. I find that all material removal for this step is best done with a small wheel attachment. A Dremel should also work. Remove material from the tip side while retaining a radius shape until the tip is just sticking up from the handle.
Removing material from the rear side will lower the spring into the handles. you will want to remove material until the spring is about 5 thousandths proud of the scales. Use an RFI for this if its available to you. If not just assemble, test and repeat.
Once you are relatively happy with both positions move back and forth between removing material from both positions until your spring is flush and your tip is hidden. Be patient here and remove small amounts of steel at a time. Watch your heat. I like to use a 240g or 400g belt.
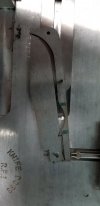
Once completed you should be left with something like this. I hope this step is clear. If anyone needs clarification let me know. This is the most difficult step to put into words. If you can get to here the remaining steps should be no problem.
Setting the closed position.
This, in my opinion is the most complicated of the three positions to set. your goal here is to get your blade closed to a point where the tip is hidden below the handle scales and the backspring is flush.

I have found that creating one large radius on this surface is the best method to achieve a solid closed position. There are lots of opportunities for mistakes here. the first mistake you might make is to extend your radius too far towards the half stop position. You need to make sure that your point of contact nearest the half stop does not extend into area you have relieved from the face of the spring. hopefully this picture makes that more clear. In the picture this point just hits edge of the spring. If any more of the spring was relieved this point would overshoot the end of the spring. If you identify this before you start removing material from the kick side you can correct it by making a small mark where the spring lines up with the half stop and only grinding your radius to this point. If you try this you will have a tiny flat spot at the end of your radius. This is not a big deal and should not affect functionality.
All adjustment here is made by removing material from the kick portion of the blade as pictured above. NOTE: you can use a RFI to get close but the final fit will need to be done by assembly and testing. I have found that even when simulating spring tension the tip will usually sit slightly higher when assembled in the closed position.
Essentially you are adjusting 2 contact points. Each point affects one area the most but each one affects the other a bit. To get this dialed in it requires a bit of back and forth. The two contact points for this tutorial will be the TIP SIDE (this is the contact point nearest the tip of the blade) and the REAR SIDE (this is the contact point nearest the half stop position). Hopefully this makes sense.
Removing material from the tip side will lower the tip further into the handle when closed. I find that all material removal for this step is best done with a small wheel attachment. A Dremel should also work. Remove material from the tip side while retaining a radius shape until the tip is just sticking up from the handle.
Removing material from the rear side will lower the spring into the handles. you will want to remove material until the spring is about 5 thousandths proud of the scales. Use an RFI for this if its available to you. If not just assemble, test and repeat.
Once you are relatively happy with both positions move back and forth between removing material from both positions until your spring is flush and your tip is hidden. Be patient here and remove small amounts of steel at a time. Watch your heat. I like to use a 240g or 400g belt.

Once completed you should be left with something like this. I hope this step is clear. If anyone needs clarification let me know. This is the most difficult step to put into words. If you can get to here the remaining steps should be no problem.
- Joined
- Feb 19, 2018
- Messages
- 660
I did notice this but not until after i took the pics. The last thing i need is any more math getting in the way. I am thinking of redoing all the pics for the final guide. So far i think i have pics from 4 different ones wich may be somewhat confusing. Thanks for participating in the thread. I plan to get the rest of the posts done in a more timely manner.Thanks,
You can set that Dial indicator to "0" in the open position. It makes it easier to keep track when doing the half and closed position by not having to do any math
Thanks for the wip
Derek, you're doing a GREAT job with your tutorial. Keep it up. Nobody is complaining about the pace of the tutorial. I've always moved my dial back t zero. Looking forward to the final - the ONLY thing keeping me from saving all this to disk is looking forward to the PDF file when complete.
- Joined
- Nov 25, 2018
- Messages
- 243
This is some good info! Thanks again
- Joined
- Feb 19, 2018
- Messages
- 660
No problem. I hope this can help someone get started on building these.This is some good info! Thanks again
- Joined
- Feb 19, 2018
- Messages
- 660
TUTORIAL POST #10
Grinding the blade.
If you are happy with all 3 blade positions its time to grind your blade. Unfortunately there is very little I can write down that will make this easier. In my opinion these blades are more challenging than most fixed blades to grind. They have almost no real estate to hold on to and they are usually very thin. I use a carbide file guide to help get straight plunge lines. I line it up with the sharpening notch. I also scribe my center line so my plunge is even side to side. If this is your first smaller blade maybe start with a 60 or 80 grit belt instead of 36 grit. Cool often as heat will build fast in these small blades. I have burnt my hands more than once. If anyone has any tips please share them. For this step practice makes perfect, no real substitute. Start with an easy grind. maybe FFG, no swedge. I don't have any pics of grinding blades (too busy grinding) but if anyone wants anything elaborated on let me know. As stated before fixed blade experience will help out a ton here.
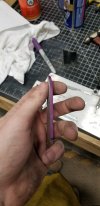
Best of luck.
Grinding the blade.
If you are happy with all 3 blade positions its time to grind your blade. Unfortunately there is very little I can write down that will make this easier. In my opinion these blades are more challenging than most fixed blades to grind. They have almost no real estate to hold on to and they are usually very thin. I use a carbide file guide to help get straight plunge lines. I line it up with the sharpening notch. I also scribe my center line so my plunge is even side to side. If this is your first smaller blade maybe start with a 60 or 80 grit belt instead of 36 grit. Cool often as heat will build fast in these small blades. I have burnt my hands more than once. If anyone has any tips please share them. For this step practice makes perfect, no real substitute. Start with an easy grind. maybe FFG, no swedge. I don't have any pics of grinding blades (too busy grinding) but if anyone wants anything elaborated on let me know. As stated before fixed blade experience will help out a ton here.

Best of luck.
Last edited:
- Joined
- Feb 19, 2018
- Messages
- 660
NOTE
I have updated my CAD a bit since starting this tutorial. I will go back and edit my previous post to include the new CAD. Very minor changes that are elaborated on in earlier posts. I figured you may as well have my latest and greatest. That way there is no (minimal) confusion when following along.
Just to be clear, the new cad files will replace the old ones. Refer to my post near the beginning of this tutorial to get the latest files. If you are reading this after Feb 18, 2019 ignore this, you already have the latest file.
- Joined
- Feb 19, 2018
- Messages
- 660
TUTORIAL POST #11
setting the spring tension
OK, by now hopefully you have a nicely ground blade and a set of slab handles.
At this time you can re assemble the knife and check your centering and action. Also verify that the cutting edge will not contact the backspring. If you apply force to the spine of the blade when closed you will be able to force the edge into the spring, this is normal but the force required should be decent so it is difficult to do. If the spring is weak it is likely that this the edge will be damaged by accident just from regular carry.
Hopefully when everything is together your centering is decent. If its not I think it is what it is at this point. Check that when closed if you pull the tip outside of the handle it springs back into the handle so its not exposed. check for up and down play in the fully open and half stop positions. Side to side play will be taken out when the knife is peened. You will likely notice that the pull is quite stiff at this point. That is normal. you will reduce the pull by removing material from the underside of the spring.
This can be done with a small wheel attachment or a Dremel. Refer to Tutorial post #9 for a photo of this. Make sure you do not grind away at the area that acts as a closed stop. To ensure you don't ruin the knife this late in the game I like to assemble one half of the knife (leave a scale off) and close the knife. use a marker to mark the point that the kick contacts the spring. Note: you do not need spring tension to do this. just put in one of the 2 handle pins and it will be good enough. Its very difficult to fully assemble the knife without both scales. Do not grind into this are. I like to stay 1/8" or so back from my mark just to be safe.
The more material you remove the lighter the tension will get. just remove a bit at a time and assemble/test. If you overshoot this the action will feel spongy and the tip may no longer stay in the handle. perform this test again once the final tension is set.
- Joined
- Feb 19, 2018
- Messages
- 660
TUTORIAL POST #12
Prepping the handles for final assembly
Now you have a fully functional knife with UGLY slab handles. Time to rectify that. I find the easiest way to do this is to temp pin my handles together using 3 short pins that are fully hidden inside the scales once assembled. If you have liners make sure they are towards the inside of the scales. Basically you are test assembling the knife without any steel (only scales).
I start with a 36 grit belt and place the scales against my flat platen. I then rock the knife side to side to create a radius along the scale. I use the center line where the 2 scales meet as a visual guide to ensure the radius is symmetrical. I advance grits up to 400. I usually go 36, 80, 12, 240, 400. Its also important to look at the butt end and top side of the assembly to ensure the arc of the radius is even from side to side.
You will not be able to reshape anything after the final assembly. A little hand sanding is all that's possible once the knife is peened. Make sure you are 100% happy with the shape and finish of the scales at this stage. Do a test assembly to see how things are looking. At r=this point you will have a very good idea of what your finished knife will look like. You should be pretty happy with things at this stage. If not correct whatever bothers you or you will regret it later.
Its very tempting to rush this stage because its exciting to see things coming together. Try not to. Run you hands over every area of your scales to check for uneven surfaces or textures.
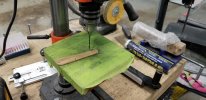
Now you need to slightly enlarge the holes on the outside of your scales. This will create a small void for the pins to swell into and fill. That's what essentially holds your knife together. This is accomplished by putting a scale on your drill press and using the #41 drill bit to open up all the holes on the scale. You only need to drill in a little bit, maybe a 16th or so.

- Joined
- Feb 19, 2018
- Messages
- 660
TUTORIAL POST #13
assembling the knife
Almost done!
This assembly should be done with brand new pin stock. Cut 3 new lengths about 1 inch or so. taper the ends on a belt grinder so they fit up a little easier. Insert the rear and pivot pins. They should feel tight when going in. Note: try to avoid sanding down the pin stock if possible, its best to use it unmodified. This assembly will be more difficult than the previous ones due to the new pins. This is ok.
Place the assembled knife into your vise and tighten to take up the spring tension. You may want to us some scrap material to make sure the vise jaws don't mark up the knife. Gently tap the center pin into position so its roughly centered in the knife.
At this time squeeze the scales together and hold the knife up to a light source to ensure there are no gaps between the spring and the scales. Be fussy. You will likely see some small gaps and you may notice some debris. Through much frustration I have learned that the debris is small brass shavings from the pinstock. A little bit comes off when you force it into the hole. To remedy this use a flat driver to slightly part the scales and push the debris out with a small piece of heat treat foil, shim stock, feeler gauge etc.
Squeeze the scales together again and check for gaps. There should be none at this point. If there are repeat the above steps. Also verify your scales are perfectly flat using a granite plate or machinists square.
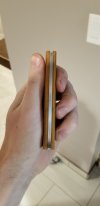
Once you are gap free its time to shorten your pins. I place them up to my grinder an use an 80g belt to trim them untill they only protrude about half the diameter of the hole away from the scale. If you are a bit over its ok, better too much left over than not enough. Be careful not to ruin your scales. Once all the pins are ground down its time to peen.
assembling the knife
Almost done!
Ensure all parts are clean prior to assembling.
This assembly should be done with brand new pin stock. Cut 3 new lengths about 1 inch or so. taper the ends on a belt grinder so they fit up a little easier. Insert the rear and pivot pins. They should feel tight when going in. Note: try to avoid sanding down the pin stock if possible, its best to use it unmodified. This assembly will be more difficult than the previous ones due to the new pins. This is ok.
Place the assembled knife into your vise and tighten to take up the spring tension. You may want to us some scrap material to make sure the vise jaws don't mark up the knife. Gently tap the center pin into position so its roughly centered in the knife.
At this time squeeze the scales together and hold the knife up to a light source to ensure there are no gaps between the spring and the scales. Be fussy. You will likely see some small gaps and you may notice some debris. Through much frustration I have learned that the debris is small brass shavings from the pinstock. A little bit comes off when you force it into the hole. To remedy this use a flat driver to slightly part the scales and push the debris out with a small piece of heat treat foil, shim stock, feeler gauge etc.
Squeeze the scales together again and check for gaps. There should be none at this point. If there are repeat the above steps. Also verify your scales are perfectly flat using a granite plate or machinists square.

Once you are gap free its time to shorten your pins. I place them up to my grinder an use an 80g belt to trim them untill they only protrude about half the diameter of the hole away from the scale. If you are a bit over its ok, better too much left over than not enough. Be careful not to ruin your scales. Once all the pins are ground down its time to peen.
- Joined
- Feb 19, 2018
- Messages
- 660
TUTORIAL POST #14
peening the knife
Time to peen, To be honest going into this I didn't know anything about peening and I was intimidated by the process. It turns out its no big deal. Some videos online make it seem like it requires a precise technique, in my experience this just isn't the case. All peening is doing is mushrooming out the soft brass pins to fill in the counterbore you made with your #41 bit. The pins will swell a bit everywhere along the length as well. this is why you drilled the pivot in the blade with the #41 bit. Otherwise the pin could swell and make it difficult to open and close.
You will need a hardened surface to peen against. you could use a scrap blade or a 123 block. I just use the flat area on the end of my vise. you can use any small hammer. you will use the flat end not the ball end. (in the case of a ball peen hammer)
I place the knife so that one of the pins is against my hard surface then I hammer the pin from the other side. Start by hammering a perimeter around the outside of the pin and work your way in towards the center. Alternate sides until the joint is sufficiently tight.
Some people recommend sliding a piece of heat treat foil between the blade and the scales. The idea is that if you go crazy on the pivot joint you may overtighten and cause a stiff action. I have never done this and never had an issue with just peeing normally. Just one more way to get the job done.
I peen with the knife open or closed and I don't find any difference.
once you are done test for side to side play and continue peening to remove any. At this stage the knife will feel very stiff, don't worry. Spray a heavy coat of wd40 inside the knife and work the action. You should notice a huge improvement right away. Once your happy you will need to clean up the excess pin material.
Simply put on a 400g belt (or whatever belt you finished your handles with) and use the same rocking motion to grind the pins flush with the scale. Do not overdo this or you will grind away the cavity you made to secure the pins.
Once all the pins are flush check them with a fingernail. There should be no perceptible lip or bump. Your knife is now complete. If you want to finish further just hand sand and buff. You can also knock down the sharp edges on the inside of the handle. Check everywhere for gaps or ridges along the springs. Remove material if needed. you should not be removing any significant amount of material at this point just enough to account for slight variances in the pin stock thickness.

- Joined
- Feb 19, 2018
- Messages
- 660
TUTORIAL POST #15
Celebrate the fact you have completed a new type of knife.
Please leave feedback about this tutorial so I know where to improve it.
Post WIP pics on this thread so we can all see how things are going and work to improve the guide. Ask any questions you want
Once I have seen 5 or so knives built from this guide I will take the feedback and work towards creating a final pdf with all new pictures (one knife start to finish)
The pdf will be free to anyone and ill post a link on this thread.
Post any new tips and tricks you learn along the way.
I hope this guide proves helpful.
- Joined
- Feb 19, 2018
- Messages
- 660
quick update:
I have modified my design slightly. it is not yet updated on this thread. Its the same knife but certain aspects have been tweaked to allow for a greater margin of error. My current design works great but doesn't allow a ton of room for error. I am in the process of getting the new design waterjet cut (a first for me) I will wait to upload my latest files until I have built a successful knife from the new design. In the mean time the current files are still valid. Hopefully my next file will be the last. I know it can create some confusion. I just want to provide everyone with a tested pattern that is not too difficult to make.
I think I will release this guide as a standalone and add supplemental guides for multibladed knives, bolsters etc. should I ever become competent in those areas. The intention of this first guide is just to get people up and running.
Thanks for reading.
