What's going on in your shop? Show us whats going on, and talk a bit about your work!

I think Stacy might be right now that I look at it again. Maybe next time consider rotating the mammoth tooth 90 degrees to better match the etch pattern in the blade, to have the grain in the mammoth tooth running the same direction.
I was thinking a ¾ wide strip of molar in the middle of the died burl would be cooler. But I'm learning, and I can always knock that handle off.
 
I was thinking a ¾ wide strip of molar in the middle of the died burl would be cooler. But I'm learning, and I can always knock that handle off.
That knife looks fine just the way it is, no need to re-handle it. Give that one to you wife and make a new one. I fact my wife mentioned to me a few weeks ago that I should start making some knives with pretty handle materials. I thinks she right, and when I get caught up on some orders, that is going to happen.
 
Actually, I think I would tell her she was right. I think letting her have some input into knife making will go a long ways when the time comes to buy a bunch of expensive tools and materials.lol
There's a balance in the Kf knife household that definitely doesn't need to be upset. Solid advice
 
That knife looks fine just the way it is, no need to re-handle it. Give that one to you wife and make a new one. I fact my wife mentioned to me a few weeks ago that I should start making some knives with pretty handle materials. I thinks she right, and when I get caught up on some orders, that is going to happen.
This I have to see...it's hard to top some of the ones you've been doing already.
 
This I have to see...it's hard to top some of the ones you've been doing already.

Thanks Richard, I've just started dabbling in chef style knives, this is an area I have a long way to go yet.lol
 
W2 core and wrought iron and bog oak
0E9LKow.jpg


nGnG0V5.jpg
I am in love. That wrought is so much better than most Damascus. I want that thing bad. Did you do the forge weld or is there a place to buy it? Not that I could ever forge out something like that.
 
I am in love. That wrought is so much better than most Damascus. I want that thing bad. Did you do the forge weld or is there a place to buy it? Not that I could ever forge out something like that.
I get the wrought bar from someone special local to me. It’s not like most other wrought iron bars. I believe this is oxide puddled. I have a bladesmith make the billet, sometimes we work together at his shop. He has a hydraulic press.
Then I forge out the bar, heat treat it etc etc
 
I'm tired of looking for them when I need them ! Then make new one ............I made a few like that and again I never can find them when I need them !
Well ......this new one will never disappear. I will fix them somewhere on bench , do you see now how smart I am :D
I used HSS steel strips for this one
MNV6xnF.jpg

uD7zMBH.jpg

G4IpDou.jpg

lmGqaCa.jpg
 
I get the wrought bar from someone special local to me. It’s not like most other wrought iron bars. I believe this is oxide puddled. I have a bladesmith make the billet, sometimes we work together at his shop. He has a hydraulic press.
Then I forge out the bar, heat treat it etc etc
You guys are doing some nice work. I will have to look up oxide puddled wrought. What are you getting it from or what did they make out of it? It definitely pops more than others that I have seen. You ever think of using cruforgeV in that mix?
 
Got a new workbench done! This one is for the milling machine you see on top. Drawers came out a little wonky, each one is crooked in a different way, but they open and close and I call that good enough:)

Nice, how is the optimum treating you?
 
Despite its problems and limitations I'm very happy with it. With the DRO it is just a fantastic tool for me. I'll be building a power feed for the X axis next.
 
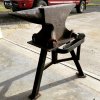
1FD31C2D-8D81-4722-800F-AB93EAD843E0.jpeg “No ring” anvil stand. I ditched the stump for this particular anvil because it was a bit louder than I cared for. After listening to some great advice from other makers, I built this heavy duty stand. 3/8” plate with 2” heavy-wall legs, welded at 22 1/2 degrees. An old silicone cooking pan liner is sandwiched between the anvil and plate, then snugged down VERY tightly with axle u-bolts wrapped in leather. The square down-tube leg brace is filled with lead shot to mitigate any harmonic vibration. Leather pads are also glued to the feet. I ran out of paint so it’s a little blotchy, but who cares? I’ll probably add another tool holder someday, but for now I’m calling it Thanks guys for the tips on this build!
 
Last edited:
Finished up the DIY etcher today and got a simple mark etched on a couple of blades. Works very well. Thanks @J.Keeton for the awesome tutorial!
I really like the single letter on the hunter I etched it on but it looks a little lonely on the bunka/ktip. Might have to get a few more stencils made with the full name etched. Amazing how such a small detail can "complete" a knife.
Handle materials arrived this week also so should be able to finish the ktip up finally! Will be attamepting to tackle the first round of stainless heat treat this week (provided I can get some dry ice) fingers crossed it goes well..
EKW41RU.jpg
 
View attachment 1504850 “No ring” anvil stand. I ditched the stump for this particular anvil because it was a bit louder than I cared for. After listening to some great advice from other makers, I built this heavy duty stand. 3/8” plate with 2” heavy-wall legs, welded at 22 1/2 degrees. Tip: an old silicone cooking pan liner is sandwiched between the anvil and plate, then snugged down VERY tightly with axle u-bolts wrapped in leather. The square down-tube leg brace is filled with 15lbs of lead shot to mitigate any harmonic vibration. Leather pads are also glued to the feet. I ran out of paint so it’s a little blotchy, but who cares? I’ll probably add another tool holder someday, but for now I’m calling it done! The “ring” is 100% gone! Woohoo! Thanks guys for the tips on this build!

I see folks who build these use sand and oil inside the legs to prevent corrosion and add weight/kill the hollow
 
Back
Top