You are using an out of date browser. It may not display this or other websites correctly.
You should upgrade or use an alternative browser.
You should upgrade or use an alternative browser.
My rehandle and shield projects (with tutorials)
- Thread starter waverave
- Start date
- Joined
- Jun 7, 2018
- Messages
- 3,145
Thank you reach out any timeHoly cow, that turned out great. I’ve done a few and been happy but haven’t gotten results like that yet. I’m not really sure what I’m doing, I’ve just been trying to figure it out as I go. I may pick your brain over pm for some tips if you don’t mind.

Thank you sirLooks pretty darn nice to me. Maybe it's a trick of the light, those aren't copper bolsters, are they?
 It is a trick of the light
 Amir Fleschwund
Gold Member
- Joined
- Nov 29, 2008
- Messages
- 7,013
Really nice job, waverave!
I would love to see photos of your stiddy! Where did you get it?
I would love to see photos of your stiddy! Where did you get it?
- Joined
- Jun 7, 2018
- Messages
- 3,145
Thanks Jeff. I got the stiddy from Jeff Claiborne of Claiborne Knives...I believe he makes them himself periodically and offers them up on FB.Really nice job, waverave!
I would love to see photos of your stiddy! Where did you get it?
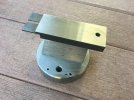
The size and weight is perfect and so far it is working out great.
The small, odd holes in the base were drilled by me to specific depths for the purpose of measuring, clipping and peening various size pin stock. (It seems that would be a great idea to add to a stiddy by design...several holes along the rim in different sizes and depths
 )
)The top of the stiddy is about 4.5" long (including the tongue).
Last edited:
- Joined
- Mar 25, 2012
- Messages
- 9,252
Look out world...I'm learning how to modify slipjoints! This really opens up some creative doors for me
Camillus TL-29 Beginner's Rehandling Project - not perfect by any means but it was a great learning experience.
View attachment 1184724
View attachment 1184725
Looks darn good from where I'm sittin' , Darren.

Amir Fleschwund
Gold Member
- Joined
- Nov 29, 2008
- Messages
- 7,013
@waverave~
Thanks for the pic and info!
Thanks for the pic and info!
- Joined
- May 25, 2018
- Messages
- 616
Dang this is cool! What did you use to grind/shorten the pinstock to the right length?Thanks Jeff. I got the stiddy from Jeff Claiborne of Claiborne Knives...I believe he makes them himself periodically and offers them up on FB.
The size and weight is perfect and so far it is working out great.
The small, odd holes in the base were drilled by me to specific depths for the purpose of measuring, clipping and peening various size pin stock. (It seems that would be a great idea to add to a stiddy by design...several holes along the rim in different sizes and depths)
The top of the stiddy is about 4.5" long (including the tongue).
View attachment 1185889
- Joined
- Jun 7, 2018
- Messages
- 3,145
For brass pins I just use some snips...Dang this is cool! What did you use to grind/shorten the pinstock to the right length?
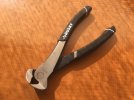
Nickel/silver is a little tougher to clip with those so I might just use my dremmel cutting wheel. Whichever method is chosen, make sure to grind or file the end flat before peening

- Joined
- May 25, 2018
- Messages
- 616
Thanks! I think that is the next step I am tackling on this lockback kit.For brass pins I just use some snips...
View attachment 1186392
Nickel/silver is a little tougher to clip with those so I might just use my dremmel cutting wheel. Whichever method is chosen, make sure to grind or file the end flat before peening
- Joined
- Jun 7, 2018
- Messages
- 3,145
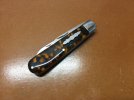
Ok I wanted to make an effort to document my attempts at learning how to work with slipjoints. I am working on shield inlays at the moment so I took photos along the way to share. I am not saying this is the best way to inlay a shield…I’m not even saying it is a good way to inlay a shield…but it worked for me and I will learn more each time I try.
This particular project is a shield inlay on an assembled knife…meaning no disassembly and no pins. My next project will involve a disassembled knife and a pinned shield. The process is a little different. I did a lot of homework and asked @Terdl76 a bunch of questions (we split the shield orders and have been learning a lot of this together) before I took a stab at this but I’m pretty happy with how things are turning out so far.
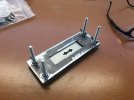
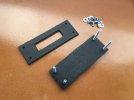
First thing I recommend is some kind of routing jig. I borrowed this idea from @Terdl76 and works pretty well. The idea is that you want to sandwich the shield template to your knife or material. This jig will work with an assembled knife, a scale or just the material. You want to make sure you give yourself enough room for your router base to move freely around the shape of the shield so make sure to drill the holes as close to the corners as you can.
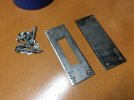
Here I lay out my shield options and ready a piece of pin stock (you can use anything really…will get to that next steps). I get my shields in bulk so I have several to work with. The shield templates are annealed so your bit won’t chew them up.
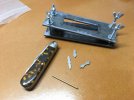
Going with this one
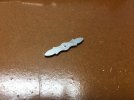
First, another trick I learned from @Terdl76 …this is only helpful if inlaying a shield on an assembled knife (no pins or pin holes in the scale). And this only works if you have an extra shield to sacrifice for the cause.
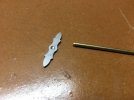
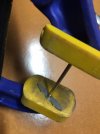
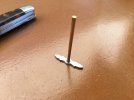
Center-punch a hole right in the middle and then chamfer out with a drill or chamfer bit a little bit. Then grind the end of the pin or rod (or whatever you want to use similar in size) to match the chamfer of the shield and then super glue together. I’d like to come up with a better way to secure these two things so I may have an update on that next time.
I thought it would be a good idea to cover all of the inside with something…in this case I used some drawer liner (same thing I use in my knife drawers). In retrospect, I only needed to cover the bottom piece. The top piece doesn’t make direct contact with the knife or material…the bottom of the shield template does.
...continued next post...
This particular project is a shield inlay on an assembled knife…meaning no disassembly and no pins. My next project will involve a disassembled knife and a pinned shield. The process is a little different. I did a lot of homework and asked @Terdl76 a bunch of questions (we split the shield orders and have been learning a lot of this together) before I took a stab at this but I’m pretty happy with how things are turning out so far.
First thing I recommend is some kind of routing jig. I borrowed this idea from @Terdl76 and works pretty well. The idea is that you want to sandwich the shield template to your knife or material. This jig will work with an assembled knife, a scale or just the material. You want to make sure you give yourself enough room for your router base to move freely around the shape of the shield so make sure to drill the holes as close to the corners as you can.


Here I lay out my shield options and ready a piece of pin stock (you can use anything really…will get to that next steps). I get my shields in bulk so I have several to work with. The shield templates are annealed so your bit won’t chew them up.

Going with this one

First, another trick I learned from @Terdl76 …this is only helpful if inlaying a shield on an assembled knife (no pins or pin holes in the scale). And this only works if you have an extra shield to sacrifice for the cause.
Center-punch a hole right in the middle and then chamfer out with a drill or chamfer bit a little bit. Then grind the end of the pin or rod (or whatever you want to use similar in size) to match the chamfer of the shield and then super glue together. I’d like to come up with a better way to secure these two things so I may have an update on that next time.


I thought it would be a good idea to cover all of the inside with something…in this case I used some drawer liner (same thing I use in my knife drawers). In retrospect, I only needed to cover the bottom piece. The top piece doesn’t make direct contact with the knife or material…the bottom of the shield template does.

...continued next post...
Last edited:
- Joined
- Jun 7, 2018
- Messages
- 3,145
Now you need to figure out where you want the shield to go and find a way to get the jig on there with everything lined up. So…put the tiniest speck or two of super glue on the bottom of the shield and place it right on the material (quickly!) You only want the smallest amount just enough to hold it in-place.
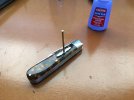
Next, put a tiny speck or two of super glue on the bottom of the shield template and gently place down over the shield and onto the knife (like a puzzle piece).
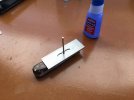
Let it all dry for a few minutes and then go ahead and put the jig together and tighten it down. You don’t have to crank these down...just enough to be snug…especially if you have some of that liner on the insides like mine (somewhat tacky).
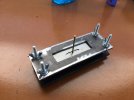
Once you are all set…just pull the shield/pin right up!
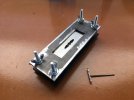
Now you need to set the depth of your router bit. Since I have extra shields, they worked perfectly for this purpose. You can use anything that is the same thickness as the shield. I plan to make a special piece just for this purpose…but for now this will work. The idea is that you want to set your router bit to just touch the material with the shields (or whatever you are using) in between the router base and the top of the jig. If you do this correctly, the bit will be set to the perfect depth once you remove those shields and start routing.
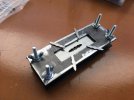
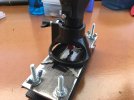
And off you go! I used a 1/32” router bit to trace the outline of this shield (a little more intricate than some of the others) and then finished it up with a 1/16” bit. It came out perfect and I didn’t have to trim any of the corners or anything like that. You will probably want an exacto knife or micro chisels for the job in the case you do have to trim.
EDIT - I switched it around and started using the 1/16" bit first to get as much routed as I could...then the 1/32" bit to finish up the corners. The new method has been much more successful and I haven't broke any more bits. The idea is that you want to put the 1/32" to work as little as possible because it is very fragile. Also, turn the router off before you pull it out of the jig. If you hit the hardened edge while it is still rotating you will likely break the bit.
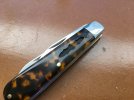
Theoretically, I can use the shield/pin tool to now check the fit and still be able to pull the shield out if it is stuck.
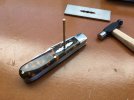
So lesson learned for me, I stuck it in too far and it broke off I wouldn’t have to worry about this if I was pinning the shield because I could already have a hole underneath and the ability to poke the shield up from the bottom if I had to.
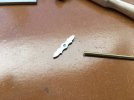
I got the shield out and then used my 1 oz hammer to gently tap in the real shield…and perfect fit. I set the height of the router bit just a hair short so I didn’t go too deep and it left just a hair of shield above the material line…but it will easily sand down (and I need to buff out the super glue spots anyway). So jigged bone might be an issue using this method!
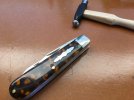
I am letting the glue dry right now then I’ll finish this up…but even this far I am more than excited to have inlayed my first shield

Next, put a tiny speck or two of super glue on the bottom of the shield template and gently place down over the shield and onto the knife (like a puzzle piece).

Let it all dry for a few minutes and then go ahead and put the jig together and tighten it down. You don’t have to crank these down...just enough to be snug…especially if you have some of that liner on the insides like mine (somewhat tacky).

Once you are all set…just pull the shield/pin right up!

Now you need to set the depth of your router bit. Since I have extra shields, they worked perfectly for this purpose. You can use anything that is the same thickness as the shield. I plan to make a special piece just for this purpose…but for now this will work. The idea is that you want to set your router bit to just touch the material with the shields (or whatever you are using) in between the router base and the top of the jig. If you do this correctly, the bit will be set to the perfect depth once you remove those shields and start routing.


And off you go! I used a 1/32” router bit to trace the outline of this shield (a little more intricate than some of the others) and then finished it up with a 1/16” bit. It came out perfect and I didn’t have to trim any of the corners or anything like that. You will probably want an exacto knife or micro chisels for the job in the case you do have to trim.
EDIT - I switched it around and started using the 1/16" bit first to get as much routed as I could...then the 1/32" bit to finish up the corners. The new method has been much more successful and I haven't broke any more bits. The idea is that you want to put the 1/32" to work as little as possible because it is very fragile. Also, turn the router off before you pull it out of the jig. If you hit the hardened edge while it is still rotating you will likely break the bit.

Theoretically, I can use the shield/pin tool to now check the fit and still be able to pull the shield out if it is stuck.

So lesson learned for me, I stuck it in too far and it broke off I wouldn’t have to worry about this if I was pinning the shield because I could already have a hole underneath and the ability to poke the shield up from the bottom if I had to.

I got the shield out and then used my 1 oz hammer to gently tap in the real shield…and perfect fit. I set the height of the router bit just a hair short so I didn’t go too deep and it left just a hair of shield above the material line…but it will easily sand down (and I need to buff out the super glue spots anyway). So jigged bone might be an issue using this method!

I am letting the glue dry right now then I’ll finish this up…but even this far I am more than excited to have inlayed my first shield

Last edited:
- Joined
- May 25, 2018
- Messages
- 616
Darren, fantastic job and an incredible thread! It is great to learn along with you as you find creative solutions!
Are you using a mini router? Do you think a dremel would work instead?
Are you using a mini router? Do you think a dremel would work instead?
- Joined
- Jun 7, 2018
- Messages
- 3,145
Thanks!Darren, fantastic job and an incredible thread! It is great to learn along with you as you find creative solutions!
Are you using a mini router? Do you think a dremel would work instead?
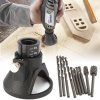
I am using a dremmel with a router base attachment (very inexpensive) and router bits. I don't recommend any bigger than 1/16" for the bit

- Joined
- May 25, 2018
- Messages
- 616
Ok thank you! I have a dremel (a Black & Decker knockoff) so good to know that I just need the stand.Thanks!
I am using a dremmel with a router base attachment (very inexpensive) and router bits. I don't recommend any bigger than 1/16" for the bit
View attachment 1188590
